-
Welcome back Guest! Did you know you can mentor other members here at H-M? If not, please check out our Relaunch of Hobby Machinist Mentoring Program!
You are using an out of date browser. It may not display this or other websites correctly.
You should upgrade or use an alternative browser.
You should upgrade or use an alternative browser.
Identify This 10EE With Only A Picture Game
- Thread starter Charlieman22
- Start date
- Joined
- May 2, 2021
- Messages
- 330
Frankly - wouldn't blame you if you had assumed I was making it all up.Cool! I was beginning to wonder if there really was going to be a lathe at the end of the story or not!
Good on you for persevering, nice machine.
Working now on the unload.
Hahaha. Indeed...Congratulations. Now the fun begins.
- Joined
- Nov 24, 2014
- Messages
- 3,150
This is the lathe that was described in the OP, right? Is this the one with the "rebuilt by" tag on it?
I'm always skeptical of war vintage machines. I figure they were run hard. Maybe not EEs. Maybe not this one. A quality '60s+ rebuild allays all fears.
It's pretty clear that you have the will and resources to get it in appropriate working order, whatever that requires.
I'm always skeptical of war vintage machines. I figure they were run hard. Maybe not EEs. Maybe not this one. A quality '60s+ rebuild allays all fears.
It's pretty clear that you have the will and resources to get it in appropriate working order, whatever that requires.
- Joined
- May 2, 2021
- Messages
- 330
Yes.This is the lathe that was described in the OP, right? Is this the one with the "rebuilt by" tag on it?
some surprises when I finally got the background - all of them good.
1. It is a 1960 not a 1945.
2. It was rebuilt by a professional shoo-in ‘71.
3. It was owned by one of the big aviation companies. They upgraded the electronics with the expensive Sabina solid state - likely at time of “remanufacture”
4. The seller worked next door and new the guys at the aviation company. They tipped him off they were selling all the tool room lathes and getting new (aerospace…). He bought it from them and they delivered and set it up for him around 1975.
5. He has used it as a prototyping machine for building antennas. The scrap behind the machine was aluminum and plastic. His stock was same. Very little steel.
so it Probably saw some serious duty in the tool room in between it’s re-manufactured in 1971 and it’s sale sometime around 75 or 76, but since then it has had fairly light use.
TBH, I feel like I got a bit of a deal. The only thing I didn’t get (yet) was the rotary power converter - so I can’t run it.
deciding if I am going to buy a solid-state one from Sabina or negotiate a reasonable deal on his used rotary one.
Believe it or not, I have a second one of these machines in the wings, and a harebrained scheme that involves using these fancy controls on the round dial one.
right now I’m garage cleaning and trying to figure out how to move the second machine.
- Joined
- May 2, 2021
- Messages
- 330
Been a strange journey.
Blindly bought a "Monarch 10EE with Taper Attachment" on Ebay.
Took days for seller to contact me - at which point he said there was no taper attachment...
Yikes!
Whole thing seemed headed south - when another member of this forum contacted me with a line on a round dial.
Yeah!
Was knee deep in securing the round dial when the seller of the square dial allowed me to come see it.
Figured I was on track to get both - but 3 days wrestling the first machine into my garage gave me pause.
Which brings us to here.
She is cleaned up and on wheels in the garage.
Now starting to think about how to proceed.
I see there is a taper attachment for sale.
My machine originally had one - see picture below of what's left.
The one for sale looks to have been snapped off a machine.
That said - the repair of the bolt holes are within my welding skills - or at least I think so.
What I am trying to determine is - what's there - what's missing - and how unobtainable are those items.
Pic of my machine: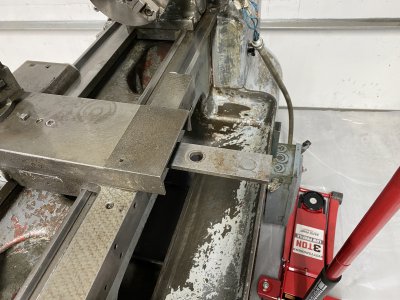
Pics of the unit for sale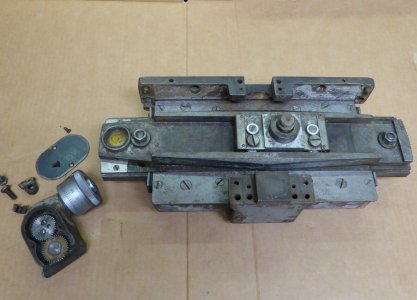
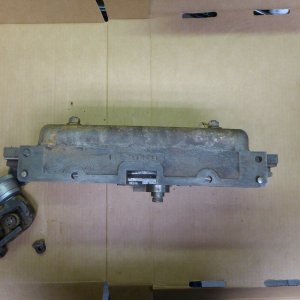
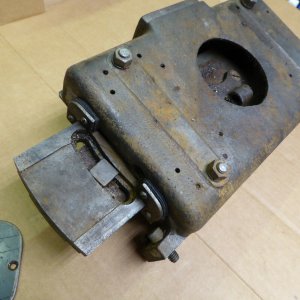
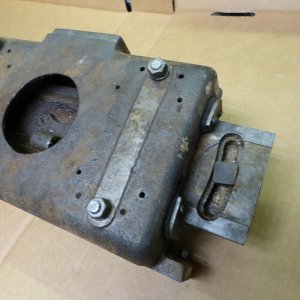
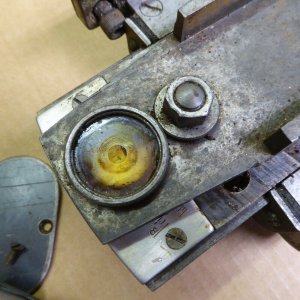
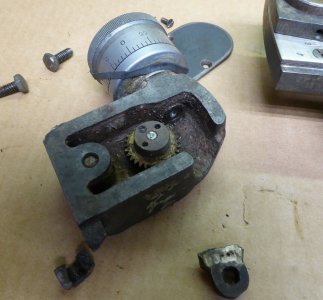
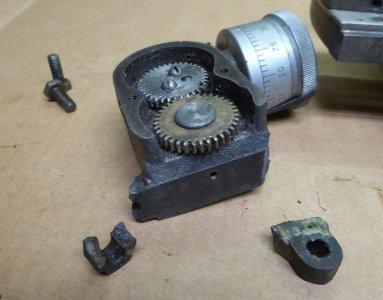
Blindly bought a "Monarch 10EE with Taper Attachment" on Ebay.
Took days for seller to contact me - at which point he said there was no taper attachment...
Yikes!
Whole thing seemed headed south - when another member of this forum contacted me with a line on a round dial.
Yeah!
Was knee deep in securing the round dial when the seller of the square dial allowed me to come see it.
Figured I was on track to get both - but 3 days wrestling the first machine into my garage gave me pause.
Which brings us to here.
She is cleaned up and on wheels in the garage.
Now starting to think about how to proceed.
I see there is a taper attachment for sale.
My machine originally had one - see picture below of what's left.
The one for sale looks to have been snapped off a machine.
That said - the repair of the bolt holes are within my welding skills - or at least I think so.
What I am trying to determine is - what's there - what's missing - and how unobtainable are those items.
Pic of my machine:

Pics of the unit for sale


- Joined
- Oct 14, 2014
- Messages
- 1,965
here' the manual. page 9 shows the attachment and most parts. Did not check but i think a complete drawing is near the back.
Looks all there with my quick look. pretty easy to miss something as I have never taken it apart.
PS the repair is a brazing job, NOT a welding job.
PPS, second look, I can see you are missing the long about 3/8 rod that bolts to the clamp (missing too) which tightens to the ways when using the attachment.
Attachments
- Joined
- Feb 25, 2021
- Messages
- 3,115
Check your schematics, in the manual. If 1960 is a modular, you actually can run it on single phase. The only thing that required three phase is the coolant pump (if equipped). Monarch built them to connect to three phase, but only used single phase for the main motor, as it reduced the complexity of the AC-DC electronics. If you look at the manual Karl posted, page 13 of the pdf, "LINE" comes in at the top, goes through the disconnect switch, and then L2 branches goes to the coolant pump only. L1-L3 drive the electronics.1. It is a 1960 not a 1945.
2. It was rebuilt by a professional shoo-in ‘71.
3. It was owned by one of the big aviation companies. They upgraded the electronics with the expensive Sabina solid state - likely at time of “remanufacture”
4. The seller worked next door and new the guys at the aviation company. They tipped him off they were selling all the tool room lathes and getting new (aerospace…). He bought it from them and they delivered and set it up for him around 1975.
5. He has used it as a prototyping machine for building antennas. The scrap behind the machine was aluminum and plastic. His stock was same. Very little steel.
If you don't have a manual, call Monarch in Sydney with the serial number, and they'll send you one. I think it is $75, includes schematics, and a parts diagrams, SPECIFIC to your serial number.
Or is this the one that changed out for the Sabrina(?) power supply unit. Having trouble keeping track, lol
I believe the cracked part of the taper attachment is a micro-adjust dial. IIRC it is an option and not required to make the taper attachment work. Karl is correct, you're missing the rod and clamp bracket. It is also missing the top sheetmetal chip cover, and the nut that clamps onto the plate sticking out of the back of your compound, as well as a small casting and bolt that clamps that plate rigid when the taper attachment isn't being used. Both of those parts could be shop made if one has access to a mill.
The taper attachments have quite a few roller bearings in them. It is fairly easy, and probably useful to take it apart and replace all the bearings. Keith Rucker has a video on doing that for a Monarch model K, they're fairly similar so it would give you a good idea of what is involved.
Last edited:
- Joined
- May 2, 2021
- Messages
- 330
Gents - excellent and thank you!
Have to say - love this forum.
Karl - Manual is a super help.
Do not see a more detailed drawing in the back unfortunately - but lots of good information here. Thank you.
My style can sometimes seem a bit "wide open"...
But I try and listen carefully - and there is often more method to the madness than may appear.
I believe this is the clamp you are referring to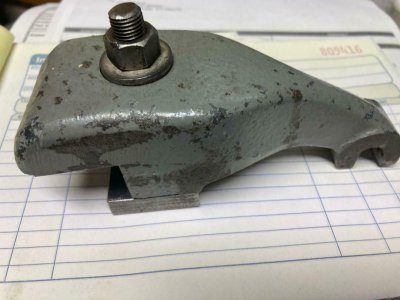
And perhaps this is the nut?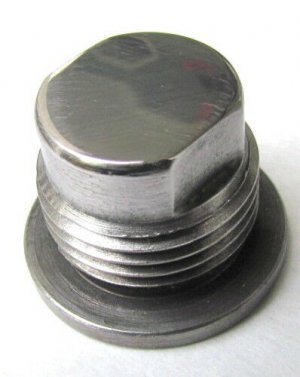
Looks like there were a number of iterations to the taper attachments - but I think I have the gist.
Largest most expensive missing part is the casted clamp I believe - though it seems they will operate without.
When you say "small casting and bolt" are you referring to the bolt and lower casted part shown in the clamp picture above?
I expect that I will pull my carriage and go through it to take out some of the backlash/ replace what I can that is worn/ create a tighter fit.
From what I understand - the carriage was basically designed to wear - so I am assuming that I would get good value out of making it tighter.
Perhaps top on my list of improvements.
Dealing with the taper attachment simultaneously would be the plan - if I have one to deal with...
Thanks for priming the pump and getting me started here.
-CM
Have to say - love this forum.
Karl - Manual is a super help.
Do not see a more detailed drawing in the back unfortunately - but lots of good information here. Thank you.
Chuckled. Yes - this one is Sabina drive,Or is this the one that changed out for the Sabrina(?) power supply unit. Having trouble keeping track, lol
My style can sometimes seem a bit "wide open"...
But I try and listen carefully - and there is often more method to the madness than may appear.
Ok - thank you. helpful details.Karl is correct, you're missing the rod and clamp bracket. It is also missing the top sheetmetal chip cover, and the nut that clamps onto the plate sticking out of the back of your compound, as well as a small casting and bolt that clamps that plate rigid when the taper attachment isn't being used
I believe this is the clamp you are referring to

And perhaps this is the nut?

Looks like there were a number of iterations to the taper attachments - but I think I have the gist.
Largest most expensive missing part is the casted clamp I believe - though it seems they will operate without.
When you say "small casting and bolt" are you referring to the bolt and lower casted part shown in the clamp picture above?
Have seen that video - didn't realize it applies.The taper attachments have quite a few roller bearings in them. It is fairly easy, and probably useful to take it apart and replace all the bearings. Keith Rucker has a video on doing that for a Monarch model K, they're fairly similar so it would give you a good idea of what is involved.
I expect that I will pull my carriage and go through it to take out some of the backlash/ replace what I can that is worn/ create a tighter fit.
From what I understand - the carriage was basically designed to wear - so I am assuming that I would get good value out of making it tighter.
Perhaps top on my list of improvements.
Dealing with the taper attachment simultaneously would be the plan - if I have one to deal with...
Thanks for priming the pump and getting me started here.
-CM

