IGaging DRO EMI Problem

Not being an electronics guy, I don't really have a go-to, and thanks for that lead. Turns out they have a $10 surcharge on orders <$20 so that would be on top of product and shipping cost. They're common parts so being a Prime member shipping is free, so for ~$9 I have 100 resistors and 50 caps heading my way via Amazon......says Tuesday delivery but in any case should be next week. I'll let you know how I do. Thanks for your help.

Best,
Kelly
It sounds like you got a good deal! Have fun!
 
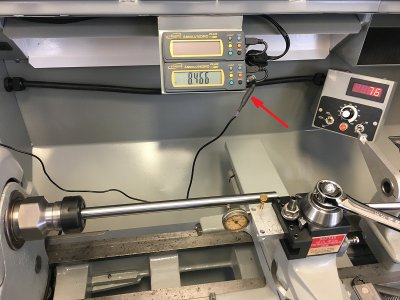
Well homebrewed, I rec’d the resistors and caps, soldered them in, and that almost did it. It’s a tremendous improvement. As before, it operates normally without the VFD on. With VFD switched on it’s mostly stable but will twitches every 3-5 seconds. When it does, it’s just a brief flash or two, but looks like sometimes it’s jumping to mm scale and other times just to nonsense values, but does recover to the correct position, only to twitch again in a few seconds. It doesn’t seem to matter what RPM the motor is running at or if it’s running at all…….just VFD switched on.

11 EMI Filter.JPG

Best,
Kelly
 
Well homebrewed, I rec’d the resistors and caps, soldered them in, and that almost did it. It’s a tremendous improvement. As before, it operates normally without the VFD on. With VFD switched on it’s mostly stable but will twitches every 3-5 seconds. When it does, it’s just a brief flash or two, but looks like sometimes it’s jumping to mm scale and other times just to nonsense values, but does recover to the correct position, only to twitch again in a few seconds. It doesn’t seem to matter what RPM the motor is running at or if it’s running at all…….just VFD switched on.

View attachment 349392

Best,
Kelly
That's progress for sure. I think your next step is to add additional capacitance inside the sensor box (the one that slides over the rule). The symptoms you have now suggest voltage fluctuations getting into it via the USB cable....they're very similar to what I observed when I was fighting my EMI problem. You just couldn't separate which was which until you did the power cable mod. Which, by the way, looks pretty clean -- good job!

You should have plenty of capacitors to do the additional mod, and have some left over for other things.
 
Appreciate your help homebrewed but think I'm going to pull the plug on this one (sorry couldn't resist :grin: ), at least for the time being.

It doesn't make sense for me to invest more time and start doing surgery on working equipment when I have something that works. I'll see how the 25 cent batteries hold up for now and spend my time getting the lathe dialed in.

Clearly not my field, but given that data and power seem to be communicated just fine across long cheap USB cable extensions that run right adjacent to the VFD, and the sensors/scales see the same ground as the VFD and everything, do you think I'd be off base to say iGaging added the power barrel jack as an after thought with no real thought whatsoever to isolating it from external interference?

Best,
Kelly
Hi Kelly,
Yes, it seems pretty likely that the external power option is an afterthought. It doesn't appear to have been well-vetted before being sent out the door.

The main reason I spent a lot of time on my iGaging problem was that even battery operation did not take care of EMI issues with the stock DROs. That and the fact that the older ones consume a lot more current, so I really go through the batteries. I'm working on that and think I have a solution, but I'm applying it to DROs that have already been heavily modified.

I have a couple of newer iGaging DROs (for my lathe) that have much lower power consumption so for the time being I'm sticking with batteries for those. However, even there I had to install capacitors on the sensor board to tame the EMI!!
 
I have a couple of newer iGaging DROs (for my lathe) that have much lower power consumption so for the time being I'm sticking with batteries for those. However, even there I had to install capacitors on the sensor board to tame the EMI!!

Well so far that is not the case for me. All is well on battery power. I fear the law of unintended consequences.......start jacking with the micro USB cables and risk creating a new problem!

Best,
Kelly
 
I happened to come across this post while browsing new posts.


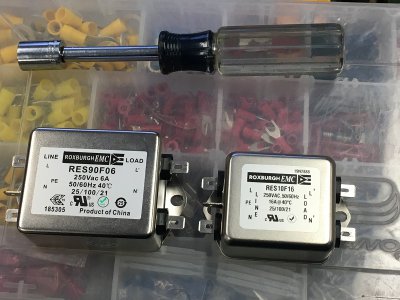
There was a link to these Roxburgh power filters at Automation direct which is a familiar supplier to me.

Roxburgh 1-Phase Drive-Rated Power Line EMI / RF Filters | Power Products (Electrical) | Products | AutomationDirect

12 Power Filters.jpg

Given the VFD is clearly polluting my shop AC supply, I thought I’d experiment with these two power filters, using one to isolate the VFD and the other on my CNC router controller.

Both of these power filters were an improvement when used with or without the inline R/C DC DRO power cable filter, but I would say the higher end filter actually “works” when used with the R/C filter fitted to DC DRO cable. Initially when the VFD is powered up the DRO display is a little twitchy, then settles down to just an occasional blip that quickly recovers. But when I actually turn the 3ph motor on the display becomes rock stable and stays that way regardless of the motor state afterward. This is with the DRO power source coming through a 12vdc regulated supply and buck convertor to 5 vdc.

When I move the DRO power source to a wall wart on a different AC circuit, also with the inline resistor/cap cable filter, it is also quite stable. If I remove the inline power filter isolating the VFD, the DRO immediately crashes. Though somewhat better, neither are sufficiently stable without the inline R/C filter. So, I think it probably has helped to some degree suppress the back EMI to the shop AC supply, I was thinking a nice way to package the R/C filters could just be an inline can on the back of the DRO mount with a female barrel jack on one end and a short pig tale/mail jack to the DRO on the other. There’d be plenty of room for other components that way. Any other ways to improve that portion of the filtering external to the DRO?

Thoughts?

Best,
Kelly
 
Last edited:
If it works, go for it!

EMI problems can be difficult to solve, and the solution can be unique to every system. So a trial and error approach, while possibly time-consuming, often is the best way to go.
 
I have access to a LMC 3900 Bench Top Mill at work. With iGaging DRO that I installed years ago, it would do incredible work. The DRO's started to fail from oil going everywhere. I took the sense heads apart once and cleaned them and got another year or two out of them. More close accuracy work to do required new iGaging DRO for X,Y, Z travels. I made and installed way covers and no more spray lubes allowed. New style heads required new mounting area and cable runs. With power off they worked slick.

Then I started milling some material and the readouts failed to hold zero and skipped all over the place with numbers.

Started the process

>Replaced batteries
fail
>Reroute wires
fail
>failure occurs only when the power is turned on, spindle turning at any speed

> On line search for iGaging problems, not good, lots of suggestions no working answers

Get out the Volt Ohm Meter VOM)

>Measure Volts AC with VOM, especially spindle which is not grounded except through bearings and is isolated by belt drive from motor

>Check grounds at machine and to wall receptacle
OK

>Check the service entrance ground wire, clamp and rod
OK

>Scales are mounted to painted support clamps that vary in resistance to machine ground

>Install ground strap on X axis scale using 4-40 tapped holes and machine screws with lock washers on ring lugs of strap.
fail

>Set up the oscilloscope and find source of problem
 
> There is a high rise time positive and negative burst at about 15KHz when the power is applied to the motor drive. This burst changes amplitude when the spindle is grounded to the table. The speed control pulse width modulated signal from the drive can also be seen.

Installed ferrite cable clamps on the X DRO near display and near scale.

Fail

> Open DRO scale case, there is a brass contact strip on the scale aluminum body that is used for connected to the circuit board.

Grounding the scale to the mill table made the problem worse since the interfering signal is now directly coupled to the readout.

Inspection of the micro usb connectors at each end of the cable revealed five individual insulated strand ed wires with soft plastic insulation. The foil wrapped shielding was not connected at either end micro connector shell.

> Where the scale mounting clamps contact the scale, wrap the scale ends with kapton tape to insulate the scale body from ground. On this installation the scale pickup is mounted to the table with G10 0.065” insulating material and need not be isolated from the mill table. Remove the ground jumper from the scale body to the mill table.

> The ground jumper was made using two 18-22 crimp ring with a #6 ring. The bonding wire was 26AWG PTFE insulated stranded tinned copper wire. To install a decoupling capacitor I cut the bonding wire at center and soldered in a 390pF tantalum capacitor.

>Operated mill, placed a 1-2-3 block on the table and cranked the table until the spinning spindle hit the block to simulate a cutting tool engaging the work. It lightly touches and causes no scratches but it is a terrific noise generator.

Fail

> Used the oscilloscope scope, and no appreciable change to noise

> Removed the 390pF and installed a 2.2uF Tantalum. Repeated the 1-2-3 block on the table test and no issues. Checked with the scope, no noise signal present at any spindle speed.

Pass


End of the day so I think it was worthy. Engineer stopped by who was helpful in this work. He can’t have his R&D parts until the DRO was operational. He insisted I publish the results.

When troubleshooting, don’t guess. Be methodical and start from the very basic items required for operation. Do that every single time you troubleshoot.


This solution made the DRO operational. Your application may be different or have different problems. Because this DRO system is susceptible to electrical noise, I would use general practice for cable routing.

Marbles
 
Back
Top