Installation of a tachometer in an LMS mini-lathe

WobblyHand

H-M Supporter - Diamond Member
H-M Lifetime Diamond Member
Joined
Dec 18, 2019
Messages
6,437
Have a digital tach kit that I'd like to install in my mini-lathe. I will make an M27x1.5 hex nut to replace the circular jam nut on the spindle. (I know I can buy the nut for $5, but where's the fun in that?) The nut will be 12mm wide so I can mount a 12mm magnet. The 10mmx1 magnet that comes with the kit is a bit wimpy. The magnet will be JB Welded to the nut. (Once I test it for proper polarity!) I did wire the unit up and tested that it works. I used my demagnetizer and spun it and it measured a multiple of the RPM (due to the multiple of magnets!)

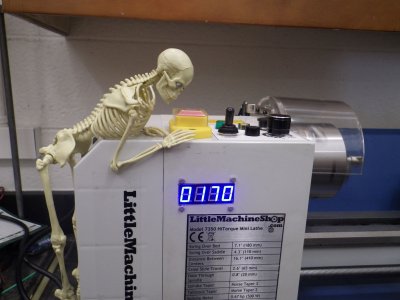
What I haven't yet figured out is where on the front plastic cover I can mount the display. There's not much real estate there. The control board is mounted to the front of the cover. I was thinking of the side, but that would require a huge cutout, greatly reducing the integrity of the plastic cover. In other words, the notch would be nearly the entire width of the side. Has anyone done a similar install on their mini-lathes? I'm trying to avoid a wart on top of the lathe. Horizontal surfaces are prime space, and I'd rather not have a plastic Bud box on top. Did you have to remove the display from the housing to install it? It looks pretty easy to pop the board and display out of the case.

In a couple of minutes I will post some pictures, so there's some context.
 
After removing the housing from the tach, there's a way to shoehorn it in, I think. Whether it will operate there or not, we shall see. I'd like to pick up the mains from the inside of the box. I don't have enough plugs at my location, and I am already swapping plugs for power right now.
PXL_20210928_194516753.jpgPXL_20210928_194950901.jpgPXL_20210928_200335644.jpg
Hopefully I can get some new decals. Looks like the display will be in the middle of the indicator table.

The display was soldered in place incorrectly. The assemblers pushed in the center then soldered it. There is a noticeable sway to the display.
Maybe I will resolder it. The display height is 8mm from the board. The plastic cover panel of the lathe is 3mm thick. If I use a 5mm spacer the display will be flush to the surface. I conveniently happen to have some 5mm MF hex spacers.
PXL_20210928_203035391.jpg
The pocket knife under the board I bought in China in 2007. You can see the corkscrew is pulled out. That was from first use, trying to uncork a wine bottle. I was so astonished that I brought it home and have kept it. It's a reminder to me that quality isn't hypothetical, it actually matters.
 
Last edited:
That looks like the perfect place for it.

Take a good photo of the label in case you have to print one yourself… But LMS should have those labels available…

To power the display, I used an old 12volt power supply from a network hub…

Oh, and I got a multiple outlet just for the lathe…. Between the magnifying lamp, RPM display, lathe…I just could not do without it…only one plug next to the lathe as well…
 
there is room to shoehorn a display in front.. this is the macpod tach kit, simple no fuss, plugs into the LMS wiring.. https://macpod.net/misc/sx2_tachometer/sx2_tachometer_kit_v2.php
3x the cost, and currently not available. Besides, I like my digits are green! ;^)

Seriously, did look into this at one time. Couldn't tell if it would really work for what I had. Not obvious (to me) how to mount the display unit board behind the main power board. Actually, disassembly looks like an interesting puzzle.
 
That looks like the perfect place for it.

Take a good photo of the label in case you have to print one yourself… But LMS should have those labels available…

To power the display, I used an old 12volt power supply from a network hub…

Oh, and I got a multiple outlet just for the lathe…. Between the magnifying lamp, RPM display, lathe…I just could not do without it…only one plug next to the lathe as well…
Turns out the label isn't listed in the parts diagram. Have to email LMS to see if they have it under some other place. Good call on taking a picture.

I have a bunch of old 12V supplies. Think I have 4 to choose from.

Think I am going to extend the electrical box. See if I can gang 4 more outlets. Tired of plug swapping. A multi-outlet is good too. I'll see if I can get a 4 foot electrical strip and mount it to the back of the lathe stand. I'd like the outlets to be covered, or at least the ones not in use. I do get chips flying. Eventually I will run another circuit to the area, it's long overdue. Haven't hooked up my mill power feed, because I'm out of outlets! No shortage of projects...
 
LMS has the label. So I can get another one. Costs a whopping $3 or so.
 
Back
Top