Levelling and Alignment - Is this run out due to bed wear?

SnakeyJ

Registered
Registered
Joined
Oct 27, 2018
Messages
95
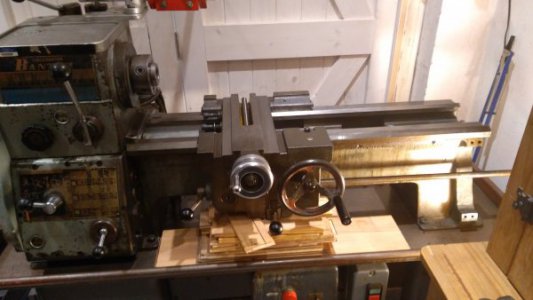
Having moved my lathe around the workshop, I've spent a fair bit of time on levelling and aligning the lathe headstock and ways and think I'm pretty close on the money now (testing with 11" ground test bar mounted directly in the spindle taper). I am now seeing just under 3/10,000" run out at the spindle end of the bar (1/2" out from spindle nose) and this rises to just under 1/1000" at far end of the bar (11" from spindle nose).

The run out is periodic and symetric, and I have aligned the headstock so that it is zeroed on the mid point according to the dial indicator and this is also zero at the end of the bar. What I don't quite understand is that as I rack the carriage along the bed I see a large variation in the dial indicator reading as I move along the bed. The dial indicator is metric and shows micron divisions (1/1000 of a mm or approx 4/100,000") - I get around 30um variation as I track along the bar, which I believe is the carriage rising and falling taking the dial indicator off centre.

I was thinking this might be bed wear or some slack/adjustment required in the carriage gibbs, but after videoing it I'm not so sure as the dial indicator reading seems to be influenced 20-30um by the reversing the direction of racking. I wondered if perhaps I might be skewing the carriage slightly, I can definitely change the indicator readings by lifting the front of the carriage or pushing down at the rear.

I've shot two short videos to try and show this and think I have reduced the error a little in the second run by tightening up the 3 allen bolts at the rear of the carriage (which I assumed were a gib adjustment) - the manual isn't too helpful here, but it looks like there might be adjustment at the front of the carriage, but I think I need to remove the apron to get access here (parts diagram below):
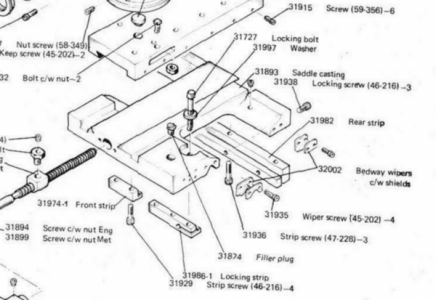
carriage.png


The run out error is not too excessive, but not sure I can be certain of my alignment as a longer test bar might give a different result - would appreciate any insight on probable cause and if I should strip the apron to adjust the carriage. It probably could use a proper clean after 50 odd years, but looks quite a messy job!
 
Likely, your carriage is not bearing on the ways correctly, year ago, I had a lathe with the same problem, the cure was to relieve the center 1/3 of the vee ways under the carriage by scraping, and then re scraping the vee ways under the carriage to proper bearing and alignment.
 
Likely, your carriage is not bearing on the ways correctly, year ago, I had a lathe with the same problem, the cure was to relieve the center 1/3 of the vee ways under the carriage by scraping, and then re scraping the vee ways under the carriage to proper bearing and alignment.

Thanks Ben, thanks for looking and your reply - that all sounds quite a skilled/delicate operation, but will take a look and seek some local help as needed. Much appreciated.
 
I would use the RDM method pf checking. It consists of rotating the test bar and averaging the maximum and minimum readings at each location. This takes into consideration any bend in the test bar and the average readings should be equal if the is no taper. A difference in the readings is indicative of the amount of taper.
Is the contact point of the indicator on a horizontal plane with the spindle axis? If not any vertical movement of the indicator would result in a more pronounced indicator change. I would also mount the indicator in front of the spindle rather tyhan at the rear. That would be more indicative of machining issues as wear on the rear way would hgave less of an effect.
 
I would use the RDM method pf checking. It consists of rotating the test bar and averaging the maximum and minimum readings at each location. This takes into consideration any bend in the test bar and the average readings should be equal if the is no taper. A difference in the readings is indicative of the amount of taper.
Is the contact point of the indicator on a horizontal plane with the spindle axis? If not any vertical movement of the indicator would result in a more pronounced indicator change. I would also mount the indicator in front of the spindle rather than at the rear. That would be more indicative of machining issues as wear on the rear way would have less of an effect.

I did check the test bar on my surface plate and happy that it is not bent or tapered, it could be slightly out of true in the taper as not tightened up with a draw bar, but that would not explain the readings. The dial indicator was mounted at the rear as I kept knocking it, the needle is bent down so perpendicular to the centre line of the bar, but point taken about bed wear probably worse at the front. It does seem to be some slack/play in the carriage allowing it to rise and fall slightly when racked along. I will check to see if it happens when the carriage is feeding (sliding) on the lead screw.

The average deflection is still zero at any point along the bar if you shift the zero to the mid point - it's a nice neat sine oscillation, with the amplitude increasing on a nice linear as you move out from the spindle nose. Just the mid/zero point shifting as the carriage is racked in/out.
 
I did a little searching around the internet last night for details/tips on stripping the apron and carriage. Several threads with problems removing the lead screw and power feed shafts, though things ran very smoothly this morning and I had the whole lot off in a couple of hours. My only slight issue is working space is tight as the tail end of my lathe is close to the wall, but I had just enough room to turn and remove the lead screw. The power shaft pulled out of the gear box, but I couldn't pull it out through its work gear until I dropped the apron.

I kept the apron chocked up on wood, but not a great deal of weight here to support. Lots of gunky grease and swarf, but no real oil sump to empty or spill over the floor.

I've recorded another couple of short videos, but more of a commentary than a proper disassembly guide.
Front of Apron/Carriage, ready to remove Apron.
IMG_20190607_101825.jpg

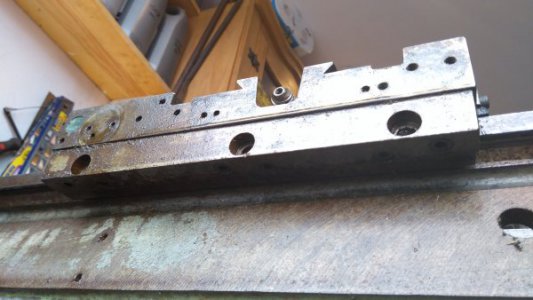
Rear of carriage showing gib adjustment.
IMG_20190607_104953.jpg

There's more detail and look at the front gib/adjustment after removal of apron in the videos...


I'll clean the bed, ways and saddle and reassemble this prior to stripping and cleaning the apron - not enough space on my workbench!
 
Cranking the carriage will generate a downward force from the pinion/rack. I have a similar machine and my carriage is front-heavy, try putting a weight on the rear side and see if that helps.
I don't think you can expect to put a micron indicator on any machine and not be able to influence the reading by hand force
-microns are kinda tiny.
The reading changing when you change direction is expected, and the reason why you should take all readings moving the same way.
I doubt the indicator moving off centreheight is the issue, sine error is basically nonexistent for such small distances.

Sent from my LYA-L29 using Tapatalk
 
Myself not knowing much of anything but I believe that Colchester has flame harden ways correct?So maybe like others are saying carriage,by the way nice lathe.
 
Myself not knowing much of anything but I believe that Colchester has flame harden ways correct?So maybe like others are saying carriage,by the way nice lathe.

Hi Kroll, the bed is induction hardenend - looks pretty good for 50 years, perhaps a few high spots to stone out from dinks and a little pitting in one area where it probably sat unused/uncleaned for a while.

It does seem to be working nicely and the runout here is not too excessive, but it does seem to bite and draw the tool in sometimes which can be annoying when trying to get a decent surface finish. The alignment is pretty good now and the spindle runs silky smooth on new Gamet bearings - I'd just like to tighten up on this play and there's a couple of bushes to replace in the headstock and feed gear box - not too serious but should make it run a bit quieter/smoother.

I'll take and post up a few close up photos of the carriage ways - they look pretty good to me. There doesn't seem to be any appreciable play/skew in the carriage unless it lifts up a bit at the front, so hopefully this can be resolved with some tlc.
 
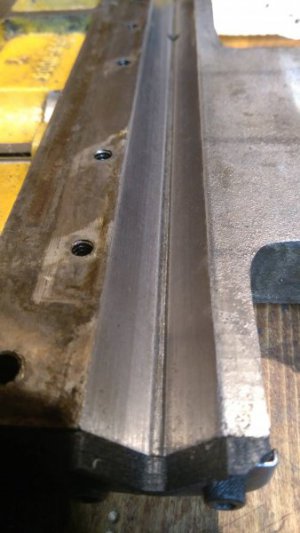
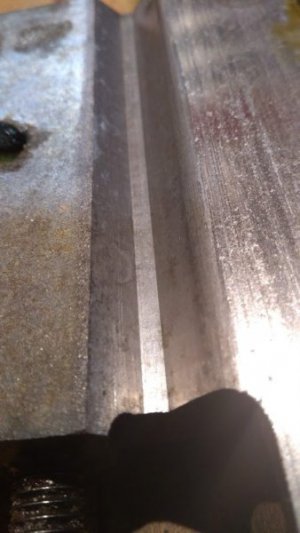
Saddle front left v way - Looks like this is the v-way is the only point of contact at the front of the bed, looks good to me!
IMG_20190607_163029.jpg

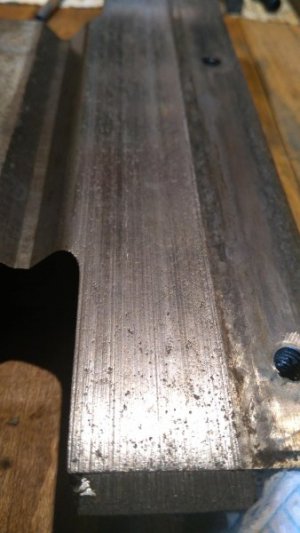
Saddle Rear left flat and v-way - some pitting and striation on the flat but v-way looks good
IMG_20190607_163050.jpg

Saddle Rear left v-way - looks pretty clean and fair to my eye.

IMG_20190607_163350.jpg
 
Back
Top