Lo-Fi's mad projects

Lo-Fi

H-M Supporter - Silver Member
Joined
Dec 23, 2019
Messages
1,138
It's a sad week when I don't get in the shop, but for me, "shop time" is either messing about in my tiny 8' x 12' shed that's crammed full of machine tools, or at the railway spannering hoofing geat big bits of steam engine.

I'll mostly be posting projects from my home shop, but I'll throw in some from the steam shop for good measure. Here goes!

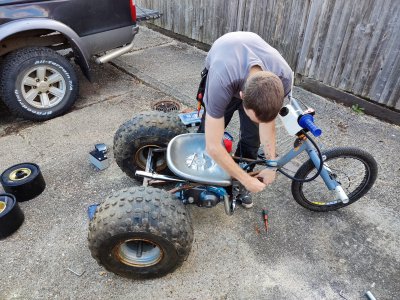
First up: Drift Trike. Unashamedly inspired by Colin Furze (but I have better tools ;) ). This is really my mates project - I helped with machining stuff.

Starting with the frame, let's boff some holes in some angle to mount the bearings and clear the axle:

2021-03-20 15.33.06.jpg

Machine the correct size hole in the "pilot bore" sprockets:

2021-03-20 16.04.21.jpg

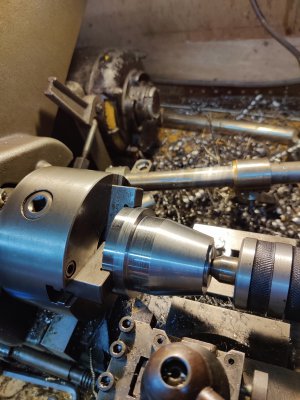
Didn't snap the broaching, but this is my setup to machine a cross hole for a set screw:

2021-03-20 18.00.24.jpg

2021-03-20 18.05.24.jpg

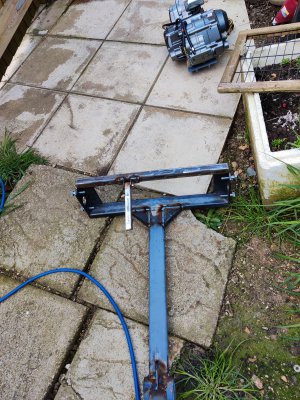
Putting the old power hacksaw to use cutting steel for the engine mount:

2021-03-20 18.18.11.jpg

Getting the holes precise is easy with a mill. Hole for aded lightness:

2021-03-21 14.15.02.jpg

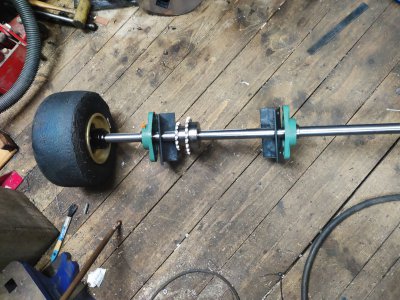
Rear axle coming together:

2021-03-21 14.06.57.jpg
2021-03-21 14.34.13.jpg

To be continued....
 

Attachments

  • 2021-03-20 17.43.21.jpg
    2021-03-20 17.43.21.jpg
    3.9 MB · Views: 9
And a change of plan. I realised I have some ATV tyres knocking around. As you do...

So, much faffing with the lathe (plus needless use of the taper attachment I mae last year), mill and rotary table later, I'd made a set of hubs to mount to the 25mm axle:

2021-04-01 14.40.28.jpg

Single holes bored to clamp using the centre in the table. Drill 4 x 100mm pcd holes to mount the wheel that double for proper clamping to the table:
2021-03-27 12.00.12.jpg

Mill centre hole to size:

2021-03-27 13.35.54.jpg

MIll sides to final size. Easy on the RT. LOVE that tool:

2021-03-27 14.14.21.jpg

2021-03-27 14.00.05.jpg

Test fit:

2021-03-27 14.17.10.jpg

2021-03-27 14.17.22.jpg

Begin machining the center boss, taper attachment in action

:

2021-03-28 13.55.37.jpg

2021-03-28 14.38.29.jpg

Not a bad finish:

2021-03-28 16.03.17.jpg

Bore, Broach, cross drill:

2021-03-28 17.21.29.jpg

2021-04-01 13.25.53.jpg
 

Attachments

  • 2021-03-28 16.32.51.jpg
    2021-03-28 16.32.51.jpg
    4.3 MB · Views: 7
Test fit. Ooooh yeaaahhhh:

2021-04-01 14.40.12.jpg

2021-04-01 14.40.16.jpg

Making up a clamp for fix the engine mount plate to the frame. Mill, bend, weld. It's sooooo easy when you have these lovely tools:

2021-04-02 13.27.28.jpg

2021-04-02 13.33.05.jpg

2021-04-02 13.34.27.jpg

2021-04-02 13.52.35.jpg

2021-04-02 14.45.43.jpg

2021-04-02 15.28.33.jpg

2021-04-02 15.36.08.jpg

Rough and ready, but it'll do.
 
Work stopped for a spot of steam engine fettling:

2021-04-10 10.01.59.jpg

2021-04-10 13.21.42.jpg

One does not simply "weigh" a locomotive.
 
100CC ebay special pit-bike engine into frame:

2021-04-05 16.01.15.jpg

Adjustable top mount to allow for chain tensioning:

2021-04-05 14.53.24.jpg

2021-04-05 16.04.00.jpg

Stopped to make a spanner to fit a new solar heat pump. Plumbers should be lightly tazered whenever they reach for adjustable pliers, grip locks or pipe wrenches for any kind of nut IMHO:

2021-04-09 12.34.38.jpg

Looks like we're going full-on Mad Max. doesn't it. I must buy some chrome spray...

2021-04-12 18.27.37.jpg

Videos of it in action just as soon as we finish it and find a farmer who's game for a laugh at our expense!
 

Attachments

  • 2021-04-11 13.56.05.jpg
    2021-04-11 13.56.05.jpg
    6.7 MB · Views: 8
  • 2021-04-12 18.40.25.jpg
    2021-04-12 18.40.25.jpg
    6.4 MB · Views: 9
Back
Top