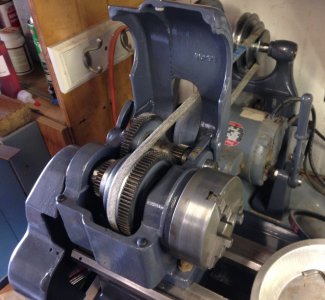
Logan 400. Headstock. (Total Logan 400 Rebuild)

Hmmm...

I've never seen a 400 closer than this thread of yours. They are obviously far different than a 200, making a lot of my advice hot air, methinks. Looks great!
 
Hmmm...

I've never seen a 400 closer than this thread of yours. They are obviously far different than a 200, making a lot of my advice hot air, methinks. Looks great!
Was kinda thinking the same earlier ... not the hot air part ... but the far different part. Surprised me when I saw the v-belt pullies instead of flat belt.
 
Ha.

I would rather have hot air with the caveat that the info is based on a different model then crickets.....

It is nice to know that there is at least curiosity in what I am doing. I have gathered that the 400 is not all that common and have yet to find a blog of someone re-building theirs so at least the next guy will have something to review. This little adventure certainly went deeper than I expected but I am having fun.....

I wish I could re-name my thread now.... "Logan 400 total rebuild" Oh well.

The hope for today is that I see a spindle back in the headstock.
 
I was just commenting in my thread on steady and follower rests, about one of each on Ebay for a 9" Logan ... figured I should point it out to you. Both auctions end tomorrow and at least currently, the price and bidding has been low.
 
Mr. Ed.

Just read your thread. Thank you for the heads up. I keep an eye out for steady rests. Rarely see one from an actual Logan. Usually they are SB 9" and I am not certain that the SB and Logan are the same. Not sure what a Follower rest would be used for so have never looked for one. I see that one and had to ask myself... "How is it mounted?" Not sure what those slots at the base are for and how they work. Keep in mind that my bed only handles about 12" of material too.....

Some good morning progress.

IMG_0904sm.jpg

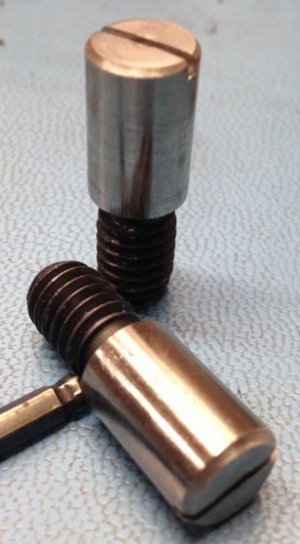
New pivot pins for the top cover.


IMG_0908sm.jpgIMG_0909sm.jpg

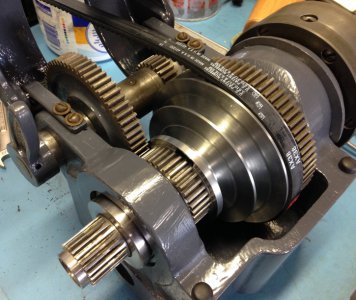
Progress. Spindle is back together and it is smooth. So here is the learning from this.

- The bull gear, pulley, drive gear and collar all have to go on as you slide the spindle thru. Don't forget the woodruff key for the bull gear.
- The main bearing is a tight fit to the housing. (kind of expected that) Had to tap it in with a wood mallet.
- Don't forget the belt.
- Once the nose bearing is in, you can slide in this order the rest of the parts through the rear bearing bore. (Make sure the "C" clip is in there)
1 Small spacer
2 First Belleville washer. Above I had this part wrong. It only made sense if this went in concave to the rear bearing. That way the ID presses on the small spacer.
3 Second Belleville washer. This one goes concave to the nose bearing.
4 Rear bearing. This has to be tapped in with a wood mallet and once it gets past flush to the housing you will need a wood tap spacer.
5 Rear lock nut. This can be used to draw the bearing down onto the "C" clip.
6 Main lock nut.
- Use the back gear with the bull gear engaged to lock the spindle to tighten the lock nut.
- Install the front bearing cover.

The grease seal for the bearing is tapped in last. It gets pressed or tapped on over the nose and is almost flush with the front bearing cover. Last comes the chuck but that can be installed later.

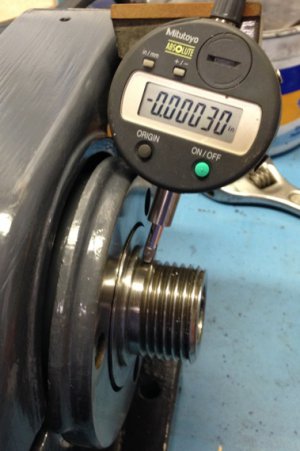
When you are all done and it is done right you get this. .0003" runout at the spindle. Yah.....

IMG_0907sm.jpg

That is all for this AM I think. I may have more time today. If I do I will finish the tail stock and mount the motor back to the table. It is starting to look more like a lathe.

- - - Updated - - -

Figured out how the follower rest would mount on my 400. There are two holes on the side of the saddle. Cool. I see how it would aid a floppy part now.

Matthew

IMG_0904sm.jpg IMG_0907sm.jpg IMG_0908sm.jpg IMG_0909sm.jpg
 
Figured out how the follower rest would mount on my 400. There are two holes on the side of the saddle. Cool. I see how it would aid a floppy part now.
There you go, helps keeping parts from flexing. I was turning last fall and really needed one for what I was doing at the time.

The steady I need bad, I work a replacing shafts in old farm windmills. Usually, 1" stock and that is too large to shove thru the spindle and choke up on. So, even if only to center drill for a center ... the steady would help me out.
 
I was looking at the Logan steady rest on ebay. Something does not seem right. He shows a scale next to it which seems to show the mount surface to center to be around 6". It also shows the center top guide biased way down. I believe for a true 9" that distance would be 4.5". I have a feeling this is from a 10" or 11" that was adapted.

I have seen other 9" units and they always seem to look really short at the mount. I have asked for clarification on that dim as something seems off with the picture.

Hard to tell with the follower rest. Same seller.


Major set-back this afternoon. About 2 months ago I rebuild a belt sander. Somehow the old belt from that got mixed up with my lathe belts. So.... I bought and installed a belt that was WAY too short. Had to tear the whole headstock back apart. Not a happy camper right now. Oh well.....

Matthew
 
After a set-back I was able to move forward this afternoon.

IMG_0917sm.jpg

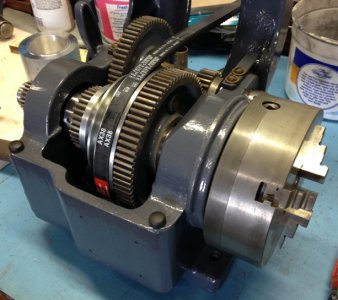
Headstock is back together with the proper belt. Bolted in place and aligned with the motor drive. Power was applied and she spins as she should. :thumbsup2:

Noticed that it sounds quieter too. It used to have a pulsating mechanical noise but then again the drive shaft and associated gears are not yet installed.

Anyways. I am a happy camper right now.

Next up is the cross slide and saddle assembly. One of the SB members is tapping a piece of bronze for me to make a new crossfeed nut. Maybe I will get that this week.

Getting closer...

IMG_0917sm.jpg
 
Yeh.. so;

You did it the 2nd time with your eyes closed, right? :lmao:

Nothing lost, eh? You got better at fiddling with it, so that is good. I put mine partially together a couple of times just because I was curious and nudgey. It took me a number of tries to get everything jiggered properly anyways, even when I finally did it for real.

It's looking really good!
 
Redlineman,

I too am guilty of putting things together ahead of time to see how it goes. The bearings I did not want to take off too many times thought. Did not want to risk damaging them.

A little progress today. Getting near the end.

Mounted the saddle and made felt wipers for the saddle. Also tried to mount the apron to the saddle. That was today's step backwards....
Went to tighten the right side 3/8-16 x 1" SHCS and immediately felt the cast iron go soft. Stripped with no pulled material so it was stripped to begin with.....
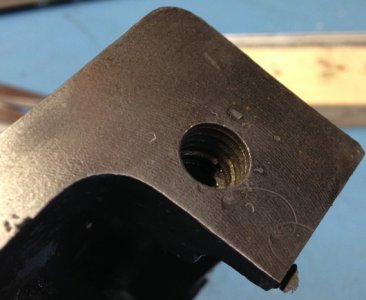
IMG_0920sm.jpg

Will have to heli-coil it tomorrow.

Also took my tail stock apart again. It is bugging me.

If you recall a few weeks ago I asked how you get the screw (LA-146) out of the spindle. (LA-147) The answer was "it should just unscrew". Well, mine does not.
Also I asked about a 1/4-20 set screw in the side of my spindle. Almost exactly in the center to the side of the distance marks. It goes to no-where. Apparently it is not factory.
I am also bothered by the fact that I can only get 2" of extension from the tail stock but it is marked out to 2.5".
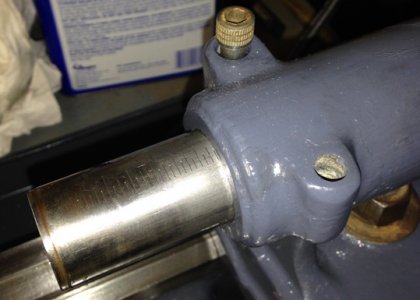
IMG_0924sm.jpg

Anyways. Tried to disassembly again with no luck. I can see (Thru the nice taped hole) that the end is buggered up. Really buggered up. Can't figure out how it happened though. I measured and I would need to work the screw thru about 5/8" of the spindle to free it up. Not going to try and I am sure I will ruin the spindle. So... only 2" of travel for me.

I was also making a list of the things I would like to find for my lathe. Maybe someone out there has these laying around.

5/16-18 x 1-3/4 square head bolt. For the saddle lock.
Original 3/4" tailstock wrench. (Are the 9" SB or larger Logans the same?)
Original tailstock lock handle. (Also are the 9" SB or larger Logans the same?)

I am also still on the quest to adapt a QCGB to this lathe. I have looked at QCGB's from 9B's as well as 10 & 11". Depending on who you read they are all similar. One thing I noticed is that the 9B's QCGB ID tag starts with a 48 Stud Gear and the newer units start with a 72. (See here for the newer one. Top left number. http://store.lathe.com/lp1785b.html)

I was talking to Logan sales about this and they made a statement that I did not follow.

"later ones for lathes that use a 36/72 tooth for the stud gear (and use a 72T gear on the input of the gearbox)"

I believe the stud gear is the lowest gear shown below on my reversing lever. Mine has 16 teeth but I think that can be changed. What do they mean by 36/72? I know what they mean by 72 to the "input of the gearbox" so are they saying the stud is 36 teeth, use 1:1 gears to get to the gearbox input which is the 72?
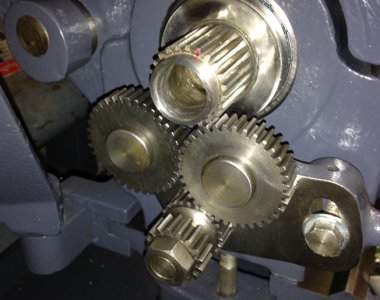
IMG_0925sm.jpg

Long winded tonight. I should be slowing down a bit as I wait for my crossfeed nut.

Matthew

IMG_0920sm.jpg IMG_0924sm.jpg IMG_0925sm.jpg
 
Back
Top