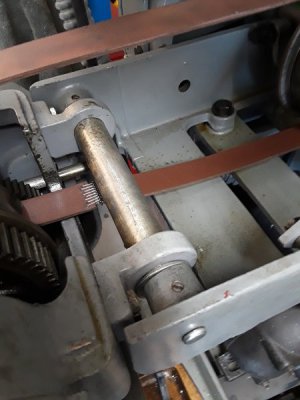
Five years, when rebuilding my Logan 820 ( see my long thread "Greg's Logan 820 Restoration", I learned my lathe had a very non-standard way of connecting the drivebox to the headstock. . Rather than the standard Logan 1" OD rubber bushings and 3/8" pins, I had a 1" OD aluminum rod running between the brackets, through drilled with a 3/8" hole. Rather than the two pins, I had a 3/8" shaft running the full length.
(See attached photos)
This worked more or less OK, but obviously any vibration dampening was missing. Less obvious was the side-to-side play and overall sloppiness, show in the short attached video. This likely causes/contributes to the flat belt sliding off the selected pair of pulleys, particularly when taking a heavy cut.
Finally I'm attempting to fix this issue.
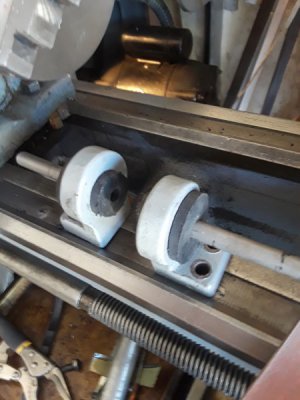
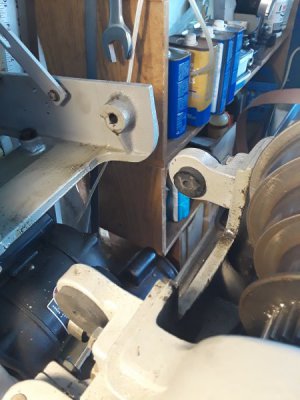
From Lowe's, I got two black rubber stoppers. I drilled them 11/32" (a snug fit for 3/8" pins). Then on an expanding mandrel, I turned them down to size and shape, with a 0.200 thick end cap to remove that side play. (Attached photos show my bushings installed into their castings, mounted in place, and with the drive box reconnected. Notice the end play is gone.
But the belt still jump track too easily. Seems this could be due to one or more of the following reasons.
Any suggestions in troubleshooting / fixing this are welcome!
1. Lateral misalignment of drive and headstock pulleys
Laying a long ruler against the headstock pulley flanges, it should nicely align with the drive pulleys. Hard to precisely measure, but it was off by perhaps 0.080 or more. I loosened the pulley and left collar setscrews, then moved the pulley to the left.
2. Belt tension adjustment
Proper belt tension is certainly an important factor in this. But what is the correct tension? What is the correct way to set the adjusting screw?
3. Angular misalignment of the countershaft
When I disassembled the drive unit for restoration, I recognized that correct adjustment of the four setscrews on the countershaft would be difficult and critical, so I only backed off the front screws to remove the shaft, then retightened just them for the rebuild. Therefore, IF it was in correct alignment, it should still that way. Again, this is difficult to measure, even more so when the lid is closed. But due to the geometery of the box, yoke, and shaft mechanism, maybe it can be measured with the lid open. Open or closed, any misalignment of the box and/or the shaft will we the same.
How to measure this? If the shaft is correctly aligned, the distances from the back of each headstock pulley perimeter to the front of the corresponding rear pulley should be equal.
3a. A simple way, use a cloth tape measure, Worth a try.
3b. Or else I plan to make a simple telescoping gauge. This would work similar to using adjustable parallels to measure a gap.
In either method, the crown of the pulley faces make precise measurement more difficult.
*** Please: Any ideas or suggestions in troubleshooting / fixing the belt problem are welcome!
Images:
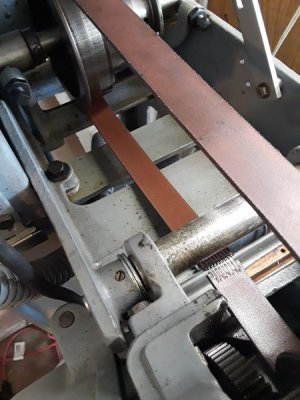
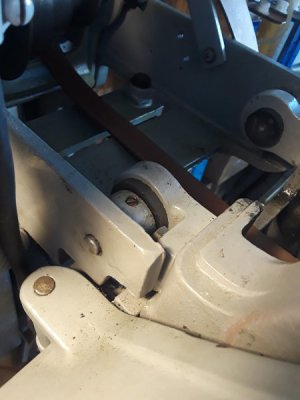
1,2. The current coupling, lacking the rubber bushings. Note the end play, with added washers to minimize the problem.
3. Video of the sloppy fit in the current coupling.
4. My rubber stoppers turned into bushings, with their pins, installed on the castings prior to reassembly (sitting on the ways.)
5. My reworked coupling, installed and coupled to the drive box. End play is gone.
(See attached photos)
This worked more or less OK, but obviously any vibration dampening was missing. Less obvious was the side-to-side play and overall sloppiness, show in the short attached video. This likely causes/contributes to the flat belt sliding off the selected pair of pulleys, particularly when taking a heavy cut.
Finally I'm attempting to fix this issue.
From Lowe's, I got two black rubber stoppers. I drilled them 11/32" (a snug fit for 3/8" pins). Then on an expanding mandrel, I turned them down to size and shape, with a 0.200 thick end cap to remove that side play. (Attached photos show my bushings installed into their castings, mounted in place, and with the drive box reconnected. Notice the end play is gone.
But the belt still jump track too easily. Seems this could be due to one or more of the following reasons.
Any suggestions in troubleshooting / fixing this are welcome!
1. Lateral misalignment of drive and headstock pulleys
Laying a long ruler against the headstock pulley flanges, it should nicely align with the drive pulleys. Hard to precisely measure, but it was off by perhaps 0.080 or more. I loosened the pulley and left collar setscrews, then moved the pulley to the left.
2. Belt tension adjustment
Proper belt tension is certainly an important factor in this. But what is the correct tension? What is the correct way to set the adjusting screw?
3. Angular misalignment of the countershaft
When I disassembled the drive unit for restoration, I recognized that correct adjustment of the four setscrews on the countershaft would be difficult and critical, so I only backed off the front screws to remove the shaft, then retightened just them for the rebuild. Therefore, IF it was in correct alignment, it should still that way. Again, this is difficult to measure, even more so when the lid is closed. But due to the geometery of the box, yoke, and shaft mechanism, maybe it can be measured with the lid open. Open or closed, any misalignment of the box and/or the shaft will we the same.
How to measure this? If the shaft is correctly aligned, the distances from the back of each headstock pulley perimeter to the front of the corresponding rear pulley should be equal.
3a. A simple way, use a cloth tape measure, Worth a try.
3b. Or else I plan to make a simple telescoping gauge. This would work similar to using adjustable parallels to measure a gap.
In either method, the crown of the pulley faces make precise measurement more difficult.
*** Please: Any ideas or suggestions in troubleshooting / fixing the belt problem are welcome!
Images:
1,2. The current coupling, lacking the rubber bushings. Note the end play, with added washers to minimize the problem.
3. Video of the sloppy fit in the current coupling.
4. My rubber stoppers turned into bushings, with their pins, installed on the castings prior to reassembly (sitting on the ways.)
5. My reworked coupling, installed and coupled to the drive box. End play is gone.