Machining Multiple Squares

rtchal

Registered
Registered
Joined
Feb 5, 2019
Messages
28
Hello all,
Lately I have been making miniature chess pieces out of wax at work in my spare time, but I want to take it to the next level. I want to make a full chess set out of brass, with one team being polished and lacquered and the other team being heat tarnished or tarnished with liver of sulfur then lacquered. I want to use the same idea to make the checkered pattern on the board. I have an idea and plan for everything in my head except for the board itself.

My main question is how to make 64 squares that are identical enough to make a nice checkerboard. I definitely have access to and know how to use a lathe, but I don't know if I will have access to a mill or any other equipment. I am going to visit my local makerspace this week or next to see what they have. I also do not have any experience with a mill.

Also, I don't know how/what I will be attaching the squares to, so any ideas there are also welcomed.

Thanks in advance and I hope to hear from you guys soon!
 
For the substrate you will need something dead flat and stable. Any deviation in the squares dimensions will be accumulative so they best be dead on size and square. One way to beat that problem is to lay them with a small space between and then fill the spaces with a filler, perhaps an epoxy.
Of course the board would then have to be surfaced which raises the question of the squares surface coloration. One way to beat that is to use different material for the squares. Perhaps copper or brass and aluminum.
I see a lot of hair pulling and clutching your forehead in store. Good luck.....................Bob
 
Hmmmm... you gave me an Idea there. I could use resin between 2 sheets of glass to give the squares and pieces a 'floating' effect. Definitely an idea that warrants some testing.

Any ideas on the actual process of making the squares though? The only thing I can think of it cutting rough squares out of sheet stock on the bandsaw then using files or a belt sander for final shaping/finishing.
 
The easy way would be to cut all the squares using a CNC mill. Once the program is written, all the squares should be virtually identical. In addition to equal size, you would want the pieces to be truly square although as long as opposite sides were parallel, an out of square condition won't affect the assembly. To ensure that the cut pieces were kept in the same configuration, I would mark one edge with a witness mark.

The hard way would be to custom fit each piece with a file.
 
Maybe the sheet stock could be thicker and one large piece.
Then groove it and lay in dividers or pinstripe dividing lines.
Then apply the coloring variation to what looks like pieces but is really one big square divided.
 
Hello all,
Lately I have been making miniature chess pieces ... one team being polished and lacquered and the other team being heat tarnished or tarnished with liver of sulfur then lacquered.

My main question is how to make 64 squares that are identical enough

Well, you could get an aluminum plate, mill some square recesses into it, black anodize the sucker, then mill off the high
parts leaving a field of black squares on white aluminum. White or yellow anodize optional after baring the
aluminum for the light squares... I once did a chess set with the board consisting of
aluminum and copper sheet (shim thickness) strips square-woven; that didn't really flatten very well, though.

For extra credit, titanium anodizes up nicely...
 
I could use resin between 2 sheets of glass to give the squares and pieces a 'floating' effect.......Any ideas on the actual process of making the squares though?

okay, continuing down your idea of two sheets of glass and the floating affect......
how about masking squares on the back of one sheet of glass and then sand-blasting to "frost" the unmasked squares.
flip that sheet over so that you play surface is on the untouched side.
mount that glass with spacers over another bottom layer to give a gap and floating affect.
It does NOT use metal squares that match your pieces, but could look rather good.

-brino

PS: If you want to go with metal squares, then a square punch of the proper size is the way to go.
 
Buy 1" (or whatever size you want ) square stock, brass and aluminum. Saw them a bit long and face them in a four jaw chuck.
 
Thank you all for your wonderful tips and ideas! I will be visiting my local makerspace either tomorrow or next Wednesday to see what tools they have available. If they have a CNC mill, I'll try cutting the squares that way. If not, I'll start experimenting with a couple squares to see what will look good with my limited experience. So far in my mind the floating squares sound the coolest but we'll see how it goes.
 
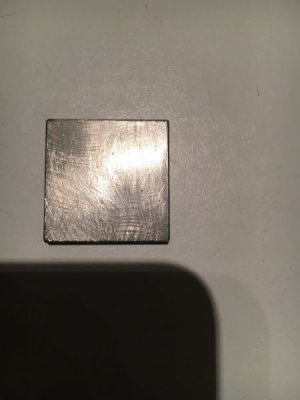
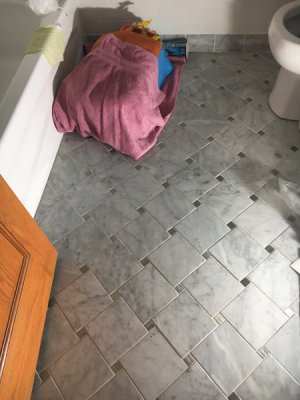
Brings back some memories of a job I did acouple years ago. I was redoing our bathroom and I wanted something no one would have. I ended up cutting 10g stainless down in strips 1” heavy. Then cut the strips into 1” heavy pcs. 130 of them. I then took packs of ten put a clamp on them to sandwich the pieces then put in the vice and milled all four sides flipping and checking squareness along the way. I broke acouple endmills in the process from 1 pc pulling in the stack and breaking or throwing a part. I was happy as hell to be done. Ended up hand filling every edge when flipping. Had it bit me once early so I eliminated that. Once my squares were milled I brushed each one in a swirl type which took making a jig so they didn’t fly across the room with the grinder. After that I slightly beveled each edge to knock the edge. Final product is my bathroom floor. 124- 1” stainless squares with 6” marble tiles going around them in a pinnacle layout with 1/8 grout lines. Each brush of the stainless squares are rotated so the light picks up on the finish. A eye catcher if you ask me. Your squares will need to be pretty close to dead on if you want a square board. A clear epoxy would be good as a top coat to smooth/seal and gaps and surface.

287003287002
 
Back
Top