Machining work bench

Hey Guys, so I finally got a decent tool box to hold my machining tooling...

Craftsman 41inch tool chest...
20201225_122524_resized.jpg
To house the tool chest I decided to build a nice sturdy metal work bench. It will be really nice have to have a bench near the Mill and lathe.

So the plan is to build a sturdy metal frame around the tool chest and then put a 1/4in steel top on it. This is just a work bench NOT a welding table, so a really thick top isn't required.

I'm also going to incorporate a system so that the bench can have wheels that raise/ lower if I want to move it.

Here's all the steel that will soon become a bench...

20201225_122601_resized.jpg

I used my mill to drill out holes in the front and back pieces of the frame.
20201226_133658_resized.jpg
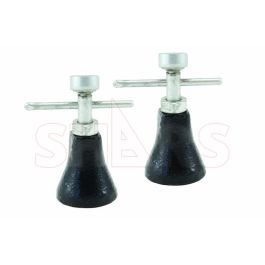
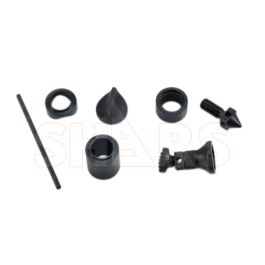
The holes on the bottom frame will be for leveing feet...
20201228_144046_resized.jpg
20201226_151315_resized.jpg
I cut to length some 3/4in steel round stock and pre-drilled to size the ID for threading.
20201226_152311_resized.jpg
Next the round stock was welded in place and threads cut through the whole 2.5in length...
20201228_144051_resized.jpg
20201226_171234_resized.jpg
pre-fit of leveling feet...
20201228_144217_resized.jpg
I used the same process for the top frame. The threaded holes in the top frame are to allow attachent points if the bench needs to be hoised in a truck etc... 1/2-13 bolts can be used.
20201227_145100_resized.jpg
Now that that was done it was time to start building the the frame for the top out of metal 2x2 and 2x4 (1/8 wall). Yhe dimensions for the top is 28in wide × 50in long.
20201227_135335_resized.jpg
20201227_163418_resized.jpg
20201227_163612_resized.jpg
20201227_165801_resized.jpg
20201227_171437_resized.jpg
20201228_170402_resized.jpg
20201229_165239_resized.jpg

Next up was to build the bottom frame that supports the tool chest...
20201229_161720_resized.jpg
I ran out of welding wire, so that's as far as I got for now.
 
Before I went any farther this evening, I decided to take a pause on the work bench and get the Mill cleaned up now that its part in the project was finished.

20210106_161954_resized.jpg

I proabbly could have got a lot more done today, if I didn't clean up the mill but I really like to keep my equipment is good shape now that its restored, plus walking on a crispy metal shaving covered floor around the mill isn't the best either.


Anyway once that was done, I got back to work on the bench.

I got the one side pretty much done minus bolting the casters on.
20210106_170614_resized.jpg20210106_170625_resized.jpg
20210106_170630_resized.jpg
I used my impact driver to test it and it raises and lowers perfectly. Takes about 2 seconds to put it up or down with the impact driver. The only catch is you need a decent sized 1/2in extension to reach the socket, but that's no big deal as I have lots. All in all I am very pleased with how it works. Now I just need to finish the other side and get the whole thing painted!
 
Looks great! If you wanted to forgo the need for the extension (it you end up moving it a lot) maybe weld a bar or tube between the jack and the socket?

Regarding machinist jacks... This Old Tony on youtube has at least one great video about making them. But mostly done on a lathe.
 
Looks great! If you wanted to forgo the need for the extension (it you end up moving it a lot) maybe weld a bar or tube between the jack and the socket?

Regarding machinist jacks... This Old Tony on youtube has at least one great video about making them. But mostly done on a lathe.
Thanks for the suggestion.

For sure I could do that if I find it becomes a problem but, I don't really think it will be to much of a bother to use a 8-10in extension. I have lots of long extensions and its not really any harder to grab a long extension than a short one.
 
Hey Guys, so I have done a bit of work on the bench since my last post.

I got the lowering mechnism on the second side finished and masked it off for paint.
20210109_112658_resized.jpg
I started painting the bench yesterday, but the paint gun quit working and despite my best efforts to clean it I couldn't get it working properly.

Anyway I went out and got another cheap paint gun yesterday but didn't have anymore time to paint...
20210110_141302_resized.jpg
So I picked up where I left off this afternoon and finished painting all the underside surfaces of the bench then flipped it up right at painted the rest of it.
20210110_161151_resized.jpg
20210110_161209_resized.jpg
The overall height came in at about 38.75 inches, so its a little on the tall side but certainly workable and in order to fit the chest I couldn't really go much shorter. Overall I'm very happy with how it has turned out given that i've not done much in the way of large welding projects like this before.

Next time when the paint's dry I'll wire wheel the top and get the casters installed. Then once I put the tool chest in, this thing will be done.
 
Hey Guys, I just had a few min to spend in the shop today. So I put the casters on...20210112_170824_resized.jpg
I used 5/16 nuts bolts and washers along with lock washers so they don't come loose.

I tested the lowering mechanism and it seems to work pretty well, its very quick and easy using and impact gun to raise and lower the casters
20210112_171456_resized.jpg

I did encounter one problem I hadn't anticipated when I designed this bench...There are a total on 8 pivot points on each on the sizor jacks, each of which is not exactly a tight fit. Which means when carrying the weight of a 400lbs bench over them there is a bit of play withing the jacks themselves. The play results when you push or pull on the front or back of the table and causes the table to tilt up or down when pushed on about 1/2in before the guide rails I installed stop the movement.

I was a bit concerned at first, but after pushing and pulling it around the shop even aggressively, I don't belive you could really tip it over sort of being totally reckless. However, you might have some things slide off if you left them on top of the bench. I determined if I only lower the castwrs to 'just' below the leveling feet they limit the tiliting to a very small amount, also pushing on the sides vs the front or back also prevents the tilting issue.

If I were to build this again I would either make my own sizor jacks with much more toleranced pivot points or use a phunematic bottle jack to raise and lower the casters, but I think for may purposes it will work just fine as it is.

All that's left now is to get the top cleaned up and put the tool chest in it.
 
Back
Top