That was option #1 in my original post.I would make a sleeve with one end slip fit over the existing pinion (existing handle removed, shear pin added) and the other end with square hole from a 3/4" drive socket welded into the sleeve.
No need to broach and you get a hardened square interface for the ratchet.

-
Welcome back Guest! Did you know you can mentor other members here at H-M? If not, please check out our Relaunch of Hobby Machinist Mentoring Program!
You are using an out of date browser. It may not display this or other websites correctly.
You should upgrade or use an alternative browser.
You should upgrade or use an alternative browser.
Making a ratchet mod to my arbor press
- Thread starter jmarkwolf
- Start date
Update from OP here:
I bought the material to start making my sleeve, but I can't get my mind past the idea that what I'm needing is simply a socket, with a 3/4in square hole in one end, and a cross hole in the side. Like the left side of the pic below.
Would it be possible/practical to turn the flats off the ID of a big a$$ impact socket to the dimension required to fit over the end of the arbor press pinion (1.69in dia in my case), then drill a cross hole in the side of the socket for the shear pin?
I know that impact sockets are not as hard as chrome, and a lesser quality socket such as those found at a "popular freight tool retailer" might be softer yet and easier to machine, but still be adequate for the intended final task?
It already has the 3/4in square hole in one end, and already has the bore for the most part. The only mods needed would be to turn the ID to finish dimension (turning off the flats) and drill the cross hole.
Granted, some carbide tooling may well be required. Anyone reading this ever done such an operation?
Attachments
Last edited:
- Joined
- Jan 20, 2018
- Messages
- 5,621
I've machined a few sockets, they're not that hard.I know that impact sockets are not as hard as chrome, and a lesser quality socket such as those found at a "popular freight tool retailer" might be easier to machine, but still be adequate for the intended final task?
It already has the 3/4in square hole in one end, and already has the bore for the most part. The only mods needed would be to turn the ID to finish dimension (knocking off the teeth) and drill the cross hole.
Granted, some carbide tooling may well be required. Anyone reading this ever done such an operation?
- Joined
- Dec 9, 2021
- Messages
- 729
Impact sockets are tough, but not hard, and often made of Molybdenum alloys. This is so they don't shatter from the impact. Hand-operated sockets are often harder, and are made of Vanadium alloys, which is similar to spring steel.
I have machined both types of sockets for projects. I have welded both types of sockets for projects. Unless you intend to abuse your press, either type of socket will work just fine. I would not worry about durability either type of socket square drive. Remember, impact sockets get hammered real hard!
I agree with the earlier post suggesting making a sleeve to slip over the shaft with a shear pin. Machine an impact socket to provide a square hole to weld into the open end of the sleeve. Don't use a long cheater pipe on the ratchet and everything will be fine. If you do use a cheater pipe, without a shear pin, the press may fail first.
Update from OP here:
I purchased a 3/4in drive, 6-point, 1-7/16 impact deep well socket at Tractor Supply Company. I selected that socket because the ID would need to be bored no more than to the points between the flats, presumably leaving plenty of wall thickness.
I was able to file it with a hand file to make sure the material wasn't too hard, I then attempted to bore the ID to a nominal 1.685in dia, with an "economical" carbide boring bar. The boring bar is a stout soldered carbide type from an economical set, the length being just right to reach the bottom of the deep well socket, but no further. It is held in a BXA tool holder on my 12x36 Grizzly G4003G.
All that happened was a lot of chirping and chattering with not much cutting. At one point I noticed the oil boiling off the carbide. I'm sure the interrupted cut isn't doing the cutter any good.
Re-grouping now.
Last edited:
- Joined
- Dec 9, 2021
- Messages
- 729
The internal hex may have been surface hardened for wear resistance. I haven't machined that part of a recently produced impact socket. All the ones I've used were made in the 20th Century.
Update from the OP here:
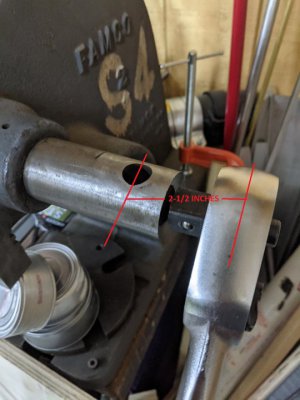
I may have to violate my own "prime directive" and modify my arbor press after all.
If I don't, the sleeve I'm currently fabricating will move the handle moment arm outboard approx 2-1/2in (see pic below). Plus, after all the work I've put in on the sleeve, I would hate to have to drill an off-center cross hole for the shear pin, while match drilling the existing original handle hole, like some have had to.
I think I'm likely to shorten the spindle to reduce the moment arm issue and to allow an on-center cross hole for the shear pin. Stay tuned campers.
Attachments
Last edited:
I'll apologize in advance if you have already covered this but how will you address the reversing feature of the ratchet? To explain, you set your ratchet for downward force. Now it's time to lift the ram. Are you going to change ratcheting direction at the bottom and top of each stroke? I ask this because I did the same modification but for a different reason. I wanted a torque wrench to monitor downward pressure. I ended up adding a pin on the outside face of my sleeve to backup the wrench so I wasn't constantly changing directions on the wrench. Worked great for the torque wrench but reduces a ratchet wrench back to a fixed bar.
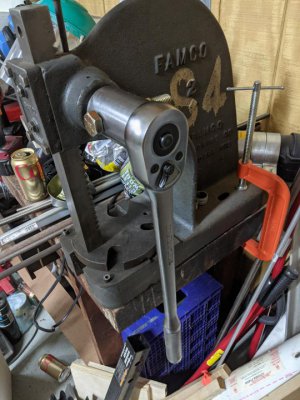
Update from OP here:
Sorry for the delay.
Project completed, except for replacing the 5/8in grade 8 bolt with a righteous shear pin and locating a handwheel for the other end of the spindle. Pics below.
Haven't had a project yet to really test it but I'm confident it won't disappoint. The 3/4in drive ratchet is probably overkill, 1/2in drive ratchet would probably worked fine as well.
The whole shooting match can be removed, and the original handle slid into the hole where the shear pin is currently located to restore original configuration if ever needed.
Eyerelief: To raise the ram there are a few options, 1. Reverse the ratchet action on the wrench and manually raise the ram by hand, 2. Reverse the ratchet action on the wrench and raise the ram with the handwheel. 3. Remove the ratchet wrench entirely (pops on and off easily with the black button on the wrench). The wrench provides 10degree resolution on the clocking angle vs the original 180degree resolution.