Milling an Accurate Circular Groove

Mike28303

Registered
Registered
Joined
Nov 26, 2016
Messages
21
Greetings Machinists,

I am trying to get a circular groove cut for a small mold I'm making (like for a lego brick). I use circular interpolation, but it comes out as an oval (out about .005”).

How would I achieve an accurate circular groove?

Here is a picture of the CAD model:
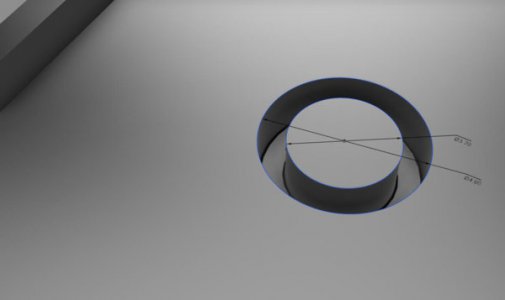
Example_Question_Groove.jpg

Details:
  • .8 mm wide groove
  • 1.6 mm deep
  • OD: 4.8 mm
  • ID: 3.2 mm
-or-
  • .0315” wide groove
  • .063” deep
  • OD: .189”
  • ID: .126”

Tools:
  • Aluminum 6061
  • Taig CNC Mill with Ballscrews
I am a novice machinist - any advice would be appreciated!

- Mike
 
Last edited:
If this is a mold? Make it out of two pieces on the lathe. The one piece will have a 4.8mm hole in it. The other piece will have a 4.8mm OD with a 3.2mm step by 1.6mm long…Good Luck, Dave.
 
You probably have some backlash. About the only way, if you can't comp for the backlash is to set up a boring head and skim it after you interpolate the circle leaving a few thousandths in it. Is the post also out of round? And have you swept it with an indicator to see the true shape?
 
If this is a mold? Make it out of two pieces on the lathe. The one piece will have a 4.8mm hole in it. The other piece will have a 4.8mm OD with a 3.2mm step by 1.6mm long…Good Luck, Dave.

Dave, I'm afraid I do not understand. I'm using my CNC Mill to cut a groove that's part of the detail on an injection mold cavity. Thank you for trying to help.

You probably have some backlash. About the only way, if you can't comp for the backlash is to set up a boring head and skim it after you interpolate the circle leaving a few thousandths in it. Is the post also out of round? And have you swept it with an indicator to see the true shape?

I was told that this machine has no (or less than .001") backlash as a result of the ballscrews, so I had ruled that out as an issue. In a few days I'll check for backlash in the X and Y, as I don't believe I've checked since I first set it up (about 2 months ago). When I first tuned it with the dial indicator, it had no backlash (at least nothing my indicator could read).

It had crossed my mind that a boring tool might be part of the solution, but I'm not sure where I would find one capable of doing this small of a circle. Does anyone know where I could purchase one?

Yes, the inner diameter post is out of round as well. I measured it with a caliper.

Interpolating accurate circles (sub .005") is a difficult task on a mill. Where I currently work there are 4 Bridgeport 2 axis knee mills, an AccuTrak bed mill, a Fadal 4020 and a Haas TM1, none of which will mill a circle within .002".

Have someone do a ball bar test on the machine if you are concerned.

Wow, If a mill could do it, I would have thought one of those definitely could. You said it is difficult - how would you go about milling a perfect circle?
 
My mill consistently interpolates circles 0.001 out of round with the maximum error on the 130/310 degree line. If I need high accuracy, I have to bore. Having said that I know there is a bit of backlash in my Y axis, but I do have 1 micron scales on the machine table so that compensates for most of the backlash. I have never actually tried to interpolate an accurate arc that small on my machine.

The error could be generated from a lot of places. Axis backlash is the first place to look, then maybe encoder instability or resolution. That's a pretty small arc, so G-code generation errors, or the controller making rounding errors in the trig are a distinct possibility.

Are you cutting the arc with a G2 or G3? Or is it converting arcs to lines?

One thing to try is to make several ''finishing'' passes and see if part of the problem is tool deflection.

As far as a boring bar, since you have a very shallow bore, you could grind a trepanning tool that would go in your boring head and just single point the circle.
 
Last edited:
I would think that Kaiser, maker of ThinBit would have some micro bars that would do it. Trepan style is what I had in mind. Also it seems Harvey tool has a lot of smaller tooling.
But you could easily grind your own starting with a round carbide blank of the correct diameter. Cross grind it to just a hair below centerline and back only far enough to get the required depth. A slight back rake would give a little side clearance. Or if this is in a soft material HSS would do it as well. Of course, it would take a bit of trial and error to hit the diameter you need, but might be worth it.
 
I would think that Kaiser, maker of ThinBit.

Kaiser makes excellent tools, used a ThinBit today for retaining ring grooves, .o40" wide grooving insert will break if you look at it wrong but this is the nature of such a tool.
I highly recommend them.

Tomorrow I have to do a dovetail O-Ring face groove and will employ a ThinBit tool as they work a charm for this application.
 
Dave, I'm afraid I do not understand. I'm using my CNC Mill to cut a groove that's part of the detail on an injection mold cavity. Thank you for trying to help.


Wow, If a mill could do it, I would have thought one of those definitely could. You said it is difficult - how would you go about milling a perfect circle?

As mentioned a boring head, or a very high end mill.

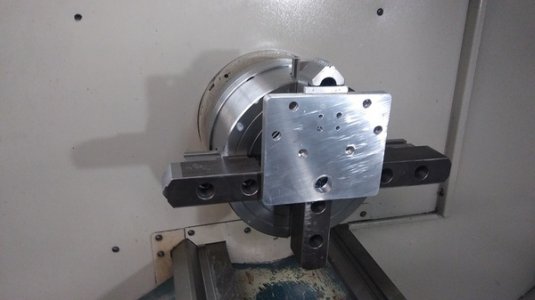
A lathe works but is often a lengthy set up. I often finish bearing bores with a lathe after the part has been in a 3 axis mill that will not make a hole within the set dimensional tolerances.

Like so
i-xpNKXGw.jpg

Also, with a groove that small how are you measuring it?

i-xpNKXGw.jpg

i-xpNKXGw.jpg

i-xpNKXGw.jpg

i-xpNKXGw.jpg

i-xpNKXGw.jpg
 
Last edited:
I appreciate everybody's help!

Are you cutting the arc with a G2 or G3? Or is it converting arcs to lines?

I used Fusion 360's CAM to generate my g-code - I went back and looked at the g-code I used for the groove, and it appears I had the 'repeat finish pass' selected in the program! It first did a conventional pass leaving no stock (G2) then climb-milled the spring pass (G3).

Once I'm done with my other project, I'm planning on doing several tests just trying to nail this circle. I'll check for backlash, and encoder instability or resolution (the latter being something I've never even considered!).

you could easily grind your own starting with a round carbide blank of the correct diameter.

That's a very good idea. I'll take a look at Thinbit, but I have a feeling that grinding my own tool from a blank would be better budget-wise, although there is the learning curve. If I do, I'll likely go with HSS since I'm always milling 6061.

A lathe works but is often a lengthy set up.

Wow, that does look like a challenge! I think I'll lean towards the boring bar for ease of setup, if I can't get my machine to CNC it.

As for how I measured the groove, I used the inside jaws of a caliper. I realize it's not the best tool for this. An inside micrometer would certainly be ideal.
 
Last edited:
Back
Top