Models for grinding HSS Lathe Tools

View attachment 247609
I am beginning to think this is of extraterrestrial origin...
Robert

EDIT:

Found this-
According to the Techstreet Store:
"Rex 49 is a high-speed tool steel designed to give much
longer life in machining difficult to cut materials such as
highly alloyed steels, stainless steels, superalloys and
titanium. Rex 49 heat treated to 67/69 Rockwell C makes
it outstanding for difficult machining operations."

"After much research, REX 49 chemical analysis % was
found within the pages of a declassified Federal Document:
Carbon - 1.10
Manganese - 0.45
Silicon - 0.30
Chrome - 4.25
Tungsten - 6.75
Molybdenum - 3.75
Vanadium - 2.0
Cobalt - 5.0"

Personally, I believe Crucible/Rex had a contract with the Federal Government that allowed them to reverse engineer materials from the fragments of crashed alien spacecraft.
R

Robert, I just saw your edit. Rex 49 has a fair amount of Molybenum compared to most HSS but the composition is not that different from other tool bits. It should tolerate more red heat, though. I honestly don't know why it would be such a bear to grind unless its the increased carbon. T15 has increased carbon and it can be tough to grind, too, so maybe that's it. Still, I should think a ceramic belt should handle it. Please let us know how your ceramic belts work on this one.
 
Wow this thread really kicked off. Is there a pic with all the models included? I forgot I actually had this great book on lathe tooling and function.
I highly recommend this book for anyone getting into lathes. It has numerous ways to ground tool bits for the lathes and some very good educational material for threads and other things. Great book for referencing.
View attachment 247547
Here's the pdf version(I hope it is alright to post these 2 links):

http://vintagemachinery.org/pubs/1617/3789.pdf
or this one:
http://campkahler.com/files/How_to_Run_a_Lathe_SB_1of2.pdf
 
I was having issues with keeping my tool bit sharp. I would grind it through several belt grits, up to 240 grit, then use a hone to finish it. It would cut great for a for short while, just a few passes and then I would have to hone it again. I was starting to think I must have over heated the HSS bit during grinding or something to lessen the hardness. However, yesterday I grabbed a piece of 2" diameter mild steel that I bought from a machine shop and turned that on the lathe and bored it for some collars I was making. I couldn't believe how nicely the tool cut and the great finish it left. I could take deep cuts and really fine ones of 0.001" and leave a great finish. Plus the tool stayed sharp. I believe I have discovered the problem. It was not the cutting tool or my grind, it was the unknown scrap yard steel. Some of the stuff I tried to mill recently would just kill my HSS end mills after only milling a few square inches.

I took the same grind principle to my HSS fly cutter and after using similar grind angles, the thing cut awesome. I was having issues with mill scale dulling my HSS end mills but with the fly cutter grind I used, the tip would get under the mill scale and just chip it away, leaving a really nice finish. It also stayed sharp for a long time.

Thanks to this thread and Mike's efforts I am starting to understand how to grind a better cutter.

Thanks Mike!!!!!
 
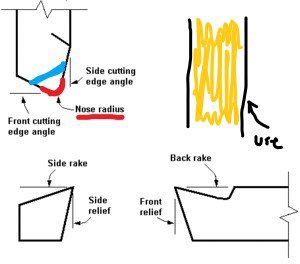
To all of you grinding these lathe bits, I highly recommend grinding a chip breaker on the top. I was introduced this concept this year and it works amazing. No more tangling up of long stringy chips or any chips building on tool. They just go on top of the chip breaker and fall right down into chip pan. It's made a huge difference for me.

I've uploaded a picture showing what I mean.
In the red outline, use a stone or grinder to make the end of the tool rounded.
In the blue outline, use the side of a bench grinder to make a slot on top of the tool.
The yellow box is supposed to be a pedestal grinder wheel. Use where the side meets the front edge to do the chip breaker.
Looking at this image, the cutting tool is like you're looking straight down on it from above.

119088-c2ea37123630a29152643e37de48d577.jpg
 
I was having issues with keeping my tool bit sharp. I would grind it through several belt grits, up to 240 grit, then use a hone to finish it. It would cut great for a for short while, just a few passes and then I would have to hone it again. I was starting to think I must have over heated the HSS bit during grinding or something to lessen the hardness. However, yesterday I grabbed a piece of 2" diameter mild steel that I bought from a machine shop and turned that on the lathe and bored it for some collars I was making. I couldn't believe how nicely the tool cut and the great finish it left. I could take deep cuts and really fine ones of 0.001" and leave a great finish. Plus the tool stayed sharp. I believe I have discovered the problem. It was not the cutting tool or my grind, it was the unknown scrap yard steel. Some of the stuff I tried to mill recently would just kill my HSS end mills after only milling a few square inches.

I took the same grind principle to my HSS fly cutter and after using similar grind angles, the thing cut awesome. I was having issues with mill scale dulling my HSS end mills but with the fly cutter grind I used, the tip would get under the mill scale and just chip it away, leaving a really nice finish. It also stayed sharp for a long time.

Thanks to this thread and Mike's efforts I am starting to understand how to grind a better cutter.

Thanks Mike!!!!!

I recall telling you that if the edge wasn't holding up that maybe it wasn't sharp to begin with. I was clearly wrong, HB, and I apologize to you. I didn't realize you were working with No-can-cutium!

At least for the more common stuff we cut, your tools seem to be working well for you and that is awesome. Now I would encourage you to experiment and teach yourself how to alter your tool angles to work with different materials because that is where the magic lies. If you think your square tool works well with mild steel or aluminum or stainless steel, wait until you work with a tool with angles that are optimized for those materials.
 
To all of you grinding these lathe bits, I highly recommend grinding a chip breaker on the top. I was introduced this concept this year and it works amazing. No more tangling up of long stringy chips or any chips building on tool. They just go on top of the chip breaker and fall right down into chip pan. It's made a huge difference for me.

I've uploaded a picture showing what I mean.
In the red outline, use a stone or grinder to make the end of the tool rounded.
In the blue outline, use the side of a bench grinder to make a slot on top of the tool.
The yellow box is supposed to be a pedestal grinder wheel. Use where the side meets the front edge to do the chip breaker.
Looking at this image, the cutting tool is like you're looking straight down on it from above.

View attachment 247736

Thanks, Justin.

Guys, let us know how this works for you.
 
I recall telling you that if the edge wasn't holding up that maybe it wasn't sharp to begin with. I was clearly wrong, HB, and I apologize to you. I didn't realize you were working with No-can-cutium!

At least for the more common stuff we cut, your tools seem to be working well for you and that is awesome. Now I would encourage you to experiment and teach yourself how to alter your tool angles to work with different materials because that is where the magic lies. If you think your square tool works well with mild steel or aluminum or stainless steel, wait until you work with a tool with angles that are optimized for those materials.

Being inexperienced I had no idea that the type of steel had that much influence on how it machined. I figured if I could file it then it must be soft enough to machine with regular cutting tools. There's a machinist salesman at the tool store where I get most of my stuff and I described what was happening and he quickly straightened me out. I guess I should have just pointed out ALL the information involved in what I was doing and using.

Edit: Mike, as I recall at the beginning of this thread you said it took you 15 years to figure this out (or something like that - memories not what it used to be). I've been at this part time for about 2 years now and I have only just ground my first good HSS tool bit and only because of this thread. I doubt I will ever get to a point where I will experiment with different angles for different materials (especially when I don't even know what the material is) lol. Too many variables: cutting speeds, DOC, feed rates, front clearance, back rake, etc. and then throw in some unknown steel and a rookie. But at least now I am not totally ignorant about proper grinding angles and the need for the edge to be honed. It's all part of the learning experience.
 
Last edited:
  • Like
Reactions: Z2V
That's the issue with buying scrap material; we don't know what we're working with. I tried to cut an old axle from some vehicle once and burned up a HSS tool, then I burned up a carbide insert and then I cut it with a brazed carbide tool but the finish was really ugly. That stuff went in the bin.
 
That's the issue with buying scrap material; we don't know what we're working with. I tried to cut an old axle from some vehicle once and burned up a HSS tool, then I burned up a carbide insert and then I cut it with a brazed carbide tool but the finish was really ugly. That stuff went in the bin.

That's hilarious ... I have an axle in my steel bin and thought it was an awesome score because I got it for free. Maybe it will be a great score .......... but it doesn't look promising after your comments. Sometimes the mystery stuff works out and other times not so much, lol.
 
Edit: Mike, as I recall at the beginning of this thread you said it took you 15 years to figure this out (or something like that - memories not what it used to be). I've been at this part time for about 2 years now and I have only just ground my first good HSS tool bit and only because of this thread. I doubt I will ever get to a point where I will experiment with different angles for different materials (especially when I don't even know what the material is) lol. Too many variables: cutting speeds, DOC, feed rates, front clearance, back rake, etc. and then throw in some unknown steel and a rookie. But at least now I am not totally ignorant about proper grinding angles and the need for the edge to be honed. It's all part of the learning experience.

You're right, and I do realize that messing with tool geometry is not something everyone wants to do. I just wanted to say that if you should decide to try it one day, I've given you what I know about it so you can do it.

Let me give you one tool I think will be useful to you. It is my aluminum tool; since we hobby guys turn a lot of that material it might come in handy. This tool will make a square tool look crappy when turning aluminum.
  • Shape: general purpose
  • Relief angles: 15 degrees for side and end
  • Side Rake: 18 degrees
  • Back Rake: 40 degrees
  • Nose Radius: 1/32"
This thread has allowed us to communicate in the shorthand given above and you should be able to reproduce my aluminum tool with ease. This tool will cut deeper, finish finer and if you get the feed right, it will produce chips instead of stringers on your roughing cuts. It will clear chips so well that you won't have any chip welding (BUE = built up edge) and it will take an extremely fine cut so coming in on size is simple.

Try this tool, your first material-specific tool, and you'll see why our square tool is just the beginning.
 
Back
Top