Models for grinding HSS Lathe Tools

Hillbilly,

Don't be surprised that sometimes same material from the same supplier may not cut the same.

One time I had a couple of 416R barrel blanks shipped to me in the same box, one would chip, and the other would string on the same set up.
 
You're right, and I do realize that messing with tool geometry is not something everyone wants to do. I just wanted to say that if you should decide to try it one day, I've given you what I know about it so you can do it.

Let me give you one tool I think will be useful to you. It is my aluminum tool; since we hobby guys turn a lot of that material it might come in handy. This tool will make a square tool look crappy when turning aluminum.
  • Shape: general purpose
  • Relief angles: 15 degrees for side and end
  • Side Rake: 18 degrees
  • Back Rake: 40 degrees
  • Nose Radius: 1/32"
This thread has allowed us to communicate in the shorthand given above and you should be able to reproduce my aluminum tool with ease. This tool will cut deeper, finish finer and if you get the feed right, it will produce chips instead of stringers on your roughing cuts. It will clear chips so well that you won't have any chip welding (BUE = built up edge) and it will take an extremely fine cut so coming in on size is simple.

Try this tool, your first material-specific tool, and you'll see why our square tool is just the beginning.

WOW that's a LOT of back rake. I'll be sure to use this the next time I turn aluminum, although that could be a while. In the 2 years I've been playing around in this hobby, I've only turned aluminum 2 or 3 times. Pretty much everything I do is with mystery steel. I do remember getting BEU when I did turn some Al and if I recall right it was hard to get off the tool.
 
WOW that's a LOT of back rake. I'll be sure to use this the next time I turn aluminum, although that could be a while. In the 2 years I've been playing around in this hobby, I've only turned aluminum 2 or 3 times. Pretty much everything I do is with mystery steel. I do remember getting BEU when I did turn some Al and if I recall right it was hard to get off the tool.

Do yourself a favor and grind this tool, guys. 40 degrees may seem like a lot compared to other tools but the standard angle tables call for 35 degrees and 40 degrees is just a bit more. That little bit more does several things:

1) it puts the cutting forces at the very tip of the tool so it finishes really nicely. This is why the nose radius is what it is. Visualize the top plane of the tool: you have side rake and back rake tilting the cutting surface to the side and back, and the nose radius is accordingly tilted off the the right. With the increased relief angles minimizing contact, the contact point of the tool is almost like a shear tool except it is round, not a straight line, so it is not limited in its depth of cut. If you cannot get a mirror finish with this tool then you didn't hone it right.

2) it greatly accelerates and thins the chip. Coupled with the increased side rake, chip velocity is significantly increased. This pulls a lot of heat out of the cut and this eliminates chip welding on the tool; I have yet to have a BUE on this tool, even in gummy hardware store aluminum, and this is especially true if I lube the cut. Take a big cut and then feel the stock; it will be cool.

3) this tool has increased relief angles, increased side rake and increased back rake. It cuts with the lowest cutting force of all my tools. It will take a 0.250" deep cut (0.500" reduction in diameter) on my 11" lathe without effort and it will produce chips, not stringers, if I feed fast enough. And it will take a 0.0005" finish cut with minimal deflection. In aluminum, it is the most accurate tool I have.

The geometry of this tool took about 6 months of trial and error to be finalized. I suspect I went through about 6 feet of 6061 in the process. You might be able to improve on this tool in your trials but I can't. It is as good an aluminum cutting tool as I can make.
 
Any tips on grinding P3 part off blades? How are they kept sharp? How are they prepared for use?
 
Any tips on grinding P3 part off blades? How are they kept sharp? How are they prepared for use?

I use a 7 degree clearance angle up front, ground square across the nose. Then very lightly deburr the top flat and you're ready to cut. I flatten the top every few months or so and maybe freshen the grind about once a year. Cuts fine for me.
 
Some followup: I got several of the ceramic belts listed earlier and they were able to cut the Rex alien alloy much quicker. I have another suggestion: for the rough in try a hand held angle grinder to remove the bulk material then finish the surfaces on the belt grinder. It will save wear on the belt and is especially helpful for large angles (40Deg back rake.)
Unfortunately, I ground the aluminum knife tool and I am less than impressed with the results. I used a 15 deg side relief angle, a 15 deg nose relief angle, a 15 deg rake and a 40 deg back rake angle. That much back rake looks weird. I tried to grind a small radius on the end with a stone. The finish the tool leaves is very poor. I may need a larger radius at the tip.
I have a question about grinding that. If the side and end relief angles are each 15 deg, then the relief angle at the middle of the tip is actually greater than 15 deg. In other words if you set the grinder table at 15 deg and grind a radius you will actually be making the relief angle smaller. Is that what I should be doing?
Robert

Well, at least we know the ceramic belts will cut alien steel. Thanks for the follow up.

I don't use the aluminum tool angles for knife tools. I use them on a general purpose tool; finishes incredibly well for me. A knife tool doesn't have the right lead angle for general and finish work and it will leave spirals in the finish. Try grinding a general purpose shape and see what happens.

As for the nose radius, you have the side and end relief angles intersecting with the side and back rake angles - a complex shape made up of three planes that connect at the tip. Controlling the grind of the nose radius with a belt or wheel is difficult and it is really easy to alter the angle of the interstection of the relief and rake angles, so I form the radius on with a diamond stone. This allows you to use the front of the tool, where the side and end relief angles meet up front, to guide the angle of your stone.

This becomes really important on an aluminum cutting tool that has large back rake angles because the back rake focuses all the cutting forces at the tip of the tool. You are correct in that this narrows the cutting/contact area at the very tip and this is why I use a larger than normal 1/32" nose radius on this tool.

Robert, try grinding a general purpose shape instead of a knife tool and put a 1/32" radius on it. The tool will cut well for you.
 
Hello Mike
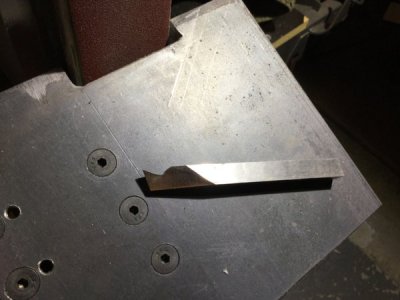
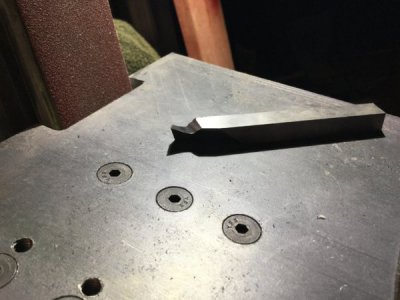
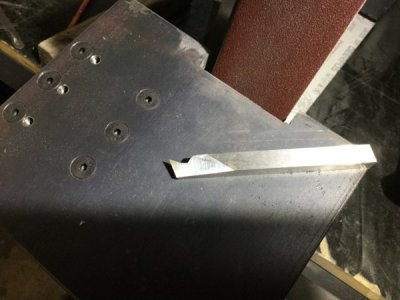
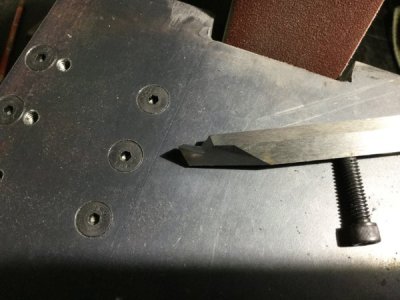
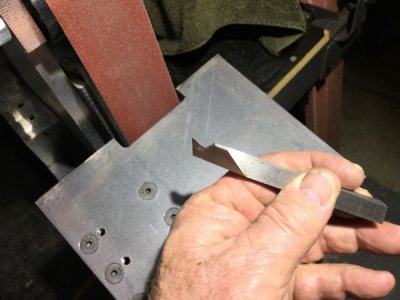
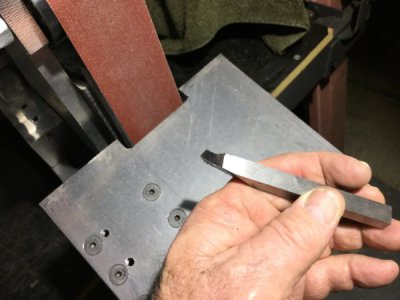
Do these pics accurately represent your general tool for aluminum?
I have not honed it yet or put nose radius on it. Just hoping I’m on the right track with the angles. I set table at 15* and made the side and end cut angles then put table at 18* and marked table on the side at 40* and ground that to what you see in the pics.
I will say for sure I will not be using a bench grinder to grind tools any more. I got the belt grinder up and running, WOW, what a difference!!
AFB07BDE-06EA-4C4A-B89E-09D43DC8F3F4.jpegD717FDC7-E576-4E73-90B4-628E9B4F8707.jpegF33184FE-8F29-48F3-9E24-319EACC3ECD7.jpeg4D9ED9F8-21A5-45A0-B41A-F89111E1D4C8.jpeg672F8625-8F23-4140-B2A5-1A761B5FB595.jpeg7C0CB749-8C6F-4B3A-B4F8-0E88DA82218F.jpeg
 
At this point, I realize I’m doing a complete brain dump on tool grinding. By the time I’m done with this you guys will know what I know about the subject. Some of you may be wondering what brought this on.

I suddenly lost my best friend a few years ago and it broke my heart. We were supposed to grow old together, going fishing and telling each other lies. He was a master cabinetmaker with so much to give, so much to teach but he never got the chance. Now I realize that none of us knows how much time we have; I’m not that old yet but my friend was 12 days younger than me so you never know. So I am passing on the information I have while I have the chance. I truly do appreciate the HM community and I cannot think of a better bunch of guys to pass this stuff to. If it helps you then I’ll be happy but I also hope it makes my friend happy to know that I did what he could not.

Thank you for sharing your knowledge and experience. I am a newbie and recently discovered this site. I have been reading and enjoying this thread from the beginning. Your friend would be proud of you and the legacy that you leave behind across the globe with the WWW.
Bob C
Hammond, ON Canada
 
Hello Mike
Do these pics accurately represent your general tool for aluminum?
I have not honed it yet or put nose radius on it. Just hoping I’m on the right track with the angles. I set table at 15* and made the side and end cut angles then put table at 18* and marked table on the side at 40* and ground that to what you see in the pics.
I will say for sure I will not be using a bench grinder to grind tools any more. I got the belt grinder up and running, WOW, what a difference!!
View attachment 248717View attachment 248718View attachment 248719View attachment 248720View attachment 248721View attachment 248722

Looks really good, Jeff. Take a look at the tip and you'll see that the tip is comprised of the three planes I mentioned above. You can see that the tip is at rather a significant angle. The somewhat smaller nose radius I prefer will be too small on this tool because of that angle; a slightly larger radius works better. Give the tool a try and let us know what you think.

You've discovered the same thing I did many years ago. A belt sander is a much better lathe tool grinder than a bench grinder. If more guys tried this on a well configured belt sander there would be far more of us than there are.
 
  • Like
Reactions: Z2V
Back
Top