Motor leads numbered wrong maybe?

JimDawson

Global Moderator
Staff member
H-M Lifetime Diamond Member
Joined
Feb 8, 2014
Messages
11,144
I fired up our new (to us) press brake and the motor overload tripped out after a time. OK, grab the amprobe and check the current draw on the legs: 10, 10, 5. Well that's not good. FLA motor current is about 16 Amps so 10 is about right for idle current. But the low leg is very weird.

4KW (5.5HP), 9 lead, Y connected (confirmed), 220/440 volt. Metric frame, made in France. Circa 1976

The motor lead numbering is not original, have been re-tagged. There is no wiring diagram on the motor or in the electrical documentation for the machine.

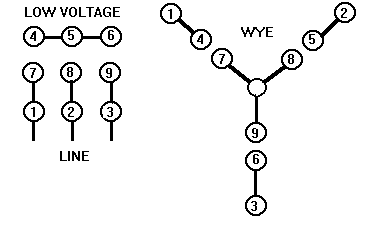
Here are the current connections in the motor box. Keep in mind this is a 9 lead motor, leads 1, 5, and 9 do not exist
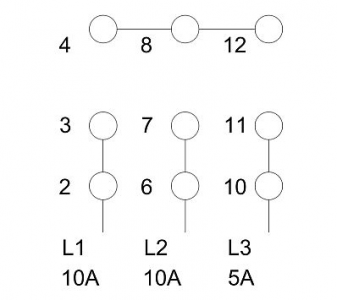
1588257176890.png

It should look like this
1588257684737.png

I suspect one of the pairs have the polarity reversed. I need to go through the excersize of re-mapping the windings.

Stay tuned.......,.
 
Last edited:
Maybe two of the pairs are actually swapped- and the 5 is the good one?
Just thinking out loud here
-Mark
 
No Joy :bawling:

Remapped the motor leads and now it won't run at all. Just trips the overload in a couple of seconds.

Going to do a bit more checking.

Stay tuned......
 
OK, I decided to check voltages.

Input power to the top of the disconnect: OK
Close the panel disconnect
Check at the top of the fuses, L1-L2 OK, L3 to anything = 0 WTH? :confused 3:
No power getting through the disconnect from L3.
Powered down the input power

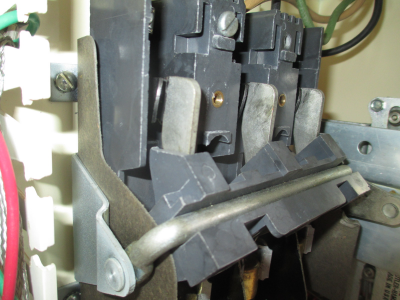
Pulled the cover off of the knives and found this, this disconnect is closed (on) You can see that the L3 knife is not even making contact, the other two are sorta making contact. I'm surprised the contacts are not burnt to a crisp. If you pushed up hard on the disconnect handle, you could get it to engage, but nowhere near as it should be.

1588295039403.png

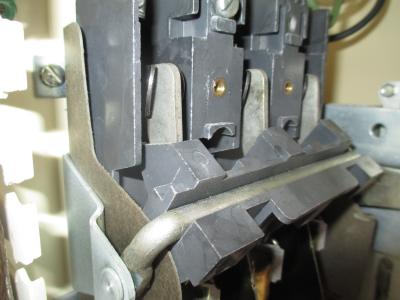
This is what is should look like when it's closed, the knives should be well into the contacts.
1588295298491.png

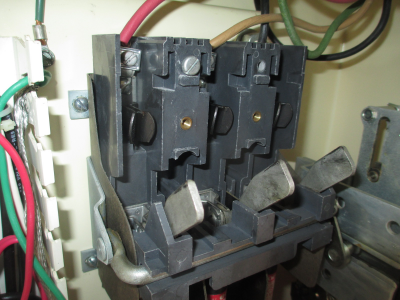
This is what it looks like when it's open, you can see by the wear marks that this was never closed properly, there should be wear marks at least halfway across the knives. I'm surprised that it ever worked at all.

1588295404911.png

The manufacturer installed the panel actuator too low or the disconnect too high, in either case they blew it on this one. It most likely worked when the system was new, but wear over time put it out far enough that it could no longer work.

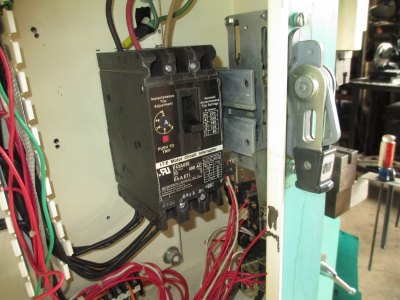
And I found one of the main fuses blown. They were 12 amp fuses, and the motor FLA is about 16. That's not going to work well. So I just ripped out the disconnect system and replaced it with a disconnect breaker I've had on the shelf since '94. I have a lot of stuff on the shelf. :grin:

1588295987401.png

Now I just need to make an actuator arm to operate the breaker from the manual operator on the panel. That plate with the slot in it is what moves up & down to actuate whatever disconnect you want to use. I just need to make a fork that will attach to the plate.

Using that breaker, I have power all the way down to the motor. I haven't tried to fire up the motor again. That's a job for tomorrow.

I did recheck the motor lead mapping that I did, it seems to be correct. I'll connect the motor again in the morning and see if the disconnect improvements have any effect.

For those of you who are interested, here is a YouTube video of how to find Y connected, 3 phase motor numbering, just in case you ever have a motor without the leads identified.


EDIT: This is the pertinent information from the above video. This is meaningless without watching the video to understand the procedure.

Identify Motor Leads Y Connected 9 Wire

find 1-4 flash 8-9, look for minimum deflection
find 3-6 flash 7-8, look for minimum deflection
find 2-5 flash 7-9, look for minimum deflection
Identify 1-4 Neg to 7 Flash 9 with Pos, Pos deflection with 1 connect to meter Pos
Identify 3-6 Neg to 9 Flash 8 with Pos, Pos deflection with 3 connected to meter Pos
Identify 2-5 Neg to 8 Flash 7 with Pos, Pos deflection with 2 connected to meter Pos

EDIT: I'M NOT SURE THE ABOVE IS CORRECT AND I AM GOING TO CONFIRM IT WITH A KNOWN MOTOR

More later.......
 
Last edited:
I remapped the motor leads using the procedure above, and instantly tripped the breaker. :mad: Either I am an idiot, the above procedure does not work, or that French motor is internally wired differently than any 3 phase, 9 wire, Y connected motor I have come across.

So I took the motor to the motor shop on Friday and told them to make it go. They will tear into to it bring all the leads out, identify them, renumber them, and test run. At that point they'll try to find the original problem of the low current draw on one leg. I expect to have the motor back mid-week. I'll see what they find.
 
sheesh, what an ordeal Jim. French stuff is often weird- I used to work for a French guy- always overly complicated ideas LOL
 
An update. We got the motor back from the motor shop today. They said it checked out fine and they identified the leads properly. It is now standard 9 lead numbering. I'm still not sure if I had it correct or not, and no way to know for sure. I need to confirm the procedure I used above.

But..........

I installed it, turned it on, and INSTANTLY TRIPPED THE BREAKER (80 amp) again. :bang head:

OK, time for a break...... Need to think this through............ :tranquility: OK, break is over. The breaker is not a normal thermal breaker it is an instantaneous magnetic trip motor circuit protector. Perfectly applied for the application, but not perfectly adjusted. It has 5 settings from 80 to 270 amps. (see picture above) So my thinking was that 80 amps would be about right for a 16 amp motor...... Well, I would be WRONG. :cautious: Time for Mr. Google , a search for the device turned up a spec sheet that gives the amp settings for various motor amp draws. It turns out that for a 16 amp motor the correct setting is 3 (180 amps) o_O

OK, so the motor is now running. Checked the voltages, 232 to 237 between the 3 legs. Acceptable. Checked the current on the 3 legs, 10, 10, 5 :confused 3: right back to where I started :mad:

And to top it all off, the thermal overload is too small for operation on 230V so after about 10 minutes it trips out. This was the original problem that caused me to dive into this in the first place, so I have come full circle and am right back where I started, minus the $181 that the motor shop charged. :faint: I'll be ordering a new contactor and overload in the next order to Automation Direct, that will be about Monday.

Factors that caused some confusion:
  • The fuses in the original disconnect were 12 amp, which would be correct for 460V operation.
  • The non-standard motor lead numbering caused considerable confusion.
  • Low amp draw on one leg
  • Intermittent power through the disconnect.
  • Overload tripping out after a few minutes of running.

So the conclusions and some conjecture on my part:
  • This machine was never run in production on 230V, was factory wired for 460V
  • It was rewired for 230V at the machine tool dealer for a quick check out.
  • The motor was probably OK from the get go.
  • The contactor and overload were sized for 460V, not for the higher current of 230V operation
  • The panel disconnect was installed incorrectly, thus causing confusion as well as an actual problem.
  • The low amp draw is on the manufactured leg from the RPC. The low reading is most likely because of the skewed power factor on that leg.
What could I have done differently to get a better (and less expensive) outcome? I should have stepped back and thought this through rather than going into panic mode because we needed the machine RIGHT NOW. There were actually three separate problems and I was only looking for one. Had I looked at the system as a whole and not concentrated just on the motor I would have come to the conclusions above and had the problem(s) solved.

This was a challenging troubleshooting excersize, but it could have been done better had I not jumped to a (wrong) conclusion. :frown:
 
I should have stepped back and thought this through rather than going into panic mode because we needed the machine RIGHT NOW. There were actually three separate problems and I was only looking for one. Had I looked at the system as a whole and not concentrated just on the motor I would have come to the conclusions above and had the problem(s) solved.
this is the hardest lesson to learn in troubleshooting ANYTHING.
very rarely is there a single source of failure
 
It's easy to forget when troubleshooting that there may be more than one problem at hand. ESPECIALLY when working on something that's been modified or worked on by someone else;)

Sounds like you've got it figured out and I'm sure your local motor shop was happy to get a little business right about now. These guys are so often unseen and underappreciated until their business goes UNDER....

john
 
I'm still back on the first post trying to figure out what's going on...
:sherlock:
 
Back
Top