Hmm, I'll take a shot at this. Luckily, this is a simple routine job for us hobby guys.
There are two general approaches to mounting a chuck on a back plate. One is to make the registration snout on the back plate a light (0.0005 - 0.001") press fit into the female recess in back of the chuck. This ensures that the chuck cannot move under load but also requires you to accept the fact that you cannot adjust the accuracy of the chuck once it is locked onto the back plate. Since you are mounting a 4 jaw independent, this is fine. The second approach is to machine the snout 0.002-0.004" undersize so that the chuck can be shifted around on the back plate once it is mounted to accurize it; this is a better approach when mounting a 3 jaw. Either approach will work.
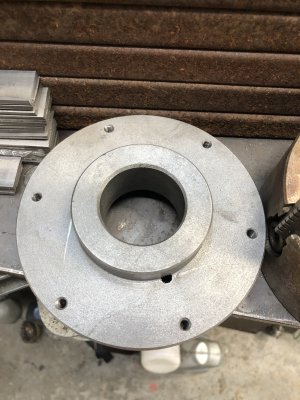
Be sure to measure the diameters of the back plate snout and the chuck recess carefully and write them down, along with the target dimensions of the snout that you choose to go with. Also measure the depth of the chuck recess so you know if the snout has to be cut down.
I am going to do this with bullets, okay?
- I assume that is a cast iron backing plate; looks like it anyways. If so, know that cast iron contains a lot of graphite and that will easily cause wear if it gets under the saddle or anywhere it doesn't belong so before you do anything else, cover your lathe. Wad up some paper towels or take an old rag and plug up your spindle bore; chips will otherwise migrate back to your gears and you will be unhappy. I suggest plastic painters tarps to cover the rest of the lathe, then take a wet towel and lay it under the chuck area to catch hot chips. Cover your cross slide and just leave your tool post sticking out so you can work. Cover any nearby machine with tarps because dust and chips will go there, too. After you are done with your back plate, carefully remove all this stuff and clean your lathe completely.
- Examine and clean the spindle mount of all dirt, debris and oil. Be sure there are no burrs anywhere, then put a very light coat of oil on the spindle. This just duplicates the condition things are in whenever you mount a chuck.
- Do the same thing for the back plate - be especially careful to remove any burrs and cosmoline. You are looking for a precision fit of the plate to the spindle. Now mount the plate on the spindle and lock it down evenly with the three locking cams.
- The first thing you will do is to take a light facing cut across the plate, from the base of the snout on out. Make enough passes to ensure you faced across the entire surface. What this does is give you an accurate registration surface that should be as accurate as the spindle mount allows. Assuming your headstock is aligned with the ways, run out on this surface should be zero. If you do check it, be sure to indicate the surface in front of AND behind the spindle. The front will always be zero but the back may not; if it is not then your headstock is not aligned with the ways and needs to be adjusted before proceeding.
- Now you can machine the snout. I suggest you first face the snout and bring it to the dimensions you need so it does not bottom out in the chuck recess. Then machine the OD so it fits the chuck recess with the dimensions you chose. Keep in mind that if you are using an inserted carbide tool for this job then you cannot take really light cuts. At minimum, you need to take a depth of cut no less than 1/2 the nose radius; ideally, a cut of 0.002" + the nose radius is better. Sometimes we don't have that much room for cuts like this and if that is so in your case then it would be better to use a sharp brazed carbide tool or a sharp HSS tool for this job; these tools will allow for very small depths of cut. In any case, bring the snout to your desired dimensions and try for a decent finish. DO NOT USE COOLANT OR CUTTING FLUIDS WITH CAST IRON.
- Note that if you chose a press fit, do not try to test fit the chuck on the snout. Measure it instead.
- Use a cutting tool or file and put a light chamfer on the snout and the rim of the back plate to make it safe to handle.
- You are essentially done with the back plate but before you remove it from the spindle I suggest you place a very light mark on the rim of the back plate that aligns with the factory mark on the spindle. Most lathes will have a zero or hash mark or dot somewhere on the spindle rim. This will allow you to replace the plate in the position in which it was machined; theoretically, this will be the most accurate position. This isn't so important for a 4 jaw but for a 3 jaw, it can be. For a camlock chuck, it is usually best to mount an accurate ground rod in the chuck and try mounting the chuck in each of the three possible mounting positions to see which is the most accurate one and then permanentlymark the chuck to align with the factory mark.
Now you can break down and clean everything. If you were careful with covering the lathe up, clean up should go fast.
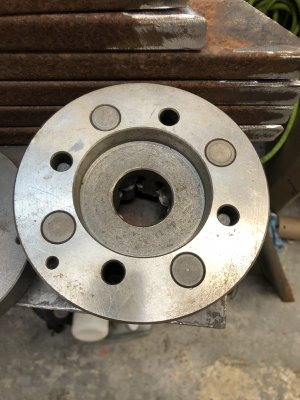
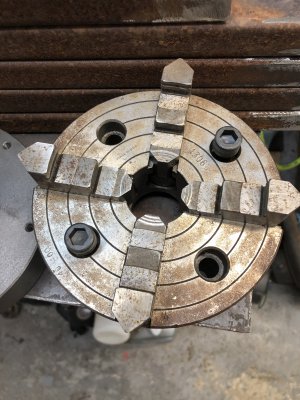
At this point, you have a finished back plate and simply need to mount the chuck to it. If you chose a press fit then look for any factory mark on the chuck that may indicate that the factory checked the chuck in a certain position. Higher quality chucks, especially scroll chucks, will have a mark over one of the pinion holes. The chuck must be tightened with the marked pinion in order for the chuck to have the accuracy the factory claims. If your chuck has such a mark, align it with the mark you made on your plate and press it on. If you chose a loose fit then try to find a shim you can place around the snout to center it in the chuck recess.
You now need to transfer the mounting holes in the chuck body to the back plate. I usually mark and remove the camlock studs so I can lay the plate flat on the bench. I mark to make sure that the same cams go in the same holes because this can affect how the plate fits and can also affect run out. Since you machined it to be accurate only one way, I suggest you mark your cams, too.
I transfer punch only one hole first, then I remove the chuck and then drill, chamfer and tap that one hole. Then I remount the chuck and try to center the mounting bolt in the hole in the chuck and then lock it down. Then I clamp the chuck to the back plate and mark the three other holes with a transfer punch. That first screw helps to hold things in alignment so nothing shifts, making it easier to mark the other holes accurately. Now just drill and tap the other holes and you're done.
This looks like a lot in words but it isn't difficult to do. Give it a try and let me know if I missed anything.