My Jeroen Jonkman’s Stirling 60 brass Stirling engine build

286678
286679

After building my first model (a simple, single action wobbler) I started searching on-line for my next build. When I came across the beautiful brass Stirling engine designed by Jeroen Jonkman, and found out that he had posted free plans for it, I knew I had found it.

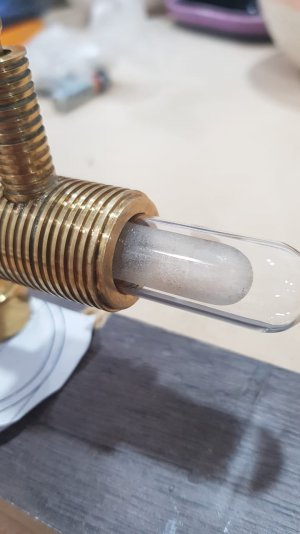
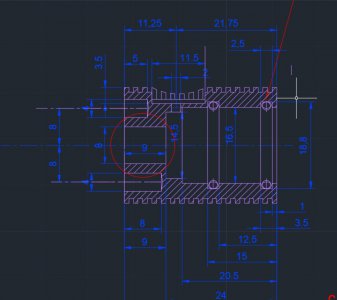
So, I converted the drawings from metric, ordered the materials I needed and got to work. First thing I did was cut the Pyrex test tube to length. I ended up using my Noga mister to keep the tube from thermal cracking. For the machining, I started with the flywheel. I drew it up in Fusion 360 so I could make drawings for the offset positions for the slots. I set it up on my rotary table and used those offsets and moves along with the rotations of the table to cut the slots. Boy, was this a lot easier with my new DRO! Also, using Fusion was a lot easier than doing all the Trig to calculate the offsets and moves.

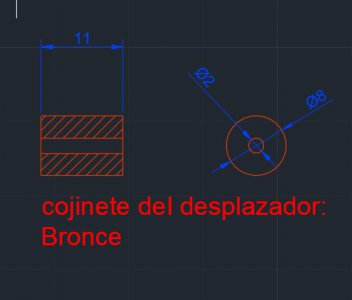
I haven’t worked much with such small parts. For example, some of the pins were only 0.047” in diameter. Most of my experience is with parts that if I drop them on the floor I’ve got at least a chance of finding them. And, my equipment is geared towards larger work, as well as my work holding devices. I’m sure that after building a few more models I will have built up a better supply of small work holding equipment. I also ordered and used a pair of Optivisors!

I made piece after piece until it was time for polishing. I ordered some buffing wheels and compounds from Caswell. These did a great job of shining things up. For me, I got to the point where I just had to say enough is enough, because you can drive yourself crazy polishing parts… The more you polish, the more those tiny little scratches show up!

I made the wood platforms out of walnut, because I thought that would look nice against the polished brass.

There can be no friction or air leaks or these little guys won’t run. So, great care must be taken there.

This project certainly came with its’ challenges… but that’s why we build this stuff, isn’t it?

So, what’s my next project? Well, to start with, I’m going to make two more of these brass Stirlings! One for each of my boys!

Ted

286657

The raw materials...

286662

Used a Dremel type diamond cut off wheel to cut the Pyrex test tube to the required length.

286664

Some fun with the rotary table.

286665

One of the first things I did was make this plate to hold some of these small parts.

286667

These adjustable parallels were just the right size to add some support.

286668

Cut these 0.047" diameter pins by taking a heavy, single cut.

286680

You lose a little stock finding the correct depth of cut, but once you find it they will come out right on size!

286670

Had to hold some of the parts with hemastates with aluminum shim stock (to keep from marring it) so I could buff them up nice.

286671

Used my tiny Albrecht chuck as a pin vise to hold the tiny pins so I could file them to the proper length.

286672

I love these Albrecht chucks!

286673

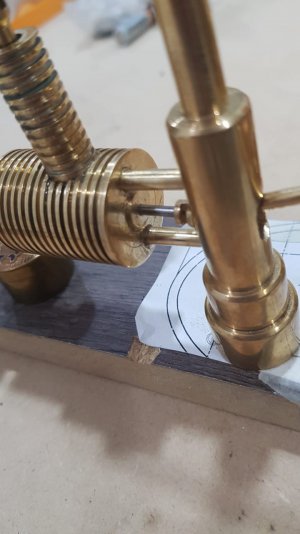
The finished main components (before buffing).

Here's a YouTube link to see it running if you're interested...

 
Please keep in mind I am not the designer of this engine so take my advice as someone who has had to struggle through the problems with this engine myself.

Not sure about using brass/bronze for the bearing... you want to use whatever material will hold up to the heat and also offer the least resistance/friction. I think this is why cast iron was used by design. It is self lubricating to an extent. But, I certainly don't see where trying different materials is going to hurt anything...

On all 3 that I built, the bearing was the biggest source of trouble... the hole through it has to be perfectly centered and concentric with the OD. The tiny drill I used to drill these ALWAYS wondered off enough to cause big problems. The only way I could get a nice straight hole was to mount one of my small Albrecht chucks in my tool post block and use a dial indicator to get it perfectly centered. This worked, although I think now there is a better way. I would make the bearing with a slightly oversized OD. Then, machine a stubby mandrel in my lathe that I could super glue the bore of the bearing to. Then, turn the OD of the bearing to final size. Heat or acetone will release the super glue.

Also, I would think that glass might weigh too much for the displacer, since you want this as light as possible. If you don't want to make it out of very thin machined brass then I would try aluminum, although it probably won't look as nice. The heavier the displacer tube is, the more the shaft will bind in the bearing.

A thought that I've had if I make another one of these is to tweak the design a little so I could make the cast iron bearing a little longer. My thinking is that being longer would give more bearing surface and help to keep the shaft from cantilevering and binding up. It would be a little more drag because of the longer surface contact, but should help the shaft from binding up because of the unbalanced weight on the shaft as it moves back and forth.

Also, make sure to get all the linkages in perfect alignment when mounting the posts/assemblies. Did you de-grease the ball bearings for the fly wheel? The assembly should turn over VERY freely.

Good luck,
Ted
Success! I made the bearing with bronze and making it as long as possible decreased friction. Now it works with the flame of a candle.
Thank you very much for your advice.
 
Success! I made the bearing with bronze and making it as long as possible decreased friction. Now it works with the flame of a candle.
Thank you very much for your advice.

That's great news! If you have any pictures, please share. And any details of the longer bearing design and how you made it can help me and others in the future! That bearing has always been my number one nemeses! Did you use a mandrel and super glue it to finish the OD?

Ted
 
¡Esas son buenas noticias! Si tiene alguna imagen, por favor compártala. ¡Y cualquier detalle del diseño de rodamiento más largo y cómo lo hizo puede ayudarme a mí y a otros en el futuro! ¡Ese porte siempre ha sido mi némesis número uno! ¿Usó un mandril y lo superpuso para terminar el diámetro exterior?

Ted
¡Gracias!
Adjunto fotografía e imágenes de los planos con las modificaciones
(Por favor no mires la parte estética, esa será la siguiente etapa)
 

Attachments

  • WhatsApp Image 2021-02-28 at 21.52.23.jpeg
    WhatsApp Image 2021-02-28 at 21.52.23.jpeg
    67.5 KB · Views: 22
  • WhatsApp Image 2021-02-28 at 21.52.05.jpeg
    WhatsApp Image 2021-02-28 at 21.52.05.jpeg
    74 KB · Views: 30
  • Screenshot_1.jpg
    Screenshot_1.jpg
    75.3 KB · Views: 30
  • Screenshot_2.jpg
    Screenshot_2.jpg
    25.6 KB · Views: 27
@Technical Ted :
I am attaching the link to a video that I made and uploaded to Youtube. It includes part of the process, mistakes and the happy end result.
I name you in the description.

------------------------------------------------------------------------
@Technical Ted :
Le adjunto el link a un video que hice y subí a Youtube. Incluye parte del proceso, errores y el feliz resultado final.
Te nombro en la descripción.

 
Beautiful little engine. I am new to the group and just ran across this posting. I just acquired a little microlux micromark true inch lathe and when I get all the work of making improvements on it completed, I think I'll make one of these for my first project. It just looks nice. I'm sure its great conversation piece. Great job!
 
Really beautiful work. Just curious, did you put a finish on the brass to stop it from tarnishing?

Thanks... Richard
 
Really beautiful work. Just curious, did you put a finish on the brass to stop it from tarnishing?

Thanks... Richard
No I didn't. I probably should have looked into something to put on it, because now it's tarnished. I'd be interested in hearing suggestions on what to put on polished brass that is invisible, would hold up to the heat, etc. etc.

Ted
 
I did quite a bit of research and also found lots of references to Everbrite ProtectaClear. I just spoke with their tech support person and they confirmed that ProtectaClear would be great for this use and lots of their customers use it for this purpose.

Here is a link to the product: https://www.amazon.com/gp/product/B01MR9FH70/ref=ppx_yo_dt_b_asin_title_o00_s00?ie=UTF8&th=1

I just finished a model steam engine that was my first project made almost completely on my CNC mill. I will be using Everbrite to stop it from tarnishing.
 

Attachments

  • 20231019_120415.jpg
    20231019_120415.jpg
    129 KB · Views: 11
Back
Top