My Next Project - A Metal Brake

In that photo, it appears he went longer than 24" for the length of the brake.

Its 24" made exactly to the prints in HSM magazine. Well sorta exactly to the prints. They do a lot of rounding to the dimensions to save space that causes some head scratching plus there are a few mistakes. I did not use the c channel that JR used in his design and is in the HSM design. I replaced it with cold rolled.
 
Its 24" made exactly to the prints in HSM magazine. Well sorta exactly to the prints. They do a lot of rounding to the dimensions to save space that causes some head scratching plus there are a few mistakes. I did not use the c channel that JR used in his design and is in the HSM design. I replaced it with cold rolled.
I have JR Williams plans and he did not use channel. He only used cold roll. His design has no fingers. That is why I ordered the HSM plans. The photos of the white painted brake I posted did use c channel. When I downloaded those photos, the web said they were from the magazine. I will find out when the plans get here. What I intend to build will be a combination of the two portrayed in the photos posted in this thread. I will take the best of them and combine into one. I will try to use all cold roll if I can find it.
In the one photo here, I see a brace added across the top. Was this needed to prevent flexing?
 
... In the one photo here, I see a brace added across the top. Was this needed to prevent flexing?
It would seem that they had some flexing (lifting) in the middle fingers when doing heavier bends. Probable lost some definition in the radius there or dimensionaly poor.
 
Good luck on your project Mark! I got very lucky last month and was given a 24” Berkroy finger brake for free. It was basically complete and needed a good cleaning. I thought it would be no problem to make a continuous 24” finger and also replace a few of the original fingers that showed excessive wear. I was surprised in many ways in the effort to make just the fingers. The material (1 X 4 1018) was just over $100. My Bridgeport mill has a 42” table. Never realized that trying to machine a 24” long piece on it is not really made for it? If I added up all the passes with the cutter(s), I probably went over 200 feet cutting. I do not have a coolant pump/tank affair. And I thought I had every cutter I would need for the rest of my life. Just trying to machine over 200 feet of 1018 tested my patience, mill and tooling like never before. And the darn stuff warped after I machined it. I had to use 15 tons of my press to straighten it and more than once…Dave.
 
Last edited:
I have JR Williams plans and he did not use channel. He only used cold roll. His design has no fingers. That is why I ordered the HSM plans. The photos of the white painted brake I posted did use c channel. When I downloaded those photos, the web said they were from the magazine. I will find out when the plans get here. What I intend to build will be a combination of the two portrayed in the photos posted in this thread. I will take the best of them and combine into one. I will try to use all cold roll if I can find it.
In the one photo here, I see a brace added across the top. Was this needed to prevent flexing?

Yup the truss is to put a little preload to prevent flexing. JR does a similar thing. Look at print #9 labeled clamp support. You will be surprised how different the HSM design is vs JR's. I think you will like the HSM design other than the c-channel.
 
Well....... I went to my sort of local steel supplier today. I got about 2/3 of the material I need for this project. Unfortunately most of it is hot roll steel. Cold roll is almost non existent around here. when the mills and machine shops closed down, so did most of the suppliers. the hot roll will work for the base part of the unit but it will take a lot more work to make it as nice. I intend to use cold roll for the fingers and a few other parts, but I will have to order it on line. The shipping is horrible. The material I got today cost a little over $100. It was over $250 plus shipping for cold roll on line. For the difference I can live with the extra work to use the hot roll. I don't like it but can live with it.

As this project progresses I will post photos and commentary here, but all the while I will also be doing a complete build article with prints and photos in a PDF format which upon completion will be made available to everyone at the end of the build. So.... get your popcorn, pull up a chair, and lets get started. ( as soon as the prints get here) :D
 
The hot rolled steel will have less internal stress than the cold rolled but breaking through the skin will be harder on the tools. When you cut hot rolled though, it will hold its shape much better so you might be better off.
 
The hot rolled steel will have less internal stress than the cold rolled but breaking through the skin will be harder on the tools. When you cut hot rolled though, it will hold its shape much better so you might be better off.

I usually sand and grind the skin off and if a flat surface is needed , I use a large fly cutter to skim cut a couple thousandths to have a nice flat finished surface that can be polished if desired. It is a lot of work but it is what it is.
 
I gathered a lot of hot rolled steel to start this project. I wanted cold roll but the only place I can get it is online and the steel came to over $350 but the shipping was horrible. This made using hot roll my only choice as my budget does not support that expense.

That being said I have spent the last few days sawing up 1/2" steel flat stock into the required pieces. I then milled all the edges to size and square. The base plate and bending leaf are rather large pieces and have been difficult.
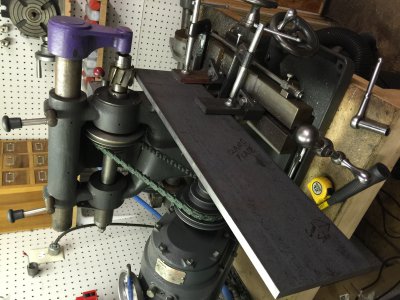
image.jpeg
In the above photo I milled the base clamping plate to get a good square edge as the hot rolled steel has a rounded edge. This was done to all edges of each piece but a few of the pieces are way too large for my small Burke mill so I have to get creative. Using C clamps and blocks I rigged a setup to mill the long edge but it has to be done in four steps because the travel on the 16" table is only about 7" or 8".
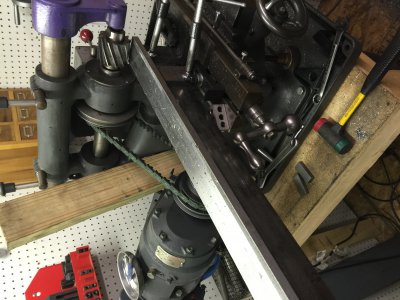
image.jpeg
The bending leaf in the prints is a 1/2" thick plate 4" wide. I feel the 1/2" surface is not adequate to make good bends especially in heavier sheet metal without leaving a Mark, so I chose to make the bending surface 2" high instead of 1/2". To do this, I acquired a 26" long piece of 4" X 6" X 1/2" thick angle iron. The first step was to use a torch and cut the 6" side of the angle iron down to a little over 2" and mill the cut edge flat. To my amazement, the hot rolled angle iron is far from square or flat. This meant now I have to rig a setup to mill the face that does the bending flat and square. This is shown in the above photo. Cutting these two pieces has taken three days on the mill. It takes moving the part in the setup four times for each pass and each edge took at lest four passes. This was a lot of setups and very time consuming. BUT I GOT 'ER DONE :grin:. Now, if I had been blessed with a 42" Bridgeport, this would have been a piece of cake, but I like to think I have illustrated almost anything is possible even if you only have a "little" machine. The next step will be to start shaping some of the pieces and drilling and tapping a lot of holes. I have spent about $50 and ordered a .625", a .750" , and a .375" reamer to make good finish and accurate holes. ( I couldn't afford to buy a whole set of reamers for around $200 , so I usually order them as I need them and have been building a set that way. It is more expensive in the long run but cheaper at time needed.)
 
Back
Top