Newbie and the Bridgeport

Watching this! I picked up a varispeed 9x42 couple years ago that wasn't in quite as rusty but looked like hell. Had been sitting in a wood working shop and had a lot of nasty crud built up. Turned out to be pretty good underneath. I did a head rebuild (H&W and this forum saved me multiple times there) but did not pull the saddle and tackle the body and freshen that all up. Watching this thread I'm kinda wishing I had. That black paint is awesome. Great quarantine project!

I can’t say it’s been the most fun, but it should be rewarding at the end of the day. I’ll do a lessons learned summary at the end of the process to give some tips. The biggest one being invest in a needle scaler. I can tell by how I’m using light taps with a hammer as a better solution to removing the old crispy paint than grinding it all off, I should have bought a needle scaler in the beginning. And I’m still going to get one for that 13x40 lathe.
 
Can't say for the display head, but on my Chinese scales I had to remove the reader head on one and reposition everything to get it to read properly. Something bumped in shipping. Yours might be fixable that way. Maybe cleaning the glass scale itself.

I've only used a few features other than just zero and cut. But I do like things like bolt circles. The calculator comes in handy as well. Down side is the manual is almost worthless so I have to figure out how it works. :)

Good progress on fixing up the mill! I like the paint job.
 
So ya, I would go with reader head too. When a reader head is dying, it will do that crap with the last digit flickering. I have never seen one of these AR2's with the button that yours is missing actually be there.

As far as the decimal point being in the wrong spot, it could be that the display is bad or that the dip switches are set for some other resolution setting or something.

You could probably sell the working Y axis and the DRO box on fleabay for something, to at least offset the cost of upgrading to a new DRO. Unless you can find a working AR5 scale that is the right length that someone wants to sell you, replacement with an Acu-Rite scale will cost a few hundred bucks along with $80 for interface cable.

Jon
 
Day 11 and 12...

Had a really productive day. Got in to the garage at 1000 and before I knew it, it was 1600. The saddle is checked off the list. Did a really good deep cleaning on it beginning with degreasing in a big plastic tub (concrete mixing tub) followed by dunking it in my garage sink and hitting is with some super hot water and soap. Got all the nooks and crannies cleaned out, all the lube ports cleaned out, and generally in good shape for painting. Ways look pretty good.

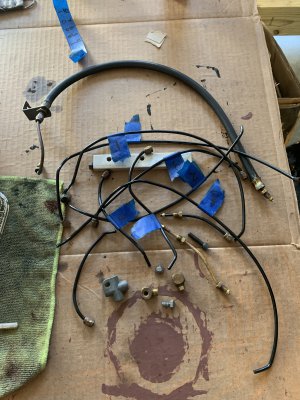
Next up was the lube system. I numbered everything and then dunked it all in the ultrasonic cleaner to see if I could get the meters to come back to life. Nope. I cant get any flow through them at all. Not sure what the inside of those things look like normally, but they must have small orifices and mine must be all gummed up. Not worth the headache. When I put in my second order while dealing with the head I'll order 10x of the #1 meters and just replace all of them. Otherwise, all of the lines are blown out and freely moving air through them. The one shot system is also pumping oil out the top pretty well, so I'm going to assuming it works, but probably should also replace the filter in that when I order the meters.

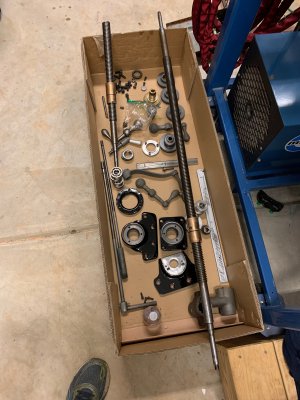
After the lube system I jumped on the X and Y screws and got them all sparkled up. Just purely from looking at the width of the teeth at the end of the screws versus the areas I would assume the most wear would be, they look pretty good.

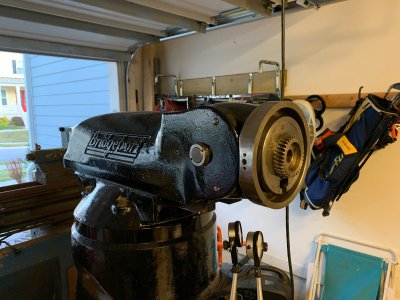
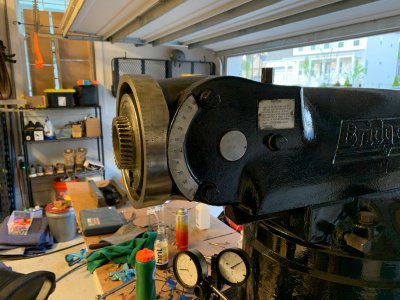
Last up, I installed the ram adapter and got that pinned in. Also installed the 3 bolts that lock the adapter. It's moving like warm butter now. I can tilt the adapter up and down by hand turning the screw. I painted a few more parts too and threw them in the 'ready' box.

Last 2 items on the list are the table and head. I won't though the head until the machine is fully assembled and my garage is in good order. I'm going to welder up a mount for the head tomorrow that can be clamped down to my welding table.

I'm going to make a change going forward. I had been painting bolt heads to match the machine. Well, that primer + paint is too think and the wrench has trouble getting on it. When it does, it just gums up the paint. So, I tested one of the ram lock bolts with a nice polished bare metal surface then hit it with a coat of clear. I can easily put the wrench on it and I like the contrasting look of the black and raw steel. I'm going to strip the paint back off the fasteners that I've already painted and go polished steel on all of that.
 

Attachments

  • IMG_2317.jpeg
    IMG_2317.jpeg
    1.7 MB · Views: 27
  • IMG_2318.jpeg
    IMG_2318.jpeg
    1.7 MB · Views: 27
  • IMG_2327.jpeg
    IMG_2327.jpeg
    1.7 MB · Views: 20
  • IMG_2328.jpeg
    IMG_2328.jpeg
    1.5 MB · Views: 21
  • IMG_2329.jpeg
    IMG_2329.jpeg
    2 MB · Views: 22
  • IMG_2330.jpeg
    IMG_2330.jpeg
    2.2 MB · Views: 23
  • 60834123016__E0E8B95A-1134-4E2C-95C9-F7390F52C514.jpeg
    60834123016__E0E8B95A-1134-4E2C-95C9-F7390F52C514.jpeg
    2.4 MB · Views: 22
  • 60834125235__3F52B709-E809-4C52-8667-7153401B1660.jpeg
    60834125235__3F52B709-E809-4C52-8667-7153401B1660.jpeg
    2.9 MB · Views: 24
  • 60834156631__A14B3CF6-498C-4B67-A2CC-AFFDAD2701C3.jpeg
    60834156631__A14B3CF6-498C-4B67-A2CC-AFFDAD2701C3.jpeg
    1.8 MB · Views: 25
Getting into the lube system can really suck. At least you had the rubber lines instead of metal. Whenever I get a table off, I always worry about what I will find regarding the lube system.

What accent color are you gonna paint the lettering on the ram?

Jon
 
Getting into the lube system can really suck. At least you had the rubber lines instead of metal. Whenever I get a table off, I always worry about what I will find regarding the lube system.

What accent color are you gonna paint the lettering on the ram?

Jon

Good question and I actually pondered that last night. I don’t know! Thinking on maybe a gunmetal grey.
 
dang this brings back memories. I went through the same process last year i believe. One thing about doing this is you will know the machine inside and out.
Your progress looks great.

Joe
 
dang this brings back memories. I went through the same process last year i believe. One thing about doing this is you will know the machine inside and out.
Your progress looks great.

Joe

Indeed...I'm glad I did it. Frankly, I dont think I had a choice. The machine was in bad shape. And you're right...I'm learning every part of the machine. I haven't cracked in to the J-head yet, but overall these things aren't that complicated.
 
Day 13...

I'm waiting for a set of wipers so I can't really install the saddle, but I put it back on the knee and boy does she look pretty all dressed in jet black and shiny steel ways. I didn't take a pic...I'll do that before I put the table on.

The big project today was to build a mount for the J-head so I could position it on a table and get to work on it. I re-purposed and old chunk of steel that use to be the base of a large reelcraft hose reel that I purchased. Cut off a couple pieces...welded them back on in different spots....drilled....and voila. J-head is now mounted to the bench and under power. I ran it a bit, but not going to push it. Looking through the gap by the speed dial where you can see the pully, everything is really rusted in there. She needs to be torn down and rebuilt.

I have a care package coming in from H&W tomorrow. Once I get those parts sorted out and reinstalled, the only items left will be the table and J-Head. I'll probably tackle the table tomorrow since it's not complicated and I would really like to get this plastic sandbox out of my driveway that I've been storing it in for cleaning. After that, the table goes up and I start pulling parts out of that head. Anyhow...a short vid of the heading coming to life.

 
It looks like you are switching the output side of the VFD. I've always read not to do that. I run the VFD output direct to the motor and use a separate control panel to tell the VFD what I want. Perhaps yours is designed to tolerate that, but just thought I would mention it just in case.
 
Back
Top