- Joined
- Feb 24, 2019
- Messages
- 924
When I built my lathe table, right before my lathe arrived, I built it with the intention of adding a drawer later.
It's 3 years later and now it has a drawer.
I built the table to span over the top of my greenlee work vault. I don't use it for anything currently but it has a future purpose. I wish it had wheels.
Anyhow, I started off with a drawer from an old tanker desk. I paid $5 for the desk at an auction, just to get the drawer.
This last week I picked up some triple telescope ball bearing rails for @9 per pair. They're rated for 100lbs.
I took some old metal pieces scavenged from an old decommissioned machine and started work.
The first part was to figure out where to locate the drawer slides on the drawer. I managed to find the only spot they'd work if I added a couple washers between the slides and the drawer. That wasn't too hard.
Next I had to ass a support beam at the back of the lathe table. I built it with a lateral stabilizer in the back about 8 inches off the floor where the front was high enough to clear the greenlee.
Adding the rear support beam was pretty easy. It's a piece of 1/8" aluminum angle 3 x 1.5, the 1.5" being the shelf the cross beam will rest.
I had to locate the drawer slides on the cross beams to fit inside the 3.5" "window" the drawer would fit into. The drawer has only about .030" clearance to the window. Basically, I was working with a pretty tight tolerance, all things considered.
I did end up having to mill the drawer slide holes on one side. I was off by @ .015" in my measurements so I oblonged the holes by .015"
It fits snug but with the weight of drill bits it will have .005-.010 clearance. That's better than I had expected.
I had to figure a way to attach the cross beams to the lathe table. The rear support was easy as there was ample room to drill. I tapped a pair of socket pane heads in each upright for that. The front, however, I wanted to secure without hardware sticking out so I wouldn't scratch myself when I wasn't thinking.
The pop rivet tools I have all were too tall for adding a rivet. I took one of them and shaved off the head of the anvil to get an extra 1/4" of room. Then, by bending the shaft of the rivet, I was able to snake it into the hole. It was a tight fit but it worked well.
I finished off with a pair of rivets in the back and all is good.
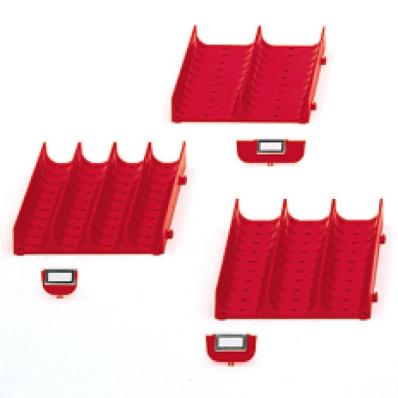
For the inside, I have these fancy little divider trays that came with the 100's of taps I got at a different auction.
I can finally organize the taps, drill bits and as I accumulate them, mill bits.
WOOT!
P.S. Don't pick on my welds. It was my very first time using a wire feed welder.


It's 3 years later and now it has a drawer.
I built the table to span over the top of my greenlee work vault. I don't use it for anything currently but it has a future purpose. I wish it had wheels.
Anyhow, I started off with a drawer from an old tanker desk. I paid $5 for the desk at an auction, just to get the drawer.
This last week I picked up some triple telescope ball bearing rails for @9 per pair. They're rated for 100lbs.
I took some old metal pieces scavenged from an old decommissioned machine and started work.
The first part was to figure out where to locate the drawer slides on the drawer. I managed to find the only spot they'd work if I added a couple washers between the slides and the drawer. That wasn't too hard.
Next I had to ass a support beam at the back of the lathe table. I built it with a lateral stabilizer in the back about 8 inches off the floor where the front was high enough to clear the greenlee.
Adding the rear support beam was pretty easy. It's a piece of 1/8" aluminum angle 3 x 1.5, the 1.5" being the shelf the cross beam will rest.
I had to locate the drawer slides on the cross beams to fit inside the 3.5" "window" the drawer would fit into. The drawer has only about .030" clearance to the window. Basically, I was working with a pretty tight tolerance, all things considered.
I did end up having to mill the drawer slide holes on one side. I was off by @ .015" in my measurements so I oblonged the holes by .015"
It fits snug but with the weight of drill bits it will have .005-.010 clearance. That's better than I had expected.
I had to figure a way to attach the cross beams to the lathe table. The rear support was easy as there was ample room to drill. I tapped a pair of socket pane heads in each upright for that. The front, however, I wanted to secure without hardware sticking out so I wouldn't scratch myself when I wasn't thinking.
The pop rivet tools I have all were too tall for adding a rivet. I took one of them and shaved off the head of the anvil to get an extra 1/4" of room. Then, by bending the shaft of the rivet, I was able to snake it into the hole. It was a tight fit but it worked well.
I finished off with a pair of rivets in the back and all is good.
For the inside, I have these fancy little divider trays that came with the 100's of taps I got at a different auction.
I can finally organize the taps, drill bits and as I accumulate them, mill bits.
WOOT!
P.S. Don't pick on my welds. It was my very first time using a wire feed welder.