NOT grinding chuck jaws.

NortonDommi

Registered
Registered
Joined
Nov 15, 2016
Messages
943
Hello all,
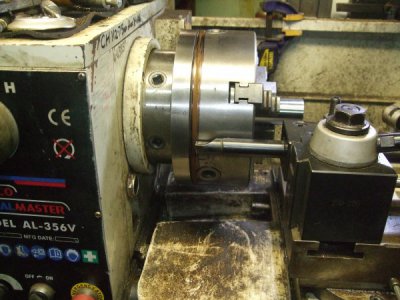
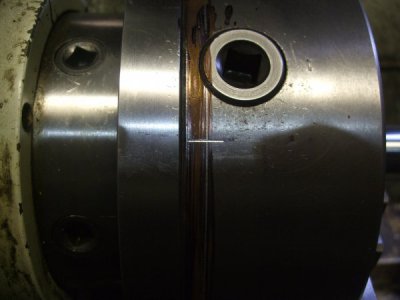
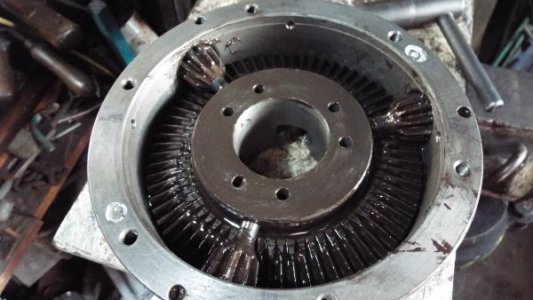
About a year ago I pulled down my 3-jaw chuck as part of a major cleanup after a lot of Cast Iron machining. When I put it back together I noticed I had some bad runout 0.75 mm! Moving the jaws around got this down to 0.5 mm. This chuck had around 0.01 mm runout before the strip down so I pulled it down again and identified the problem as the bolt seats for the bolts that hold the chuck together being unfinished. I think it was in the middle of some holidays at the time so I put it back together to sort out later then as life goes I got a bit busy. Most of the stuff that goes in the 3-jaw is Mysterium that always need a clean up and anything accurate gets done in the 4-jaw and life went on.
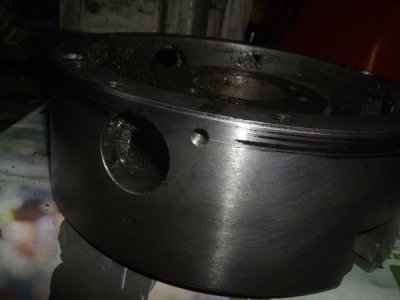
I finally got fed up with it and as it was due for a clean anyway decided to sort it out. As it happened just about every time I went on the Youtube something popped up about grinding lathe chuck jaws, Then I picked up some old magazines and found all these articles on truing up chuck jaws. I knew that this chuck had been good and I knew why it was not now so time for some surgery. I decided to make the chuck adjustable to make life easy in the future whenever I pull it down for a clean.
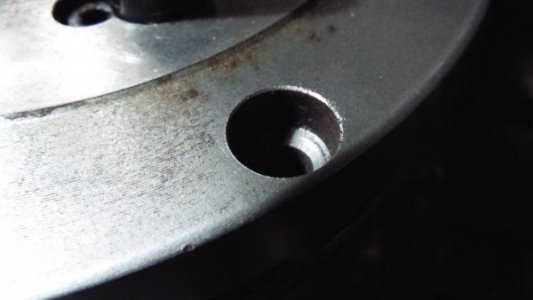
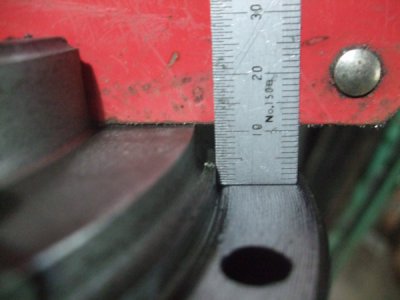
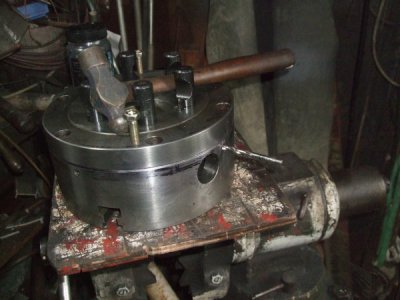
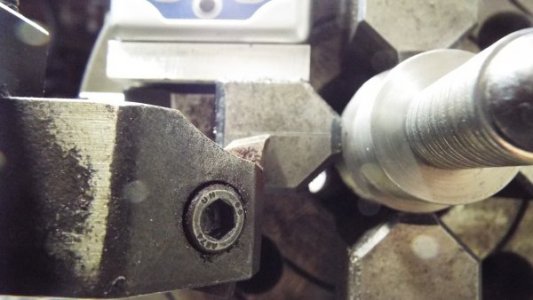
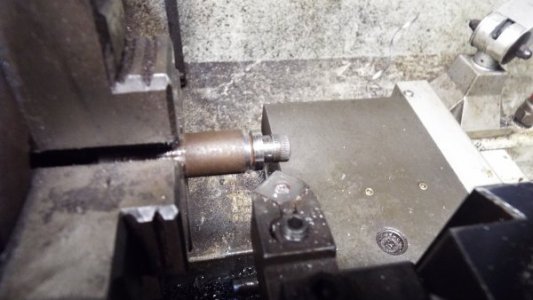
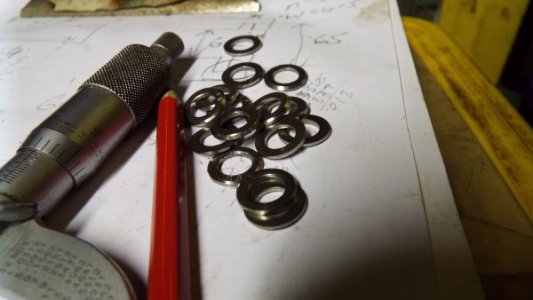
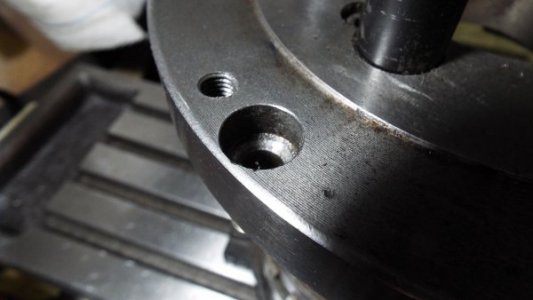
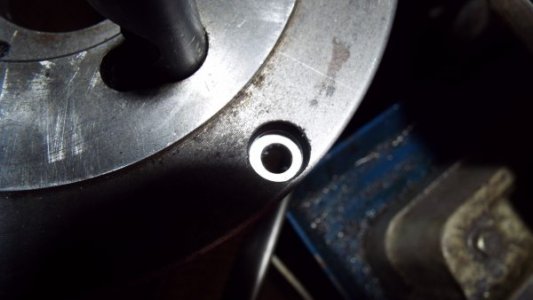
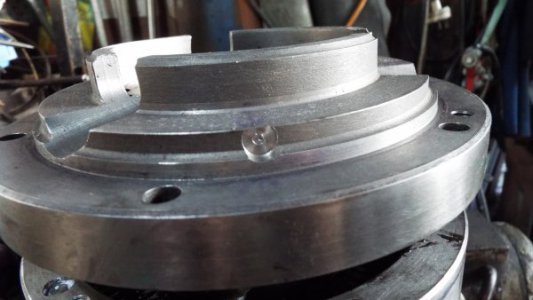
Attached are some photographs of the process. Careful measurement determined that I would need to sink the seats 1.6 mm to clean them up which was fortuitous as that is a standard washer thickness. I could get some hardened washers but they would need to be ground to diameter,(We are a long way away from suppliers that have everything such as in civilised countries),and best price I'd have to buy a 100 of each from South Island. Fortunately a new shop had opened up a few miles away and I bought some packets of A2 SS very cheap. I still had to turn them down to size but that was no biggie.
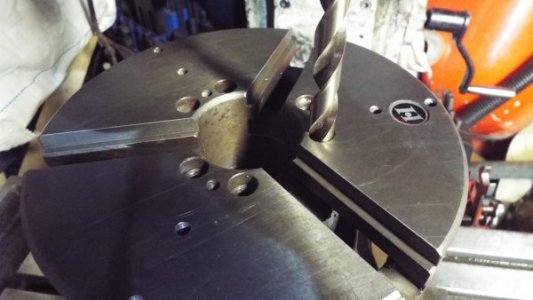
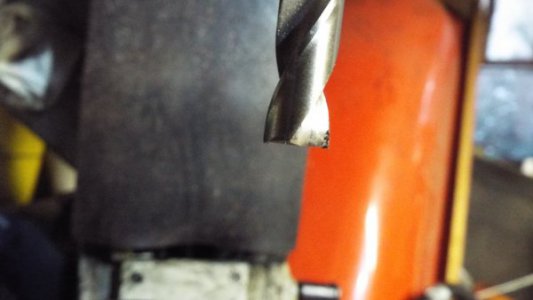
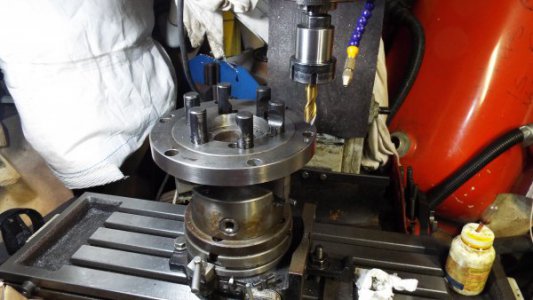
I didn't have an end mill the correct size for the body seats so ground a drill bit to suit.
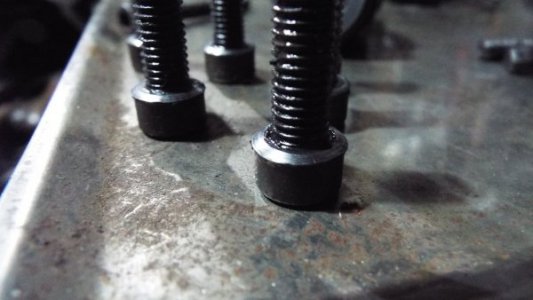
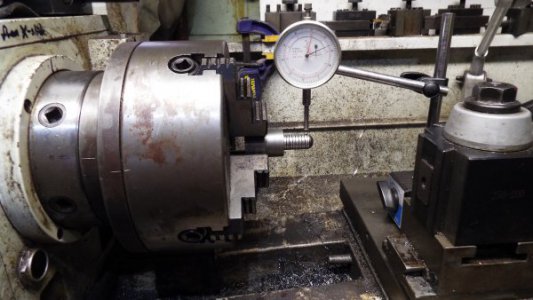
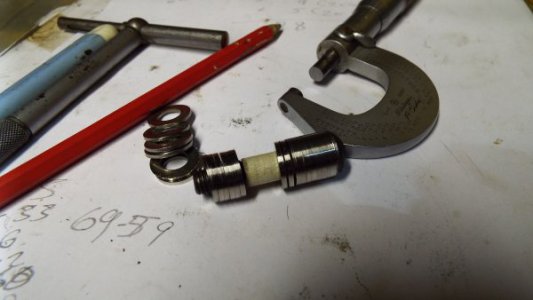
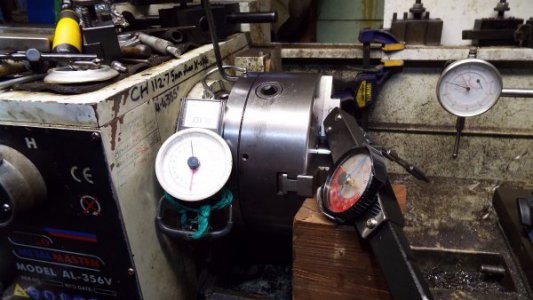
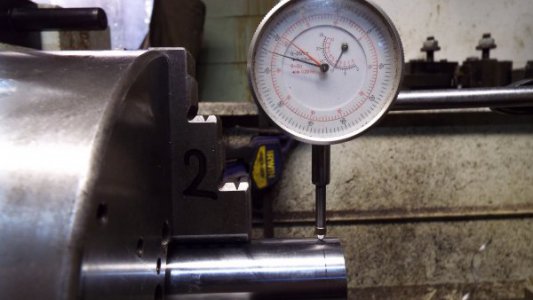
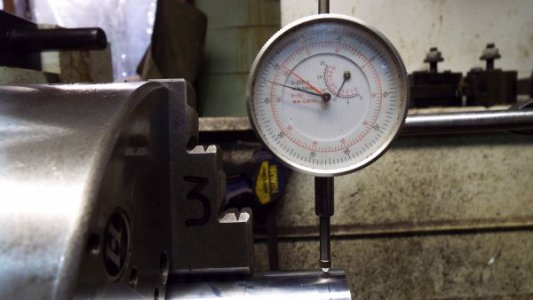
Torquing up the bolts was done on the lathe very carefully 5 pound/inch at a time working in a reversing pattern back and forth and measuring runout at each step. I used a Matco pound/inch torque wrench on the front and because of space limitations a ball end Allen key with a small hand scale at the rear. The groove at the top of the ball made a loverly locator for the scale hook.
 

Attachments

  • 001 Bad bolt seats.JPG
    001 Bad bolt seats.JPG
    25.5 KB · Views: 46
  • 002 Chewed up bolts.JPG
    002 Chewed up bolts.JPG
    35 KB · Views: 46
It was a pretty easy and straightforward job once I got time to get into it and I would recommend doing this to any self-centering chuck when you pull one apart for cleaning. I can't afford a Bison Set-tru but works just as good.
Locating the four adjuster screw was the hardest part and was done with a sharpie , center finder, rule and square.
 

Attachments

  • 003 Measuring adjuster location.JPG
    003 Measuring adjuster location.JPG
    34.7 KB · Views: 45
  • 004 Marking adjuster location.JPG
    004 Marking adjuster location.JPG
    61.3 KB · Views: 43
  • 005 Body marked.JPG
    005 Body marked.JPG
    33.5 KB · Views: 41
  • 006 Body drilled & tapped.JPG
    006 Body drilled & tapped.JPG
    30.6 KB · Views: 40
  • 006 Body drilled & tapped.JPG
    006 Body drilled & tapped.JPG
    30.6 KB · Views: 40
  • 007 Spotting backplate.JPG
    007 Spotting backplate.JPG
    48.5 KB · Views: 41
  • 008 Backplate spotted.JPG
    008 Backplate spotted.JPG
    39.4 KB · Views: 41
  • 009 Milling flat on backplate.JPG
    009 Milling flat on backplate.JPG
    46.6 KB · Views: 44
Next photo's are just turning the washers to size and chamfering one outer edge. I've thrown in a couple of shots to show how I center lathe tools. On each chuck one jaw has a line scribed/cut on center when the jaw is parallel to the bed. I find this to be very quick and easy.
 

Attachments

  • 010 Centering washers for reduction.JPG
    010 Centering washers for reduction.JPG
    47.1 KB · Views: 44
  • 011 Setting tool on center.JPG
    011 Setting tool on center.JPG
    41.5 KB · Views: 46
  • 012 Tool on center.JPG
    012 Tool on center.JPG
    35.9 KB · Views: 45
  • 013 Masking tape use to make washers true to bolt.JPG
    013 Masking tape use to make washers true to bolt.JPG
    30.6 KB · Views: 42
  • 014 Chanfering one side outer edge.JPG
    014 Chanfering one side outer edge.JPG
    37.6 KB · Views: 40
  • 015 Washers finished.JPG
    015 Washers finished.JPG
    33.6 KB · Views: 41
The next shots are cleaning up the bolt seats and assembling. I used Copper Coat anti-seize simply because I have a few big tins of it and it is a good high pressure slow speed lube for the scroll gears and a lot less messy than the Moly lube I used last time!
 

Attachments

  • 016 Cutting body seats.JPG
    016 Cutting body seats.JPG
    37.2 KB · Views: 41
  • 017 Modified drill bit.JPG
    017 Modified drill bit.JPG
    25.9 KB · Views: 40
  • 018 Bad backplate seat.JPG
    018 Bad backplate seat.JPG
    29.6 KB · Views: 39
  • 019 Cutting backplate seats.JPG
    019 Cutting backplate seats.JPG
    46.7 KB · Views: 40
  • 020 Clean flat seat.JPG
    020 Clean flat seat.JPG
    28.5 KB · Views: 40
  • 021 Coppercoat lube.JPG
    021 Coppercoat lube.JPG
    46.3 KB · Views: 42
  • 022 Adjuster on the mark.JPG
    022 Adjuster on the mark.JPG
    36.9 KB · Views: 44
Norton, very interesting, thanks for sharing.
How much clearance was there between backplate and chuck body that determines the amount of adjustment available?
 
Final torquing of bolts and checking runout. Torquing up the bolts was done mostly over a period of about 2 hours and was left overnight before the final tightening.
To check the runout I used a bit of 2" induction hardened hard chrome rod I had left over from a job. This is accurately ground to size and I checked with the dial gauge shown and a Starrett finger gauge. As best as I can tell I had a slight flicker of about 0.001 mm that occurs in a slow spiral on the rod. This is at the low end of the specs for the rod. I end for end the rod and measured several times. Photo's show the measurement by each jaw.
I am very happy with the result.
I knew what the problem was right from when it happened, the deformed bolts and seats were introducing all sorts of stresses and until this work was carried out the chuck would have never run true.
I hope this will be of help to someone else.
P.S. Before anyone comments on the state of my machines I DO clean them, all the important bits are always clean and lubed and that brown stuff that looks like rust isn't. I live less than a 10 minute walk from a large lake, 3 minutes walk down towards the valley in the other direction is a creek and the ocean is 1 1/4 miles away in one direction with a harbour wrapping up inland . Fresh and salt water with high humidity and frequent winds so I coat bright stuff with Grapeseed oil which oxidises to a pretty tough protective coating.
 

Attachments

  • 023 Torguing in place.JPG
    023 Torguing in place.JPG
    50.4 KB · Views: 40
  • 024 Measuring runnout.JPG
    024 Measuring runnout.JPG
    36.1 KB · Views: 40
  • 025 Measuring runnout.JPG
    025 Measuring runnout.JPG
    36 KB · Views: 37
  • 026  Measuring runnout.JPG
    026 Measuring runnout.JPG
    35.2 KB · Views: 32
Norton, very interesting, thanks for sharing.
How much clearance was there between backplate and chuck body that determines the amount of adjustment available?
Hello Tozguy 0.2 mm all up,(about 0.008"). I used 6 x 1 mm set screws as adjusters and they can easily develop about 1 Ton of force. Needed to make a small adjustment at 15 lbs/inch and another tiny tweak at 25 lbs/inch.
Just cleaning up the bolt seats would probably have been fine but I figured what the hey, since it was apart may as well improve it.
 
A nice job, Norton!

I did a similar modification to a 3" chuck for my Atlas/Craftsman 6x18. I used 3 adjustment screws rather than four which made adjusting a bit more tricky. I had angular runout as well so I used six biasing screws, two on either side of the mounting screws. Because the chuck didn't have enough meat to add the screws, I used an intermediate plate which also reversed the direction of the flange. The three point adhustment rather than four was used be cause there wasn't enough room on that small chuck.

The chuck worked but because the measurement point was well forward of the angular adjustment point, any measured runout was a combination of radial and angular components. This made adjustment tedious. I found that the adjustment varied with the diameter of stock as well, most likely due to variations in the scroll.

I eventually removed the setup and went back to the traditional back plate, largely because the added hardware took almost an inch off my center to center distance. Here is the adapter from the back side.
Set True Adapter .JPG
 
Not grinding of chuck jaws is fine, I have a Buck AdjustTru on my 19" lathe, but chuck jaws still may need grinding to remove wear with consequent bell mouthing.
Good point Benmychree, I'm well aware of that and no doubt if I live long enough I will have to do that. It has been necessary on a couple of very old lathes I've fixed up. The reason I posted was to show that identifying the cause of a problem is the most important thing. When I mentioned all the articles popping up about grinding the jaws I should have said that to someone new to lathes they might think that this is the solution. It was all these articles that prompted my to pull finger and sort it out. In my case I knew what the problem was, what caused it and when it happened. Hopefully anyone pulling their chuck down for clean and lube will have a good look at this area as a matter of course.
Us poor people have to make do with what we can afford and this lathe is a Chinese one and not at the top end of the market, very good value and the first new lathe I have owned. I bought with my eyes open knowing that it would need tweaking here and there, things are just better after fettling and I get to have fun at the same time.
 
Back
Top