Ok, I give up. 7 start thread

Wow, a lot to digest for me.

I'm in the house now ad got lazy and just re-coded the file instead of going out to the shop to get the file off the machine and now the numbers are coming out like the ones papa charlie posted. Different than before only just slightly.

Got to thinking about this and nothing has changed in the file (didn't make any changes) but the numbers are different since I got my 1 year trial of fusion approved. I've seen posts mentioning this elsewhere, but just didn't think about it until now. I will go out after everyone wakes up and run the file.

Using a sharpie and cutting shallow makes sense. I'm going to try with papa charlies numbers, the try the sharpie if necessary.

I'm definitely interested in the spreadsheet. That would be so easy considering what Ive went through already.

I never thought when I started this thread it would have such a response. I feel privileged to be an accepted part of this community.
 
Papa Charlie reposted my numbers, which may have been unclear.

My thought was: if trying to cut with seven equal offsets makes one of the threads too small for some unknown reason, why not try making that thread too big? Whatever is making the thread too small will undo your attempt to make it too big and it will come out at the exact right size.

Shallow threads with a sharpie is a better idea.
 
Jaek:

I got to thinking about it before I ready your last post and figured I could kill two birds with one cut.

I can cut shallow and then try the new numbers.

I'm out in my shop and since we have decided that diameter really doesn't make a difference I was turning he material down for another try and discovered this.

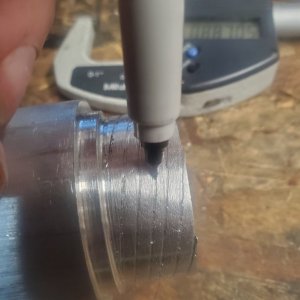
Take a look at the pic when I've pointed it out. The thread to the right is closer than the one to the left of it. There is a definite difference in the width between the threads. Kinda like using a sharpie but in reverse.

Now I just need to identify which thread it is.

But this is a big difference. I'm not sure there was enough error in my code to account for this.

SPACING.jpg
 
I just had a thought. If the math in the G code is correct then the only thing I can think of is a problem with the lathe controls. Try moving the entire process about 1/2'' to Z+ My thought is that maybe there is a glitch in the motor encoder right at the point where it starts the third thread with your current setup. Off setting everything to the right would put it in a different position.
Am I correct in assuming this turning center uses ball screws?
If so and along the lines of an encoder malfunctioning, what about perhaps something in the ball screw assembly being wonky?
And perhaps something in the 'tool post' maybe?
Something mechanical going awry ...
The thin one is happening and repeating in the same area no matter how the stock is positioned, have I got that correct?
 
I'm still working on it. I lost my file that had all the op stops in it, overwrote it somehow. Have to hand code that in again.

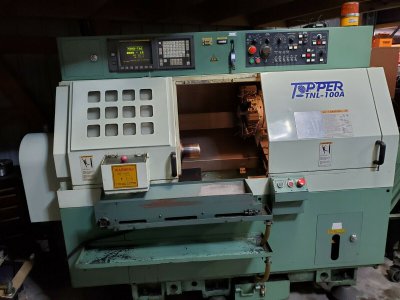
Yes full on turn slant turning center with ball screws, Fanuc OT control. The Z ball screw has just been rebuilt. Tool is rigid in the turret. It has a very good taper lock setup. Very hard to remove it even when I losen the clamp bolts.

Yes it seems it's happening the same if I move the stock.

s-l16002.jpg
 
snip>
Got to thinking about this and nothing has changed in the file (didn't make any changes) but the numbers are different since I got my 1 year trial of fusion approved. I've seen posts mentioning this elsewhere, but just didn't think about it until now. I will go out after everyone wakes up and run the file.
<snip

Please clarify.
Which file (G code? solid model? other?)?
Which numbers are different?

What are the Z offsets (STARTs) and FEED numbers that cut that test pictured in reply #143?
 
What about doing up a 3" or 4" length of thread? See if the 'Thin One' appears more than once and in the same location.
I'm having a feeling that it is mechanical and not in the code. Hope that I'm wrong though.
Or maybe a weird hiccup in the controller?
I'm trying to follow the coding effort but admit that I'm rusty as a piece of ol' Iron out in a field. :grin:
 
Wow, that's really visible. I wonder if cutting seven equally spaced grooves (not threads) would show the same difference. Or if you make your threaded part long enough that each individual thread makes more than one rotation around the entire part.

Hard to imagine a ball screw that far out. It's also hard to imagine how a ball screw or encoder problem could cause one thread to be offset but have all the individual threads still end up straight.

Maybe someone tried to set a machine calibration parameter and messed it up bad?
 
Following with interest but haven't had much to contribute.

But... for what it's worth: How about facing off the end of the part before a shallow threading operation. Fine feed, try for a good surface finish at the outer edge where the thread grooves start. Face it off again after the threading to clean up the start burrs - maybe even a light edge break.

Might be able to see if they are clocked appropriately from the end. If they're all the same arc length between grooves then you can rule out spindle index signal & ball screw inaccuracy.

At that point it's a programming problem - if they all start equally spaced around the OD then the 'overcut' one is not being cut at the same pitch, or it's being cut deeper in X than the others.

The other suggestions of cutting longer threads would also identify if the pitch is different on the oddball.
 
Back
Top