PM-1640TL problems getting reasonable surface finish

heavier depth of cut, higher feed, higher speed. I only ever used CCMT inserts on nasty steel (rust etc) on my Atlas as the cut looked like a beaver had chewed on it. Tried them again on my South Bend heavy 9 and got a beautiful shiny almost polished finish and chips pinging off the chip shield like gunfire. CCGT cut much better at a shallower depth of cut, but gave a more matte finish even though it was very smooth. It was quite a revelation.
 
Last edited:
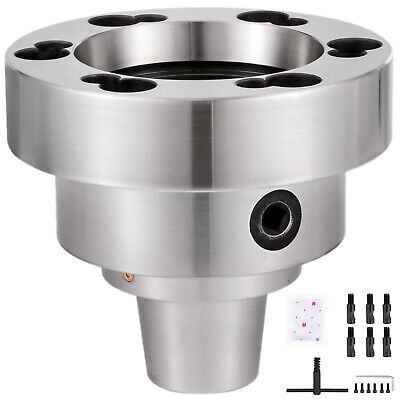
Same issue here. Glad you asked...glad you got all those helpful tips. I was getting awesome surface finish on Delrin (which was both good and frustrating given the mess I was making with some practice 1018). Love the collet chuck. How do you like it? Where did you get it?

Here’s the collet chuck I got. Super cheap, but pretty happy with it for the price:

 
Can you give us an update on this?

Still digesting, watching videos and reading. I ordered a copy of [mention]davidpbest [/mention] ‘s book on insert tooling and am waiting for delivery of some easier materials than the 1018 I have been trying to cut.

Despite that, with more speed (1200 rpm) and a heavier cut (0.020”) and flipping the inserts to a fresh edge (hard to say if this mattered), I was able to get a MUCH better finish.

I think one of my many takeaways from this thread is that I had inadvertently picked one of the more challenging material combinations as a starting point (small diameter, high aspect ratio 1018) and inappropriate speed (too low) and depth of cut (waaaay too shallow) with cheap carbide inserts.

Another takeaway (but not news) is how great this forum is in terms of quality of responses, speed of responses, and encouragement.
Sweeeeeeeet!
 
I saved this link when i started learning about lathe work; was a great overview for me: link

I think it might be worth pointing out to not confuse DoC with diameter of cut. My lathe's dials read diameter which is double the DoC. I know its a very basic thing but might help those who are learning.

TNR Tool Nose Radius. Select a tool with a larger TNR it will be easier to get a better finish.
Also little passes are for finishing.
Could you please elaborate? I learned the opposite - small radius when taking light cuts to get a better finish for the reason that macardoso illustrated (minimize the ratio of radial to axial forces....did I say that correctly?). But maybe I'm misunderstanding what you wrote. If you meant that a larger nose radius for a better finish when taking large DoC (vs. small DoC): then I get it.

I agree that sneaking up doesn't seem work well with carbide inserts. I do like you say: understand total diameter and then try to divide into appropriate, equal DoC passes. Its a good learning experience when a lot of material has to be removed because you can dial in your DoC, make a pass and measure result as well as the finish. You can then tweak remaining DoCs so you know that you will accurately hit your #'s and finish on the final pass.
 
Could you please elaborate? I learned the opposite - small radius when taking light cuts to get a better finish for the reason that macardoso illustrated (minimize the ratio of radial to axial forces....did I say that correctly?). But maybe I'm misunderstanding what you wrote. If you meant that a larger nose radius for a better finish when taking large DoC (vs. small DoC): then I get it.

Most manufacturers will measure surface roughness in terms of Ra and Rz, essentially a statistically averaged surface height deviation. In the home shop, we most often shoot for "jewelry" finishes. Here's how they differ.

A CNC lathe will be programmed to make a part in as little time as possible. Running a 10 minute finish pass on a machine means wasted money so the programmer will opt for methods to meet their Ra/Rz requirements (measured on a profilometer). For a given feed rate, a tool with a larger nose radius will produce scallops in the part with a lower height (hence better finish) than a small radius tool. See the highly exaggerated image below, and play with this calculator: https://www.custompartnet.com/calculator/turning-surface-roughness
1633609889200.png


Now the same holds true in the home shop with a few notable exceptions:
  1. Time is not usually nearly as important to us as we don't run production
  2. We do not spend lots of money on fancy ($$$) inserts to give optimal results on each material
  3. Our machines (even your 16") are WAY less rigid than a production CNC. Your 16" is much better than my 12" in this category, and mine much better than the guys running 7" lathes, but the CNC lathes outclass us all.
So why does this matter. Well, the logic above drives you to select a tool with a very large nose radius for finishing. But in doing so, you accept very high cutting forces. You end up needing to take a finish pass at 75% or more of the nose radius (that can be a very meaty cut) or if you do less, your radial cutting forces will be very high, deflecting the tool, deflecting the workpiece, ruining your accuracy, and potentially allowing the tool to rub and mar the pretty finish.

If you can get used to taking a 0.050" or more finish pass, then the larger nose radius tools will allow your to finish at a higher feed rate. But if you are after a precision fit and you need to sneak up on the final size, a sharp, small nose radius insert will allow you to take very small depth of cut finish passes, get a very accurate final size, and get a great surface finish, BUT, your finish feed rate will need to be comparatively slow.

Using xxGT style inserts, I've taken 0.0005" depth of cut passes that have come off as one continuous chip. I've also used these inserts to turn bearing diameters within 0.0002" on diameters without needing any sanding or polishing to get the fit right.

So in summary, the large nose radius suggestion is correct, but needs to be applied with an appropriately large depth of cut on the finish pass. Small nose radius tools generate less cutting forces and can take smaller depths of cut, which allows delicate finish passes. Both can give great finishes, but the large nose radius will do it faster.

EDIT: Great pic from Sandvik

1633735564068.png
 
Last edited:
I'll throw one more tooling complication into here :D

Besides the nose radius, the insert's included angle or shape plays a big part in the amount of cutting forces generated.

1633610887187.png
1633610905143.png
1633610956907.png


Compare the 3 inserts above: CCMT, DCMT, VCMT (left to right).

EDIT: Great pic from Sandvik

1633735508753.png


Each of these inserts could have the exact same nose radius, but the tools on the right will have significantly lower cutting forces. They also allow access into restricting undercuts and grooves much better too. The downside is they are weaker, so probably not for roughing.

For my most precision work, I always use a VCGT insert, narrow, sharp, ground edges. For general turning I use almost exclusively the CCMT insert.

In fact, most production tools will rough with something like a CNMG (negative rake version of the CCMT) and finish with a VNMG, especially on boring bars. This helps those CNC lathes squeeze out more accuracy.

1633611365485.png
 
Last edited:
Back
Top