- Joined
- Sep 11, 2019
- Messages
- 22
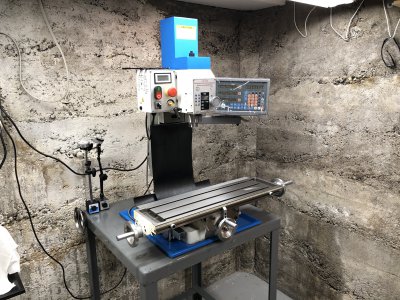
Been unable to get to the thing I wanted to address on the machine for a number of reasons.
Finally had time last night to get at it and action those plans!

First couple of things were that when I reassembled the X table after transporting it home in my car I didn't pay any attention to the screw alignment.
This caused some irregular resistance when turning the handles and got worse near the ends of the travel. Took the table off, loosened the screws on the nut and visually lined up the screw using the dovetails as a reference. Table back on, end caps and wheels installed and things are much much better. Smooth and consistent all the way through the travel.
Second was the gib adjustment, the instructions in the manual are rather vague, assumed knowledge kind of thing. Researching online I finally had a really good mental image of how it works. They only go in one way with the notch no the right for the X, the front from the Y and the top for the Z. Slightly tapered over the length, too little to see by eye, they need to be snugged up first by hand by rocking the table and then by the nuts carefully monitoring the friction changes.
This video by Hoss shows it well:
I also have some minor changes to the gib locking screws so they cannot bind up on anything ever again.
Added some silicone tubing to the Y axis ones to keep them from dangling, and put in some short 8mm bolts for the X axis. Custom knobs are next on my list to mill for these")

Replacing the bellows and rubber way protectors is a big improvement, these are attached via magnets using the original retaining plates and are held quite solidly.
Some more tweaks to the design are coming but I really like the zero hassle setup and fast access for cleaning and lubrication.


The basement floor is not very level where I have the mill on a Little Giant machine table. Bought some extremely nice leveling feet for it and installed them, such a difference!

Amazon link for the leveling feet: https://www.amazon.com/gp/product/B0029MRUKK/ref=ppx_yo_dt_b_asin_title_o04_s01?ie=UTF8&psc=1
Lastly I routed the DRO cables and power wires so they are nice and clean, and shimmed the DRO support arm, the sagging was rather noticeable.


So happy to be getting all of this taken care of in an evening, maybe make some parts tonight!
Finally had time last night to get at it and action those plans!
First couple of things were that when I reassembled the X table after transporting it home in my car I didn't pay any attention to the screw alignment.
This caused some irregular resistance when turning the handles and got worse near the ends of the travel. Took the table off, loosened the screws on the nut and visually lined up the screw using the dovetails as a reference. Table back on, end caps and wheels installed and things are much much better. Smooth and consistent all the way through the travel.
Second was the gib adjustment, the instructions in the manual are rather vague, assumed knowledge kind of thing. Researching online I finally had a really good mental image of how it works. They only go in one way with the notch no the right for the X, the front from the Y and the top for the Z. Slightly tapered over the length, too little to see by eye, they need to be snugged up first by hand by rocking the table and then by the nuts carefully monitoring the friction changes.
This video by Hoss shows it well:
I also have some minor changes to the gib locking screws so they cannot bind up on anything ever again.
Added some silicone tubing to the Y axis ones to keep them from dangling, and put in some short 8mm bolts for the X axis. Custom knobs are next on my list to mill for these
Replacing the bellows and rubber way protectors is a big improvement, these are attached via magnets using the original retaining plates and are held quite solidly.
Some more tweaks to the design are coming but I really like the zero hassle setup and fast access for cleaning and lubrication.
The basement floor is not very level where I have the mill on a Little Giant machine table. Bought some extremely nice leveling feet for it and installed them, such a difference!
Amazon link for the leveling feet: https://www.amazon.com/gp/product/B0029MRUKK/ref=ppx_yo_dt_b_asin_title_o04_s01?ie=UTF8&psc=1
Lastly I routed the DRO cables and power wires so they are nice and clean, and shimmed the DRO support arm, the sagging was rather noticeable.
So happy to be getting all of this taken care of in an evening, maybe make some parts tonight!