PM1236 setup quesiton and pics of my first cuts

Morgan RedHawk

Active User
H-M Platinum Supporter
Joined
Jan 10, 2014
Messages
200
So I made my first chips with the 1236. Wow..I really put my foot in it, didn't I? This was the first time I have machined anything, and I'm afraid I'm hooked.

My first attempt wasn't the best but it was a start:
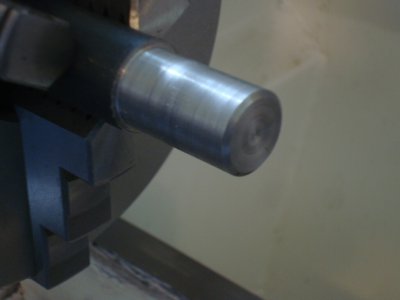
First Try.jpg

I came back inside, read a few things, changed speeds, and used a tool with a bit of a radius and did this:
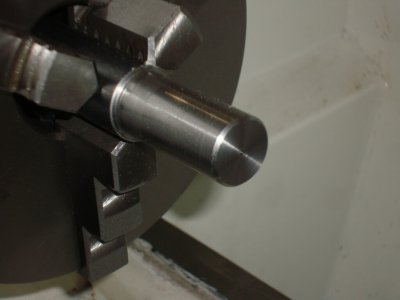
Second Try.jpg

Definitely better. I have some stainless bars that I scrounged, so I decided to give it a try to see whats what:
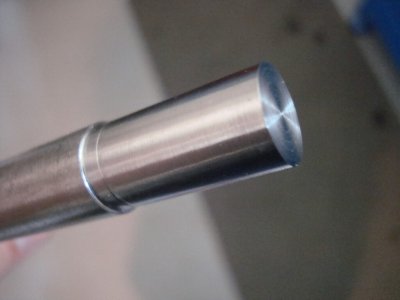
Third Try.jpg

That one came out pretty nice! I must have gotten lucky :thinking:.

I have to say, watching that chip come off that stainless and across the face of the tool like a little stream of water was pretty cool.

I have a few questions about the setting up of this thing, I wanted to run past yall.
I have an actual project that I want to do, so I decided quit just playing around and set this thing up the way it is supposed to be to make it accurate. I have read a bunch of the leveling threads, and plan on doing the 2 collar method.

First, I decided to try to get as much twist out of the bed as I could with my level. I am guessing that this is the right way to set this up. I do understand why it does not need to be Earth level, but I am going by that as an easy to see standard.
I used a Starrett 98-8 level, 2 parallels (checked with a micrometer to make sure they were accurate), and used the flats of the ways. I cleaned all surfaces with napthalene, and when I changed to the tail end of the bed, I put the parallels in the same position relative to each other that I had used at the headstock end. Also, I made sure the parallels only sat on the ground surfaces of the ways. I seem to remember reading that the machinist levels have a slight bow in them, hence they way I placed it on the parallels. Here is what I did:
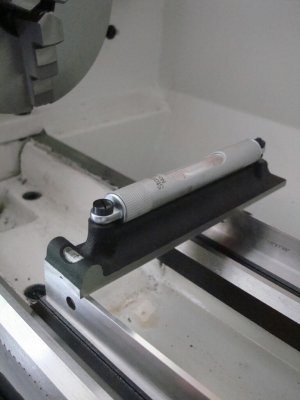
Head end set up.jpg

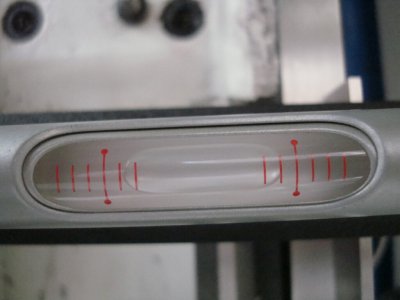
and this was the reading:

Head end reading.jpg

I then repeated the set up at the tail end.
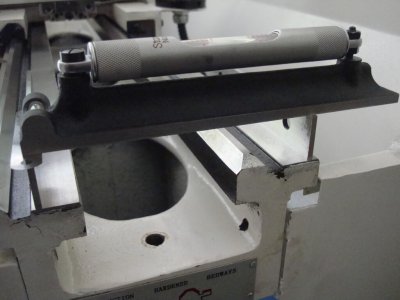
Tail end set up.jpg

I had to add a feeler gauge leaf of 0.004" to get this reading.
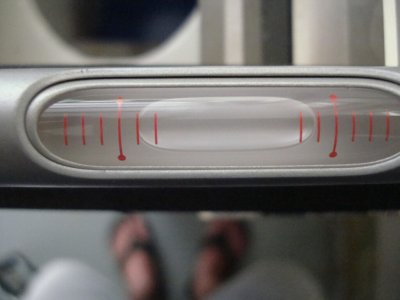
Tail end reading.jpg

At first, I attempted to adjust the leveling feet to correct this error...the problem is, the base of the lathe is made from 3/16" thick 2x2 square, and the lathe is not heavy enough to flex it. I can adjust one of the tailstock end's leveling feet enough that the other one (rear) will come off the ground and the bubble will not move.

So in order to get the twist out, I am guessing I am going to have to shim it? If so, where would I put the shims? Under the base or under the tailstock foot?

When I put the thing together, I did the recommended smearing of silicone around the holes between the chip pan, the base, and the lathe's tailstock foot. I tightened everything down good, but I am wondering if that will cause any problems with the alignment.

What do you yall think I should do, or do I need to do anything with that amount of error over the whole length of the bed?

Thanks for any advice yall can offer!

Morgan

First Try.jpg Second Try.jpg Third Try.jpg Head end set up.jpg Head end reading.jpg Tail end set up.jpg Tail end reading.jpg
 
While RayC is typing his usual long post with accurate instructions about how to twist your lathe, I congratulate with you for the good work you made.
Just a suggestion: avoid flip-flops while turning, chips are pretty hot and usually tend to drop down on the floor :biggrin:
 
While RayC is typing his usual long post with accurate instructions about how to twist your lathe, I congratulate with you for the good work you made.
Just a suggestion: avoid flip-flops while turning, chips are pretty hot and usually tend to drop down on the floor :biggrin:

Lol! The flip-flops are just for picher-takin!
 
Looks pretty good for first time to me. The second one just looks pretty good. I cant help much on the shims. But I will add that you should calibrate that level if you have not. It dont take much to throw off a machine level. At least flip it around 180 to see if it reads the same .
 
Looking good... I hope you have the setup guideline from post 13 of this thread: http://www.hobby-machinist.com/showthread.php?t=14005&highlight=1236+FAQ

So, what do you do now? Nothing -until you do the two-collar test and see how far things are off. After that, the commonly available articles about that testing technique tell you which end to shim given different circumstances.

When doing the test, I recommend using a bar of aluminum at least 1.5" diameter (preferably larger).


Ray
 
BTW: Before you do the two-collar technique, just use the lathe for a few days and get comfortable with the controls. Nobody is timing you on how fast you set it up. Try-out some different feeds, speed and DoC's. Spend some time and learn the machine. When it comes time to do the 2-collar test, you will be more confident that you're making the test cuts properly.

Also, really watch your safety habits. -Now is not the time to play games.

Goggles.
No long sleeves or loose clothing.
No wiping swarf with your fingers.
Keep hands away from anything that rotates.
Engage safety switch when messing with the side gears.
No gloves.

-And get some tweezers to pull the splinters from between your toes.


Ray
 
Looking good... I hope you have the setup guideline from post 13 of this thread: http://www.hobby-machinist.com/showthread.php?t=14005&highlight=1236+FAQ

So, what do you do now? Nothing -until you do the two-collar test and see how far things are off. After that, the commonly available articles about that testing technique tell you which end to shim given different circumstances.

When doing the test, I recommend using a bar of aluminum at least 1.5" diameter (preferably larger).


Ray

Yessir, read that, and did all the break in procedures, testing and oiling. Everything with the machine seems just fine.

I have a 22" bar of 1.5" cold rolled annealed and some 3" aluminum that I was thinking about doing the 2 collar test with. Any issues with mixing the metals for something like this? I was going to do the loctite method on the collars. If not, I can get an aluminum bar this week.

When I do the test, how will I know what is caused by the bed twist and what might be caused by the tailstock not being aligned?

Thanks for the help!


Read-up on the two-collar test.... you don't use the TS for that.

Sometimes, using 1.5" CR with AL collars causes vibration/chatter problems. Try it and find-out. Just use a thicker solid bar if you have troubles with vibration. Keep the bar short -like about 8" long protrusion. Only take off 1/2 to 1 thou off the collars. -Light cut, slow feed, moderate RPM.

When you get it shimmed so it's cutting within 0.00025" between collars, quit. Check again in a week then forget about it until the next time you have a part that calls for high precision. Occasional tweaking is needed. Your garage floor expands/contracts enough to change things...


Ray
 
So I made my first chips with the 1236. Wow..I really put my foot in it, didn't I? This was the first time I have machined anything, and I'm afraid I'm hooked.

My first attempt wasn't the best but it was a start:

View attachment 80637

I came back inside, read a few things, changed speeds, and used a tool with a bit of a radius and did this:

View attachment 80638

Definitely better. I have some stainless bars that I scrounged, so I decided to give it a try to see whats what:

View attachment 80639

That one came out pretty nice! I must have gotten lucky :thinking:.

I have to say, watching that chip come off that stainless and across the face of the tool like a little stream of water was pretty cool.

I have a few questions about the setting up of this thing, I wanted to run past yall.
I have an actual project that I want to do, so I decided quit just playing around and set this thing up the way it is supposed to be to make it accurate. I have read a bunch of the leveling threads, and plan on doing the 2 collar method.

First, I decided to try to get as much twist out of the bed as I could with my level. I am guessing that this is the right way to set this up. I do understand why it does not need to be Earth level, but I am going by that as an easy to see standard.
I used a Starrett 98-8 level, 2 parallels (checked with a micrometer to make sure they were accurate), and used the flats of the ways. I cleaned all surfaces with napthalene, and when I changed to the tail end of the bed, I put the parallels in the same position relative to each other that I had used at the headstock end. Also, I made sure the parallels only sat on the ground surfaces of the ways. I seem to remember reading that the machinist levels have a slight bow in them, hence they way I placed it on the parallels. Here is what I did:

View attachment 80640

and this was the reading:

View attachment 80641

I then repeated the set up at the tail end.

View attachment 80642

I had to add a feeler gauge leaf of 0.004" to get this reading.

View attachment 80643

At first, I attempted to adjust the leveling feet to correct this error...the problem is, the base of the lathe is made from 3/16" thick 2x2 square, and the lathe is not heavy enough to flex it. I can adjust one of the tailstock end's leveling feet enough that the other one (rear) will come off the ground and the bubble will not move.

So in order to get the twist out, I am guessing I am going to have to shim it? If so, where would I put the shims? Under the base or under the tailstock foot?

When I put the thing together, I did the recommended smearing of silicone around the holes between the chip pan, the base, and the lathe's tailstock foot. I tightened everything down good, but I am wondering if that will cause any problems with the alignment.

What do you yall think I should do, or do I need to do anything with that amount of error over the whole length of the bed?

Thanks for any advice yall can offer!

Morgan

I think the bubble has a slight curve not the base. It has been to many years since i used one.

Your turnings look good to me. I usually set the lathes, I used, to cut a fine feed. A little rounded nose on the tool bit helps. Also use a smooth file to knock down any sharp edges. Nice JOB.
 
-And get some tweezers to pull the splinters from between your toes.
Ray

Turning tool steel hot and fast always gets me. Produces those crunchies that break to form tiny splinters that love to get into your fingers. You'll look like you got into a tool steel cactus if you aren't careful.
 
Back
Top