POTD- PROJECT OF THE DAY: What Did You Make In Your Shop Today?

Nothing fun in the shop this weekend, just one of the things you have to do from time to time. Noticed the lathe was starting to turn a taper, and it's been some time since I checked. Cleaned it up and broke out the level. Once the basic leveling was done made a test bar and started the process of making test cuts. After some shimming and re-shimming got it dead nuts perfect. Tonight, I will check the tail stock alignment, and once that is dialed in, I can go back to making chips.
 
Not quite POTD, but close, sort of. Finally got a round tuit and finished a lathe tool holder rack and holders for the tool holders. 3d printed the dove tailed holders based on @vtcnc's design. Had a stick of 1.5" 80/20 and mounted it to the lathe. Sounded simple, right? That silly stick and mounting it fought me for quite a while. Most of it was me unestimating how much thread depth I needed. There were some 5/16" holes in the 80/20 and for some silly reason I though I could screw some 5/16 screws in there and thread into the aluminum. It went ok for one of the holes but not the other. So off it came from the lathe and set it up on the milling table.

I used a 5/16 drill to center on the hole. Then I used a 13/32" drill to open up the sides of the 80/20, so I could easily get a 3/8" tap in there. Then tapped to 3/8-16. I used a 1-1/4" 3/8" bolt to attach the stick to the lathe, but put in a 5 degree wedge between the back splash and the 80/20. I had printed that along with the holders. The wedge makes all the dovetails point up by 5 degrees so they won't fall off. Finally got it all together.

It was a long day, because I was diagnosing a bum X DRO. PM is sending me a new read head, so that is good.

So finally, this round tuit is done. Makes me happy to be able to clean up some of the clutter. I need to make some more holders, including one for the live center and a drill chuck. They will need to be a lot beefier. I will have to keep my eye on the AXA4-D boring holder, that is a lot of weight hanging out there trying to twist the printed plastic. May have to redesign that. Hmm, must have taken the picture before I hung it up. Take my word for it, the plastic section that grabs the 80/20 is only 1/2" wide, there's about 1.5" of steel hanging to the right of the dovetail. Think when it gets warmer (next summer) there will be sagging, maybe even sooner.
PXL_20221205_210457958.jpg
 
Last edited:
Finally managed to get this off my bench, I’ve been pecking away at it for nearly two months now!

I been wanting shelf for in front of one of my bay windows for quite a while so this was going to be it. A former neighbour had left me a nice board of teak but I could never really come up with the ideal project for it. I’m not a huge fan of teak itself and even less so as one monolithic board, so I decided to slice it up into strips and reconfigure it into something else.

I wanted to keep a look of airiness and also play off the nice angles that the sun makes through a window so this is what I came up with. This is just after glue-up, the two legs will spring off the top of the baseboard to support the front edge.

1670362776903.jpeg
1670362810594.jpeg
1670362911693.jpeg

And the same pieces after a couple coats of varnish. I like varnish, and I’m getting to like teak a bit more too.

1670362968678.jpeg

And finally in place this morning. Thanks for looking!

1670363010968.jpeg
1670363079340.jpeg

-frank
 
Last few weeks i've been very busy but one by one i've been finishing the extra tasks and today i've got the entire afternoon free. Being me i spent it in the big garage working on the W210 mercedes. It needed some cosmetic work for which i don't have patience but the body shops around here don't want to fix parts. Prices for a new front bumper are more then what that car is worth. So i spent some time plasting welding and reinforcing all the cracks with stainless mesh on the front bumper, side skirts and had to fix one tire on it, they need replaced but that will have to wait. Now i need it to hold air so i can move it around, the tire machine is coming in very handy.
IMG_20221112_152928.jpgIMG_20221112_152937.jpgIMG_20221112_152947.jpgIMG_20221119_202104.jpgIMG_20221119_203708.jpg
 
Even a blind cow finds an oat every now and again.

I picked up an old, used Jacobs 18N bearing super duper chuck USA made on the bay for $70 delivered. Here is a pic off the bay:
1670366678735.png
At first glance, I thought it may have had a little too much oxidation on it. But I knew it could also be an old paraffin based rust inhibitor that had collected some dust and crap from sitting. Turns out that is what it was. The original owner had taken pretty good care of it. The build up on the nose is aluminum, peeled off easy. It cleaned up very well using a scothbrite pad with the chuck spinning in the lathe.
IMG_9339.jpgIMG_9340.jpg
BUT!! That is not what brings me before the alter of the Hobby Machinist........
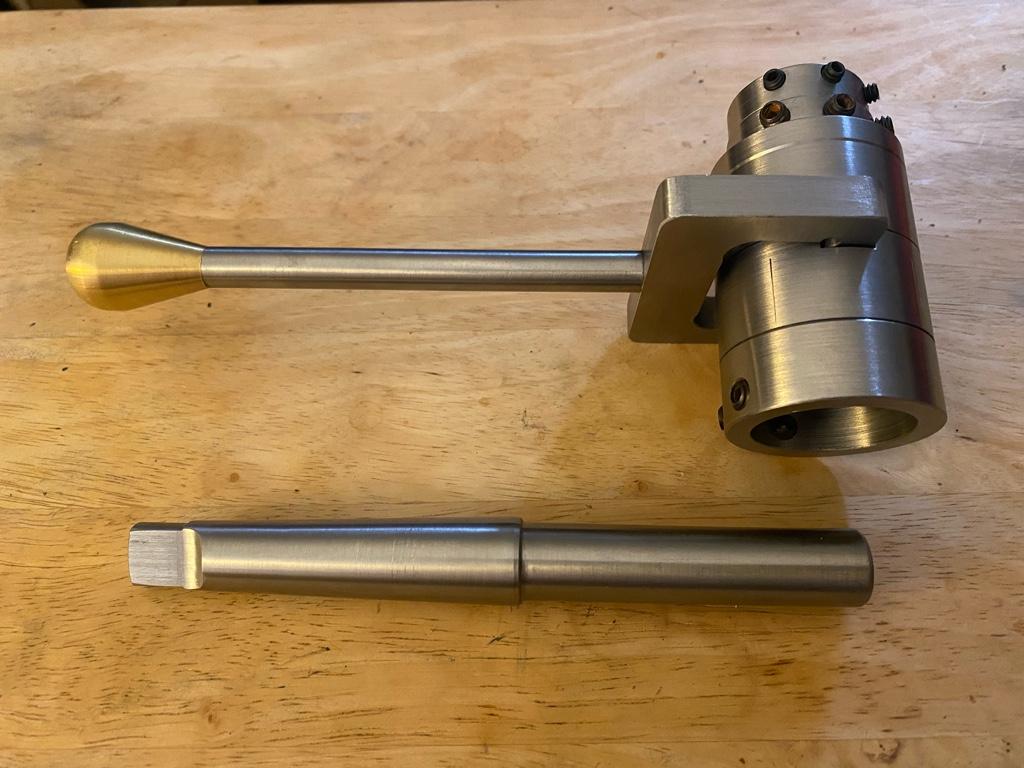
If you notice in the first picture, it came with a 1.25" straight shank. Really nice, very hard, fit nothing I had. I set out to remove it and put a Morse taper 4 on it. I don't know how old this chuck is, it says made in USA on it. Something tells me the newer ones may not but I no very little about Jacobs super chucks and women. The straight shank was firmly attached. I did not have wedges to fit a 4JT so I tried going about it a different way. I used a bearing puller.
The bearing puller did not quite fit in the groove at the base of the shank, so I chucked the hole mess up in the lathe and deepened and widened the groove in the shank with a parting tool. About .040 deep and .125 wide was all it took to get a bite with the bearing puller.
IMG_9331.jpg
Using the gaps in the bearing puller halves, I rubber banded a couple of .375 dowels to push against. The dowels transfer the energy to the back of the chuck. The rubber bands simply hold things in place until the pipe makes contact. You could use a wire tie, tape etc.:
IMG_9332.jpg

Tried and aluminum pipe as a pusher, but the dowels immediately dug into it.
IMG_9333.jpgIMG_9334.jpg

Yup, it was on there pretty good. Switched over to a deep socket. NOW I can get some beer behind it:
IMG_9335.jpg
It took a fair amount of force but it did pop out. Wedges have always given me fits, this did not. Probably do it this way going forward. If nothing else, I got to play with a lot more tools.................
I did press the chuck apart to get out all the old grease, cleaned it in the parts washer and reassembled. Operates through its 3/4" range very smooth. I dont know what runout will look like because I don't have an arbor yet, but since it is for use in the tailstock of the lathe, I am not overly concerned.
 

Attachments

  • IMG_9333.jpg
    IMG_9333.jpg
    237.8 KB · Views: 14
That is a beauty, what a find! Looks mint. Good job on getting the arbor off. I've done a few of those large straight shank arbors and I now drill a 5/8" hole through the chuck and press it off with a short 5/8" dowel held lightly in the jaws
 
Got around to turning up the Morse taper shaft for the tailstock die holder. Fun little lathe job.
8437955e7aab08e8d84716e54ba4ae83.jpg


Cutting oil is my blood.
 
That is a beauty, what a find! Looks mint. Good job on getting the arbor off. I've done a few of those large straight shank arbors and I now drill a 5/8" hole through the chuck and press it off with a short 5/8" dowel held lightly in the jaws
I like to drill and ream a 1/4 hole and fill the cavity with oil. A 1/4 rod for a piston and a solid wack with a hammer will hydraulic the arbor off with ease.
 
Back
Top