

-
Welcome back Guest! Did you know you can mentor other members here at H-M? If not, please check out our Relaunch of Hobby Machinist Mentoring Program!
You are using an out of date browser. It may not display this or other websites correctly.
You should upgrade or use an alternative browser.
You should upgrade or use an alternative browser.
POTD- PROJECT OF THE DAY: What Did You Make In Your Shop Today?
- Thread starter wachuko
- Start date
- Joined
- Oct 14, 2013
- Messages
- 982
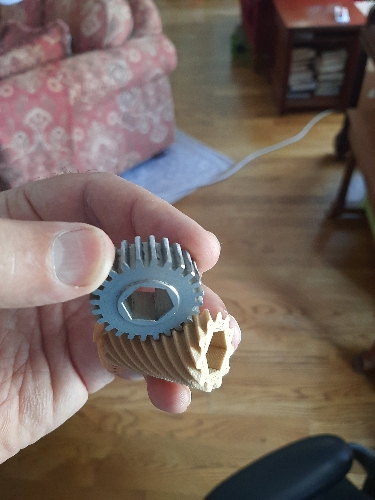
Noodling toward a non-right angle worm drive for a First Robotics intake. I'm looking for a way to have feelers, kind if like a Roomba, that sweep balls inwards. The truck is that the axis of rotation needs to be angled...
That's an 11 start worm that engages with a standard 20 DP gear. FRC kids love their 1/2" hex shafts... once I get the spiral -exactly- right I'll make a bearing block for it. The tooth spacing is still just a whiff off.
Sent from my SM-G715A using Tapatalk
That's an 11 start worm that engages with a standard 20 DP gear. FRC kids love their 1/2" hex shafts... once I get the spiral -exactly- right I'll make a bearing block for it. The tooth spacing is still just a whiff off.
Sent from my SM-G715A using Tapatalk
- Joined
- Aug 6, 2015
- Messages
- 3,871
Wow!! That came out amazing!!Finally done! Way more work than I thought it would be. Stripping the old 80 year old paint wasn't bad. I used a needle scaler and it worked well. It was all the scrubbing with scotch brite pads and Xylol to get the grime off, then wipe it all down again that wore me out. Scrubbing old iron on your hands and knees is not for the old. Anyways new paint job with red accents on the important stuff. Almost to nice to use it now.
View attachment 406915
View attachment 406916
On other news... finally finished this project.


the damage I did today continued tonight.
I went to drill the cross bar for the lathe key. the 4140HT is not that hard, but it was not easy. The small pilot was fine, but the larger hole just wouldn't cut. Took out the cobalt drill bits and still wierd, then grab, finally got through.. Reamed.. deburred.
brought it over to the vise, heated it, started putting the bar through, going, then it started coming out of vise.. readjust it, in a better position... it's already tight and not even 1/3 in. tried reheating, but the key and t bar are heating together, tried cooling the t bar with acetone.. not helping.
ok, time to use the press. going, then stop... I think it galled up.. put some antisieze on it. not moving. heat it, press, bent the the t bar. straighten it. try again. nothing. Bang it in there. not moving. now banging the key.. what a mess.
change the bottle jack to a higher tonnage. it's moving again.. ok.. pretzel...
straighten it ... snap...
shower... hard alcohol... anger, ... realization I should have stopped when it was stuck and given it more thought... licking my wounds now...
The key is damaged from hammering... its usable, but not pretty. I might be able to fix it up with some knurling to hide the damage.
probably going to cut the T handle, then drill it out. Grrrrrrrrrr...
- Joined
- Aug 6, 2015
- Messages
- 3,871
Listening to some vinyl... was reading a few posts in the forum for the vendor that makes the turntable that I have ( VPI )...
Someone posted that they could not use the record clamp if they were playing a 7" 45rpm record with the adapter that goes in the center...
That got my brain cells moving... the clamp is made out of Delrin... the only reason the adapter would not work is because there is not enough clearance to do so... I have a mandrel I just made... and the small lathe... Let's give this a try...
Taking apart the clamp is easy... just remove the cir-clip and the two pieces come apart.

This is the adapter that the clamp needs to clear...

Seems easy enough...

Finished part...

Let's assemble it back...


Tested... now, I do not have any 45s... but the test is simple... just needs to go over the adapter and clamp against the plate...

Oh yeah... works fine...

I shared the steps with the folks in that forum... they can take their clamp and have a local shop do the modification... felt pretty good... Also sent a note to the owner so maybe he can incorporate this change in future record clamps...
Now back to listening to music...

Someone posted that they could not use the record clamp if they were playing a 7" 45rpm record with the adapter that goes in the center...
That got my brain cells moving... the clamp is made out of Delrin... the only reason the adapter would not work is because there is not enough clearance to do so... I have a mandrel I just made... and the small lathe... Let's give this a try...
Taking apart the clamp is easy... just remove the cir-clip and the two pieces come apart.
This is the adapter that the clamp needs to clear...
Seems easy enough...
Finished part...
Let's assemble it back...
Tested... now, I do not have any 45s... but the test is simple... just needs to go over the adapter and clamp against the plate...
Oh yeah... works fine...
I shared the steps with the folks in that forum... they can take their clamp and have a local shop do the modification... felt pretty good... Also sent a note to the owner so maybe he can incorporate this change in future record clamps...
Now back to listening to music...
- Joined
- Nov 24, 2014
- Messages
- 3,154
@wachuko
Very nice job. Looks OEM.
I'm not up on high zoot hi-fi equipment (for 40ish years?). Am I understanding correctly, the spindle is threaded and the clamp knob is a nut that screws onto the spindle?
I might have made a thinner 45 adapter, rather than mod the clamp. LOL, different strokes.
I just noticed your motto. LOL I think I also qualify. We should have T-shirts made.
- Joined
- Aug 6, 2015
- Messages
- 3,871
Correct, that is how the clamp works.@wachuko
Very nice job. Looks OEM.
I'm not up on high zoot hi-fi equipment (for 40ish years?). Am I understanding correctly, the spindle is threaded and the clamp knob is a nut that screws onto the spindle?
I might have made a thinner 45 adapter, rather than mod the clamp. LOL, different strokes.
I just noticed your motto. LOL I think I also qualify. We should have T-shirts made.
Either that or use those old yellow plastic adapters that 45's used to use... But the person that posted the thread had an adapter similar to what I had...
Hahahahahahha, I can't fight it man... that is just the way it is... someday I will finish them all...

- Joined
- Dec 15, 2018
- Messages
- 784
This saw was used to trim the ends of lumber at sawmill that hasn't operated in 50 some years. Setting it up with a gas engine to cut up my slabs from the mill has been the plan for years. A couple of days ago it seamed like the time to do it. Sawed some cedar timbers for a base and hauled the saw into the shop, intending to give it a going over, lube the babbit bearings, buff the rust off the table.


Well as often happens one thing led to another and we decided it deserved a restoration.

So now its sandblast and paint.
What was so different about the old steel. This is all square headed bolts so old, line shaft old but all the bolts came out easily , as in mostly finger tight once broke loose, and this worked its life in an open shed and spent the last maybe 10 years under the trees here.
Greg
Well as often happens one thing led to another and we decided it deserved a restoration.
So now its sandblast and paint.
What was so different about the old steel. This is all square headed bolts so old, line shaft old but all the bolts came out easily , as in mostly finger tight once broke loose, and this worked its life in an open shed and spent the last maybe 10 years under the trees here.
Greg