More time in the shop today and I knocked this out in a couple hours.

Huh, looks like a cheap dial indicator, what’s the big deal? Well it is a cheap dial indicator, in fact I kind of pooched it a few weeks ago when I severely over-travelled it and it’s been lying on the bench ever since. More recently though I’ve developed the need to make a replacement part out of a hard rubber material, and while I have a product I’m going to use I won’t really know if it will be dense enough until after I’ve made it. It would be nice, I thought, to have a way to measure the hardness of my old part and thereby be able to compare that to other known samples. In other words, a durometer. Hmmmm….
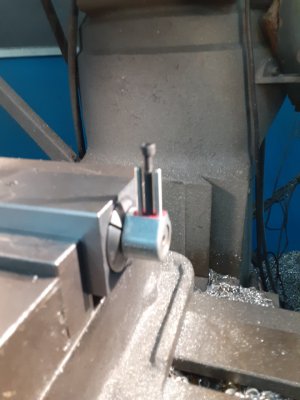
Without getting overly involved here’s the breakdown: regular 1” drop indicator with removable tip. I unscrewed the tip, fitted a small washer to shoulder against the tip but not slide up the stem, then slid a fairly close fitting compression spring over the stem and screwed the tip back on. A normal indicator has this spring action built in — this is what causes the stem to return after a measurement — but that’s the part I wrecked on mine and plus, I wanted a much stiffer spring action.


The big aluminum part is essentially just a sleeve drilled and reamed to fit snugly on the barrel of the indicator. It’s open on the end, the spring-loaded stem is free to slide inside the sleeve, and the tip extends beyond the end of the sleeve by about an eight of an inch or so. The sleeve is held on to the barrel with two small grub screws so it can be adjusted a little if necessary.

How does it work? Well, you press the tip against the test material until the sleeve comes in contact and note the measurement. A “soft” material will allow the tip to sink further in and not depress the spindle very much against the spring. But a harder material will not yield as much so the spindle will be depressed much further giving a higher number. Here’s two examples: the pink sample is 30 Shore A and quite squishy; the green sample is 40 Shore A and more of a medium softness. The actual numbers on the indicator won’t correlate to any actual Shore hardness values (unless I’ve been unbelievably lucky!) but they do provide a relative comparison which is what we’re after a lot of the time anyway.


In all likelihood this may be one those “…it seemed like a good idea at the time…” projects that you really never use but it fun just the same. Thanks for looking, again.
-frank