Powerkraft 10'' spindle issue

rambin

Registered
Registered
Joined
Jul 29, 2013
Messages
237
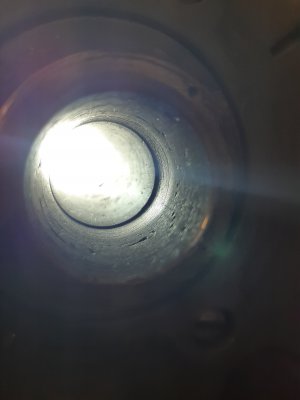
ive noticed in the past one time when I put a 3mt lil chuck attachment into the spindle I had big runout I blamed the lil chuck on being out of wack….recently I had to put a 3-2 adapter in there to machine a blank 2mt tool.. issues again..i bought a new 2-3 mt adapter as mine was old and looked welll beat up... now I think ive found my problem if you look down the spindle bore you can see a ridge... check the pics. its not even either it almost disappears in one area. im thnking the spindle would be pretty hard metal how did this happen? factory defect? did someone run a boring bar down there at some point? what are my options here? I have a dial indicator but not a test indicator.. need some wisdom on what to get there... I see some shars ones on amazon should I go .0005 or .0001


but n bubut 20200121_113302.jpg20200121_113246.jpg

 
I think your diagnosis is correct - someone ran a boring bar in there when they shouldn't have.
Is is as eccentric like it looks in the picts?

How far in until you hit the 'ridge'?
 
I can't tell for certain from your photos but think that the Powercraft 10" has a 1-1/2-8 spindle nose threads with a radial register area (unthreaded) between the threads and the flange or axial register. Put your best dial indicator on the tool post and check the radial runout to confirm that it hasn't changed significantly since the last time that you checked it.

Assuming that it has not changed, your only option is to run a good 3MT tapered reamer into the 3MT taper and clean it up. However, I would not trust the tailstock back-set setting. So first, you must check and adjust that. In order to do that, you will need an accurate test bar or you will have to make one. And you will have to have a straight chucking dead center and a 4-jaw chuck to hold it. You will also need a good 2MT tapered dead center for the tailstock end. And a good 2JT mounted drill chuck to eventually hold the 3MT reamer (Unless you can find one with a 2MT arbor). As a circumstance like this is about the only case where you would ever need the straight chucking dead center, I assume that it at least you will have to buy. You will also have to have a lathe dog that will fit the test bar and that has a tail on it that is long enough to be driven by one of the jaws on the 4-jaw chuck because with the 4-jaw chuck mounted on the spindle, you cannot mount the usual dog drive plate there also. And you must tie the dog tail firmly to the chuck jaw so that it cannot bounce.

In the meantime, read up on how you adjust the tailstock back set. If you have a Logan manual with those instructions, fine. Otherwise use either the Atlas Manual of Lathe Operations or the SB How To Run A Lathe, whichever you have or can find.
 
I think your diagnosis is correct - someone ran a boring bar in there when they shouldn't have.
Is is as eccentric like it looks in the picts?

How far in until you hit the 'ridge'?


its about 1.25 in from the end... no its not eccentric so not sure how it could have been done with a boring bar? would a boring bar cut the hardened spindle?
 
I can't tell for certain from your photos but think that the Powercraft 10" has a 1-1/2-8 spindle nose threads with a radial register area (unthreaded) between the threads and the flange or axial register. Put your best dial indicator on the tool post and check the radial runout to confirm that it hasn't changed significantly since the last time that you checked it.

Assuming that it has not changed, your only option is to run a good 3MT tapered reamer into the 3MT taper and clean it up. However, I would not trust the tailstock back-set setting. So first, you must check and adjust that. In order to do that, you will need an accurate test bar or you will have to make one. And you will have to have a straight chucking dead center and a 4-jaw chuck to hold it. You will also need a good 2MT tapered dead center for the tailstock end. And a good 2JT mounted drill chuck to eventually hold the 3MT reamer (Unless you can find one with a 2MT arbor). As a circumstance like this is about the only case where you would ever need the straight chucking dead center, I assume that it at least you will have to buy. You will also have to have a lathe dog that will fit the test bar and that has a tail on it that is long enough to be driven by one of the jaws on the 4-jaw chuck because with the 4-jaw chuck mounted on the spindle, you cannot mount the usual dog drive plate there also. And you must tie the dog tail firmly to the chuck jaw so that it cannot bounce.

In the meantime, read up on how you adjust the tailstock back set. If you have a Logan manual with those instructions, fine. Otherwise use either the Atlas Manual of Lathe Operations or the SB How To Run A Lathe, whichever you have or can find.

-lots of questions... yes its 1.5 -8
would a reamer cut into that I assume its quite hard?
not sure I have a 2mt dead center i'll have to look
i do have a few dogs, never used them or the plate b4
need some wisdom on what dial test indicator i should get for this and general usage like this... alll i have now is a few .001 dial ind. i see shars has some on amazon? should i go .0005 or .0001?
im just learning on all this. seems the lathe is falling apart faster then im fixing it...
 
I doubt that the spindle is hardened, or the boring bar or whatever probably couldn't have done the damage that it did.

If you don't have a 2MT dead center, you really should. But surely you have a 2MT live center. Typically not quite as accurate but better than nothing.

No comment on the dogs. And you can't use the driver plate until you fix the 3MT in the spindle, anyway.

Dial indicators come in all different shapes and sizes. But the most convenient style for measuring both spindle register runout and diameter of both test bars and regular work will be something that can be mounted in the tool post or Quick Change Tool Holder, the rod that operates the dial pointer should move in the horizontal plane and at right angles to the spindle axis, and the dial should be in the horizontal plane so that you can conveniently read it from above. As to sensitivity, +/- 0.0005" should be sufficient.
 
A few things occurred to me:
  • Your spindle is probably not hardened. It is pretty beat up, too.
  • The ridge defect is uneven so a boring bar is not likely to be the culprit. A spinning morse taper might be, though.
  • I don't think a reamer held by a tool post or tail stock can ream this accurately enough. I would remove the spindle and either replace it or have a machine shop ream it accurately.
  • I wonder about the condition of the spindle bearings or bushings.
As for an indicator, and this is just my own opinion, I would opt for a 0.0001" DI for evaluating spindle concentricity. A 0.0005" DI is really good for general use but for a spindle, tenths matter. At this level of tool, I prefer to buy once and cry once so I recommend a Swiss-made tool instead of Asian imports. If I were you, I would go to the Long Island Indicator site and spend some time looking at their info and recommendations. Far and away, the most recommended DI from actual users are the Interapid, Compac, Tesa and B&S/Bestest indicators, and for very good reasons. They are accurate, tough and they can last for decades if used with care; if something breaks, they are repairable.

My personal choice is the Compact 215GA, a large dial horizontal 0.0001" DI. It is just as accurate and smooth as Interapids but is tougher.

Brand new, Amazon usually has the best prices. Ebay is also an option but you takes your chances there.
 
hey..sites finally back up and running...

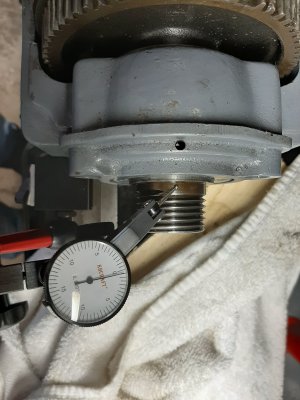
well I got a test indicator and toook some measurements probably not doing it all correctly but this is what ive done...20200125_125131.jpg

outside of spindle collar.. was about .0007 (1.5 ticks @ .0005)

inside of spindle guess I didn't take a pic of it but it was .0023" (4.5 ticks @ .0005 per)


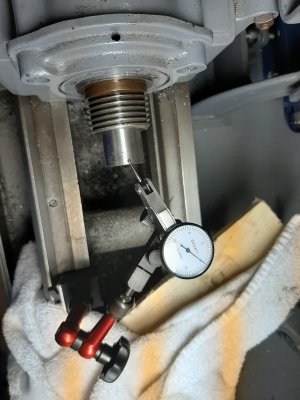
20200125_130812.jpg
outside of new 3-2 adapter... .0025(5 ticks @ .0005)

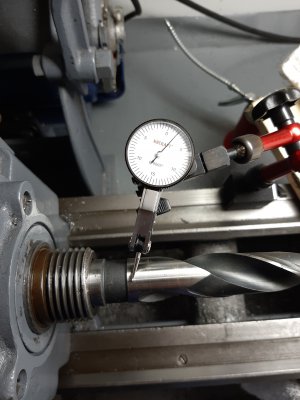
20200125_132529.jpg
3mt drill bit .025 (5 ticks @.0005)


i think i'm reading this thing right? thats why i mentioned how many ticks ;p so what i'm thinking about these numbers is my outside of spindle is good my inside is screwed..... what should i do from here?
is reaming it an option? i would have to buy the reamer... should i do it in my lathe or take the tailstock out and have it done somewhere? or should i look at getting another spindle?
 
That's a lot of runout for the spindle bore. It should be less than 0.0005" (mine is 0.0003"). I think it would be better to clean up the taper with a boring bar first, then finish with a reamer.
 
Back
Top