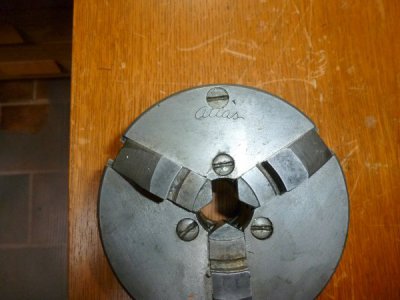
Problem With The Screws On My 4 Jaw Atlas Chuck

thanks for the feedback, and the exploded view Peter I'm going to try press one out and see what happens Ive got a 12 tons press so Ill let you know how it works

Art B
 
David,

No, I don't have anything like that. My limited understanding is that 10F's were shipped to England under Lend-Lease initially and still with Atlas badges. Then they may have been shipped complete but re-badged. And finally were either built or partially assembled in England with non-Atlas badges. But I only have a few snippets to support that progression. It could well be that Atlas shipped lathes but some supplier in England provided chucks and later Atlas started buying chucks from that vendor for sale in the US. I also don't know when that stopped. My 4-jaw doesn't have anything but jaw numbers, model number and what I presume to be a serial number stamped on it. And the casting number doesn't look like what either Atlas or Clausing used. My original 3-jaw has all of that plus Kalamazoo Industries stamped on it. They were both bought in January of either 1981 or 1982.
 
I was kind of curious about this myself. Maybe do some Googling . As mentioned, the pic I grabbed was from a Gator manual, but maybe different chucks have different ways of seating them? The tap/extract sounds like a good idea but I wonder if like most chuck components, maybe hardened or real tough stuff?

https://www.google.ca/search?q=4+ja...hVp2IMKHQAHBq4Q_AUIBigB#imgrc=HXd6glMsD9E6CM:
http://bbs.homeshopmachinist.net/threads/53041-How-to-disassemble-a-Grizzly-4-jaw-chuck
http://www.practicalmachinist.com/vb/south-bend-lathes/disassemble-4-jaw-chuck-129791/
http://bbs.homeshopmachinist.net/threads/63293-Questions-On-Disassembling-4-Jaw-Chuck
 
Well, they might be (hardened). Unfortunately, I don't have a hardness tester so the only way to find out would be to try it. Which I've no desire to do on mine.
 
If they are like my four jaw chucks, the "plugs" are slightly tapered. I made a simple tool to tap them out the back of the chuck.
They come out quite easily actually. Once removed, the rest just slides out.
 
You'd think for how much chucks cost, these drive-in 'plugs' seem a bit primitive for what they do. But I guess it obviously works & probably what counts is the chuck jaw fit itself as it slides in its track & the screw basically just provides locomotion. I had one jaw that you could feel would tighten & loosen a bit as it was rotated, almost like the worm screw was not axial. The others were nice & smooth. That's what got me digging into mine to begin with. Turns out I could see a bit of bur on the end of the (unfinished) thread & I dressed it off with a small Dremel grinder point. I cleaned & examined the threads of the jaws & cleaned them up lightly with a stone. Some of the offshore chucks are not very pretty in this regard.

One thing before removing the plugs, maybe it was mentioned - scribe a distinctive witness line across the plug & extending to the chuck back & number them 1,2,3,4. At least you will know how they were installed originally. I cant see the plugs rotating as they are tapped back in again, but if it did, it would affect the orientation of the fork & thus how it enveloped the axle portion of the screw.
 
In the late 30's & early 40's, they also sold electric motors with Atlas badges. But they didn't actually make them.
 
I just put the 4 jaw chuck on my 12x36 craftsman commercial lathe for the first time and when I started to adjust it, I found that the square adjusting holes were all rounded out and non adjustable. Has any had this problem, are their any suggestions as to how to resolve it. can the screw plugs be removed so the screws can be taken out.

art b
Art, I have the same problem with one of my jaws. I don't think your adjusting holes are rounded out, I think that there was a thin round four sided piece of metal that the chuck key fits into that is broken off the top leaving only a hole in the center of the screw. That is what I found when I looked at mine. If you look at your screw from the front of the chuck you will see a space where there are no threads near the edge of the chuck. If you look on the backside you will note the plugs are right under the "space". Back looking from the front, you will see two ends of metal, one on each side of the space that look like they are grasping the screw. I took a small thin punch and taped back and forth on the ends of metal and it easily moved the plug out. I found that you don't need to completely remove the plug to get the screw out, therefore no problem in replacing it.

My repair plan (starting tomorrow) is to get a allen head bolt in which the allen head is just slightly smaller than the diameter of the screw. I than plan on machining the screw part of the bolt so it just fits into the round hole at the end of the screw. Than I plan of having it welded together as I am not a good enough welder. The other thought I had was drilling the hole deeper and threading it. Hopes this helps.
 
Back
Top