Procedure/methodology question on simple project

devils4ever

H-M Supporter - Gold Member
H-M Supporter Gold Member
Joined
May 13, 2019
Messages
1,016
While I'm working on getting my PM-25MV mill converted to CNC, I thought I do some manual machining to help hone my skills.

So, I want to make a simple Burr Puzzle. There are 11 pieces exactly the same with a simple cutout. There is 1 piece similar to the others, but with an additional cutout. See drawing below.

So, what would be the best way to do this?

I would like to "gang" cut a bunch of them, but I'm not sure how.

I'm buying 6061 Aluminum 3/4" square stock, so I'm thinking I don't need to mill this dimension. A few thousandths aren't critical. I'm assuming 3/4" stock is +/-0.002"?

My thoughts are:
1. Rough cut to length.
2. Use the mill to make one end square.
3. Mill opposite end precisely to length using a "stop" to make it easier.
4. Setup a "stop" to mill the cutouts all the same.

Is this the proper way to do this? I would like to mill all or most of the cutouts at the same time, but I'm not sure how to do this.
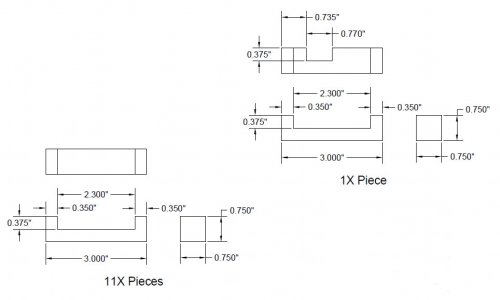
BurrPuzzle.jpg
 
I have made a few 6 piece burr puzzles out of aluminum. If you want to gang cut a bunch you're probably going to need to make up a fixture
like in this video.

I found they need tight tolerances to fit nicely, pretty fussy little thing that way on a 6 piece burr. To loose and it falls apart on it's own, to tight
and it's no fun to try to solve. Mine that fit the best were hand fitted for the last little amount.
A 3d printer makes a pretty good burr puzzle. The roughness of the print makes it hold together while also being slid able.
 
Cool video. Thanks. Joe Pie is the man!

I have to decide if a fixture is worth making since I'm only making one puzzle. Plus, I only have one Kurt 4" vice.

I guess the fit is like Goldilocks. It has to be just right!
 
For one puzzle I think I'd do them individually. Clamping multiples in a vise doesn't work well unless they are very accurate lengths so one isn't loose causing a disaster.
The fixtures are cool, but there is more material in it than there is in the puzzle. So definitely just for making multiples.
 
One of the critical dimensions are the thicknesses of the sides of the "U" shape. If you set up your vise with a stop, you can mill one side, turn the work around and cut the other. Then remove the waste in between, no need to worry about tolerance at that point. So while you'd be making them one at a time, at least your fixturing will minimize the setup time required.

You can do something similar to mill the pieces to length.

I've been thinking about making a bur puzzle as well so I'm curious on how it works out for you.
 
Puzzle is complete! It taught me a lot be doing this. I was able to stay within 1 or 2 thousandths throughout this project. This is much better and faster than I could ever achieve with my Sherline mill. The extra capacity and ability to take decent size cuts helps a lot. I wasn't pushing it too much, but was able to take 0.050" deep cuts with a 1/2" 4-flute endmill without issue.

Now, I need some advice on finishing this. There are minor tool marks and the original bar stock finish that I'd like to remove. Is there a easy way of doing this? Fine grit sandpaper? Scotchbrite pad? I do have a tumbler for brass ammo casing. Can this be used?
 
For small stuff, I've been using an air grinder or a dremel (needs a 1/8 arbor instead of the usual 1/4) and those 80-for-twenty-bucks bags of roloc disks. Step up from coarsest grit to finest and finish with one of the scotch-brite style, or a buffing disk and some polishing compound.

The casing tumbler can be used but there are some caveats - your medium (walnut shells, corn husks, whatever) may already be dirty from the casings, if you add any sort of polishing compound you will need to change the medium before going back to doing casings, that sort of thing.
 
How about a few pictures of your set up.
Looks like a fun project and it has got me to thinking.
I really need to light a fire under the electrician to finish getting my mill wired up!
My boys will be home for the holidays and we could spend some quality time in the shop.
 
ThinWoodsMan: I don't have an air grinder, but I do have a Dremel. Would these work? Dremel

finsruskw: I will try to get a few pics up shortly. It was fun, but a bit repetitive since 12 pieces are needed and 11 are identical. Perfect for me since I'm learning how to do all this. I was taking my time and seeing how accurate I could be.
 
Great job! I prefer to finish with the normal (reddish) ScotchBrite pad and then the fine (gray). Very small circular motions and don't rub near the edges long at all or you might round them off. Sometimes I'll put the pad on a flat table and rub the part against it there.
 
Back
Top