Quick and dirty taper pin pusher

Clock work

Registered
Registered
Joined
Nov 25, 2016
Messages
175
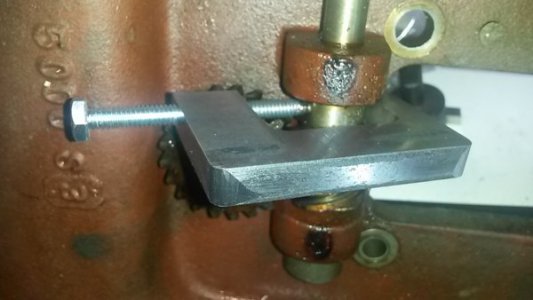
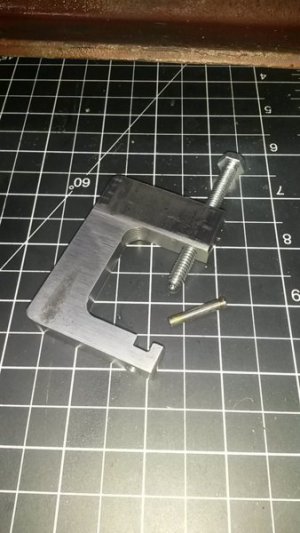
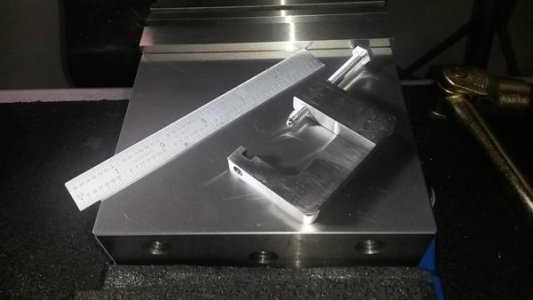
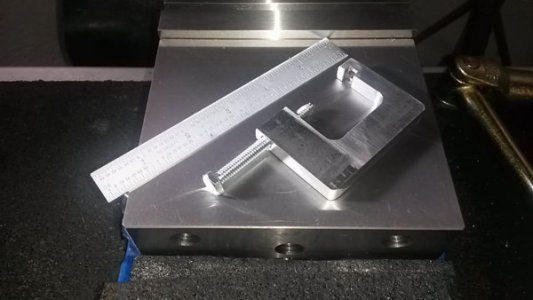
In taking my SB7 shaper down to clean it up and paint it, I encountered taper pins for the first time and I will say now... not a huge fan. Nothing but stories online about turning them into rivets or people having to repair the thing the taper pin was in after they beat it to death getting the pin out. One guy mentioned he used his hydraulic press to get them out but that wouldn't work for me but.. another tack, see photos. Hideously crude.. looks like I made it with an axe but it works. Only popped two so far with this but worked great... keep on dialing in force on the pusher and then the pin just lurches out... gently push it out the rest of the way with what ever fits in the hole. The ball bearing is to have a small bit of reach into the hole in which the pin is located

CW

20180315_105503.jpg20180315_105521.jpg20180315_105926.jpg20180315_110425.jpg
 
Looks like it would work great. Your axe is better than mine.
 
After about years of dealing with taper pins, my technique is to make sure what is the small end and take a tapered drift punch and land it on that end and give it a whack with a good sized hammer applied with vigor and knocking it loose on the first whack; if one pussyfoots around, you just peen it over and have a hell of a time getting it out, even having to finally drill it out.
 
I'd seen a lot of advice to that end.. I felt a simple machine would eliminate the vulnerability of me misjudging the vigor of the strike and the risk of then repairing what I screw up when I go to drill it out. A coward's life is an easy life:)
 
In taking my SB7 shaper down to clean it up and paint it, I encountered taper pins for the first time and I will say now... not a huge fan. Nothing but stories online about turning them into rivets or people having to repair the thing the taper pin was in after they beat it to death getting the pin out. One guy mentioned he used his hydraulic press to get them out but that wouldn't work for me but.. another tack, see photos. Hideously crude.. looks like I made it with an axe but it works. Only popped two so far with this but worked great... keep on dialing in force on the pusher and then the pin just lurches out... gently push it out the rest of the way with what ever fits in the hole. The ball bearing is to have a small bit of reach into the hole in which the pin is located

CW
In looking at the pictures I can't seem to find the "Hideously crude..." device that you mention. :cool:
Another good practice is to sand off or remove all paint from both ends. I failed to do that once upon a time and the large end had been tack welded and there was several layers of paint covering it that I didn't noticed. Firm hits on the narrow end didn't work.
 
Tapered pins are supposed to have domed ends on them. Usually if they have been removed and installed a few times, they get flat ends
so need to be ground to a domed shape again before reinstalling. I have also just tapered the tips and that works too.
 
Tapered pins are supposed to have domed ends on them. Usually if they have been removed and installed a few times, they get flat ends
so need to be ground to a domed shape again before reinstalling. I have also just tapered the tips and that works too.

There appear to be places on my shaper where the manufacturer went to the trouble of blending pins into the surface such as on the hand wheels. Perhaps these are straight pins, but either way, thanks for posting that. It seems like a good thing to have an indicator something has been "screwed with". Is there a second reason beyond that (and perhaps is that even a reason)?
 
In looking at the pictures I can't seem to find the "Hideously crude..." device that you mention. :cool:
Another good practice is to sand off or remove all paint from both ends. I failed to do that once upon a time and the large end had been tack welded and there was several layers of paint covering it that I didn't noticed. Firm hits on the narrow end didn't work.

Tack welded. I'm in awe. Thank God we have these innovators!

You're too kind.. I look at what people who post in this forum make and the norm is just a much more finished looking item. In my partial defense, I was trying to get it done before my daughter's midnight noise limit so she can sleep (over rated:).

CW
 
After about years of dealing with taper pins, my technique is to make sure what is the small end and take a tapered drift punch and land it on that end and give it a whack with a good sized hammer applied with vigor and knocking it loose on the first whack; if one pussyfoots around, you just peen it over and have a hell of a time getting it out, even having to finally drill it out.
What John York (benmychree) said. Make damn sure what end is the small end and give it a good whack, supporting the work if necessary to prevent damage to stuff like bearings, and to make it more rigid so the hammer and punch blow does not just flex things. On installation you do not have to (or want to) beat them in hard. The pin will stay put with just enough medium tapping that it is set. A really tight or press fit is not required or desired.
 
Back
Top