I've been wanting to make a ball turner for quite some time. Well, this past week I finally got a "round 2 it"! My first tool holder attempt caused me to say some things, that I'm glad my son didn't hear...

...but I managed to get it right the second attempt! I first tried mounting the base to the location where the compound rest normally occupies, but soon learned that I would not have enough room, between the radius turner and the lathes center line....

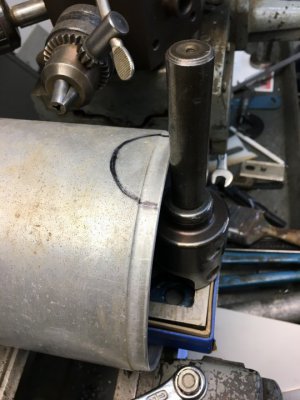
On the right side of the pic, you can JUST make out the tip of the live center in the tailstock...so went back to the drawing board, and decided that I would remake the base, suited to mount on the cross slide...
Well, I deffinately had more clearance now, but something else hit me like a ton of bricks. I had no means of moving it forward or backward, something I didn't even consider since it was originally going to be mounted on the compound. Also, I really disliked having to use the gib from the cross slide, it was just SO oversized for this little 4" tool, so I decided to make it's own gib.
Well, this got me to thinking...there is no way that I am going to be able to keep up with that little gib, when the turner was not in use. My solution was to embed the small cut off section, that was cut in order to be able to use transfer screws to place my gib screws in the right location, with a few magnets. Viola! No losing the new gib now!
As far as for making the tool move forward and backward, I decided to make an nut that would ride on the original cross feed screw, and i was quite pleased with how well it turned out, not to mention it worked!!

After fixing those few road blocks, I decided to gun blue the toolpost, and obviously had to change the color of the lock down screws, so there would be some contrast. That process, again, turned out surprisingly well....


Only thing left to now, is mill the top of the tool holder down enough to accept an insert, and to put it right on the center line, then drill/tap the screw to hold the insert....and, oh yeah, make a brass ball for its handle!")


Anyways, thanks for looking. It was a fun project!

...but I managed to get it right the second attempt! I first tried mounting the base to the location where the compound rest normally occupies, but soon learned that I would not have enough room, between the radius turner and the lathes center line....
On the right side of the pic, you can JUST make out the tip of the live center in the tailstock...so went back to the drawing board, and decided that I would remake the base, suited to mount on the cross slide...
Well, I deffinately had more clearance now, but something else hit me like a ton of bricks. I had no means of moving it forward or backward, something I didn't even consider since it was originally going to be mounted on the compound. Also, I really disliked having to use the gib from the cross slide, it was just SO oversized for this little 4" tool, so I decided to make it's own gib.
Well, this got me to thinking...there is no way that I am going to be able to keep up with that little gib, when the turner was not in use. My solution was to embed the small cut off section, that was cut in order to be able to use transfer screws to place my gib screws in the right location, with a few magnets. Viola! No losing the new gib now!
As far as for making the tool move forward and backward, I decided to make an nut that would ride on the original cross feed screw, and i was quite pleased with how well it turned out, not to mention it worked!!
After fixing those few road blocks, I decided to gun blue the toolpost, and obviously had to change the color of the lock down screws, so there would be some contrast. That process, again, turned out surprisingly well....
Only thing left to now, is mill the top of the tool holder down enough to accept an insert, and to put it right on the center line, then drill/tap the screw to hold the insert....and, oh yeah, make a brass ball for its handle!
Anyways, thanks for looking. It was a fun project!