Reversing shaft/Head Bolt

geraldsd

Active User
Registered
Joined
May 22, 2012
Messages
55
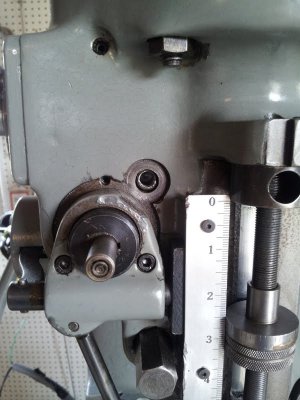
I have recently purchased this Bridgeport Mill. J-Head built in 1969. The ways are in great shape and it makes no noise when it runs. There are these two places that I need to work on. As you can see the reversing shaft is missing pieces and probably a wheel. Also, the Head Bolt(Nut) is missing. Can I just drill out and remove the piece in the reversing (?) shaft? Then, obviously replace the parts? Also, what about the head bolt? Help is appreciated!reversing shaft and missing head bolt.jpg

reversing shaft and missing head bolt.jpg
 
Last edited:
Here's a couple of great sources for parts and rebuilding info.


http://www.machinerypartsdepot.com/

http://www.matacoinc.net/html/milling_machine_head_parts.html

They have the part#s and parts blow-up drawings and books on how to take it apart. Prices are reasonable too.

Marcel

Thanks Marcel. I look at the pictures and don't see the head clamping bolt in the upper left. The bolt (stud?) appears to have a double length head. Have you loosened and/or removed this from your mill?
 
I have recently purchased this Bridgeport Mill. J-Head built in 1969. The ways are in great shape and it makes no noise when it runs. There are these two places that I need to work on. As you can see the reversing shaft is missing pieces and probably a wheel. Also, the Head Bolt(Nut) is missing. Can I just drill out and remove the piece in the reversing (?) shaft? Then, obviously replace the parts? Also, what about the head bolt? Help is appreciated!View attachment 44266
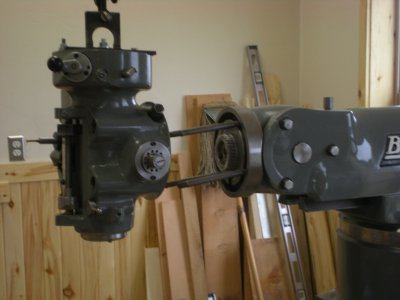
this will give you a better idea of the size of that head bolt--it is a ''T'' shaped bolt and the power head must be removed to replace the bolts. hope the picture helps. re steve in mont.

DSCN1377.JPG
 
this will give you a better idea of the size of that head bolt--it is a ''T'' shaped bolt and the power head must be removed to replace the bolts. hope the picture helps. re steve in mont.

Thanks a lot. Your Mill looks very nice! Did you do that yourself? I hope to clean mine up to look like yours!
 
gerald---if you look closely at the picture i sent --you will see a machine screw protruding from the reversing mechanism. this screw is what holds the ''knob '' onto the reversing mechanism shaft. as i remember it's an 8/32 thread. yes it's sheared off--you will have to center drill and wedge something tightly in center of drilled hole to remove the broken mach. screw. once a new screw is inserted --that is really all you need to operate the power feed up and downward ---it also has a neutral position. you can make a new knob at a later date--now as the screw is moved towards and away from the operator you should feel 3--very slight ''detent'' positions. up feed-- neutral-- and down feed. the inner shaft which contains the ''screw threads also changes the feed gear position ''it has 3--grooves around it's outer circumference --they are contacted by a spring loaded ball as the shaft is moved inward and outward. it's a very ''soft'' contact and the shaft moves a very short distance between it's 3-- gear locations. the ''clutch'' is that handle to the left of the machine and should disengage, by itself ,when it reaches the top of the quill travel or when it has proceeded downward to a limit you can preset --before you begin drilling downward. hope i didn't confuse this too much--writing instruc. books just is not my thing. if you have more ques.--fire away--there are lots of people on this site who are willing to answer same and remember it's suppose to about ''fun'' :)) re steve in mt.
 
gerald---if you look closely at the picture i sent --you will see a machine screw protruding from the reversing mechanism. this screw is what holds the ''knob '' onto the reversing mechanism shaft. as i remember it's an 8/32 thread. yes it's sheared off--you will have to center drill and wedge something tightly in center of drilled hole to remove the broken mach. screw. once a new screw is inserted --that is really all you need to operate the power feed up and downward ---it also has a neutral position. you can make a new knob at a later date--now as the screw is moved towards and away from the operator you should feel 3--very slight ''detent'' positions. up feed-- neutral-- and down feed. the inner shaft which contains the ''screw threads also changes the feed gear position ''it has 3--grooves around it's outer circumference --they are contacted by a spring loaded ball as the shaft is moved inward and outward. it's a very ''soft'' contact and the shaft moves a very short distance between it's 3-- gear locations. the ''clutch'' is that handle to the left of the machine and should disengage, by itself ,when it reaches the top of the quill travel or when it has proceeded downward to a limit you can preset --before you begin drilling downward. hope i didn't confuse this too much--writing instruc. books just is not my thing. if you have more ques.--fire away--there are lots of people on this site who are willing to answer same and remember it's suppose to about ''fun'' :)) re steve in mt.

Thanks for the help! I know that you understand the part of me that wants to get this machine in great shape and make chips. It also looks to me that the head bolt in the upper left position has broken off at some point in the past. Also, it looks like someone bored a hole in the bolt and threaded it so that a smaller stud or bolt could be installed into it. Really cheesy if you ask me. Does it appear that way to you? I know that I will have to remove the head to do this. I am going to build a stand for the table so that I can remove the head. I am very excited to get started...Merry Christmas!
 
No , I haven't had to remove that bolt on my mill. Thankfully, my machine was pretty well maintained when I bought it. But I have ordered parts from both of those links i supplied above. I needed some parts to get my quill feed back to OEM and i also bought some parts for my x powerfeed from them. They are both reputable places and the shipping was quite fast and reasonable. If your not sure what you need, jot down your machine serial # and give them a call. One or the other will stock most of the parts you need.

Marcel
 
Thanks for the help! I know that you understand the part of me that wants to get this machine in great shape and make chips. It also looks to me that the head bolt in the upper left position has broken off at some point in the past. Also, it looks like someone bored a hole in the bolt and threaded it so that a smaller stud or bolt could be installed into it. Really cheesy if you ask me. Does it appear that way to you? I know that I will have to remove the head to do this. I am going to build a stand for the table so that I can remove the head. I am very excited to get started...Merry Christmas!
--gerald---i was wondering why a hole had been drilled in center of the broken bolt--i will bet your assumption is correct as to repairs made by others. the very best advise i can give to anyone rebuilding or repairing a b.p. is to purchase a copy of the book i used to rebuild my b.p.--it's called ''a guide to renovating the bridgeport 2j variable speed milling machine'' published by the ilion industrial services llc.--they publish books for all the b.p. models--not just the 2j--but that is my model.. you can buy it by calling ''h&w machine repair and rebuilding inc.--phone # 800-285-5271. they also have a really good web site. before you go to trouble of making ''stand'' to support power head i would suggest you see if you can borrow -or beg use of engine stand . in this manner you can move the power head far enough away from the main machine to give you lots of room. if this is done with the motor in place it is going to be real real tipsy. the motor is quit heavy. i reassembled my powerhead back onto mill base one piece at a time -the drive motor was the last thing to be added. --it's really not hard to do -once lifting fixtures are made -and i also used an engine lift which i borrowed from a friend. the proper torque on those powerhead bolts is 50 psi. i hope this helps you along your way --have fun makin ''chips'':)) re steve in mt.
 
No , I haven't had to remove that bolt on my mill. Thankfully, my machine was pretty well maintained when I bought it. But I have ordered parts from both of those links i supplied above. I needed some parts to get my quill feed back to OEM and i also bought some parts for my x powerfeed from them. They are both reputable places and the shipping was quite fast and reasonable. If your not sure what you need, jot down your machine serial # and give them a call. One or the other will stock most of the parts you need.

Marcel

Thanks Marcel. With the info that I have found on this site and a couple of manuals I am ready to tackle this. I am building a support to clamp down on the table and fit into the spindle and feel that I have the support to deal with whatever I find. Thanks again to you for your time to reply!
 
Back
Top