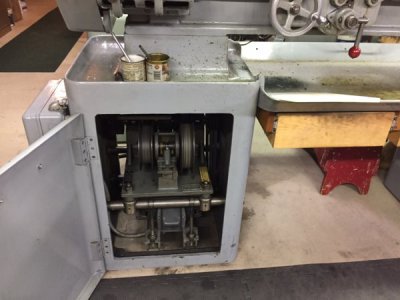
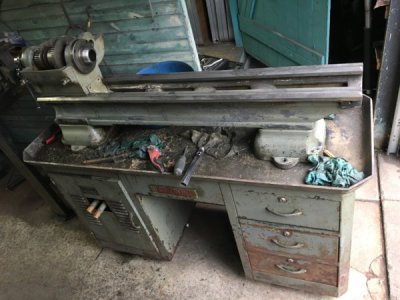
Sheldon 10" Under drive to basement help in Montgomery county PA?

Ststephen7

Registered
Registered
Joined
Oct 8, 2013
Messages
58
Hey guys,

I bought this a few weeks ago, and have it about as 'apart' as I can get it, other than the the headstock as seen (with my very limited knowledge), and it is still way too heavy for me and a strong friend to move safely. Is there anyone with knowledge/tools/machinery that can help (I can afford a couple of hundred $) to move the bulk of this, relatively small lathe 40' from the garage down the driveway, up 4 steps, and a straight shot down the basement steps? I'm at a standstill, and every time it rains/snows everything in the garage rusts up a bit more, so I'd really like to get this into the basement.

Thank you,
Steve

IMG_3161.JPG
 
If you are willing to cut the flat belt on the headstock, I can help remove the headstock, then the lathe bed from the stand.

Looks like we both live close to Rt 309 but I am in NW corner of Lehigh County likely best part of an hour depending on traffic.

I removed the headstock of my Southbend Heavy 10 for cleaning since the flat belt was worn out so it needed to be replaced. Since I had the belt removed, it was not difficult to remove the headstock.

I expect the Sheldon is similar. Remove the piece of steel under the spindle and you should see the bolt at the spindle end. Likely one at the outboard end also.

Send me a PM and we can arrange time to get together.
 
My Sheldon is similar size to yours. I did not take the headstock off the bed. I took two 2x12 planks, screwed those together with 2x4 on the top, so the bottom is flat. Set the bed and headstock on to the 2x12s and lag bolted it down. A lot easier to move and roll around with plastic pipe or golf balls for rollers.
FYI the cabinet and motor for us was harder to move around than the lathe itself.
I would get it all apart and ready to move. Then recruit some help from the football team for an hour or so, that's what I did.
If I was closer I would give you a hand. Still have my planks and lag bolts.
Jeff
 
I would wait for Dave and let him do it. :grin big:

OR, I would take the headstock off and separate the bed from the feet under the bed and move them separately. Then I'd remove the motor and drawers and move them separately, too. I do most of the moving in my shop by myself and I almost always figure out a safe way to do it. If I cannot, then I get help.
 
My Sheldon is similar size to yours. I did not take the headstock off the bed. I took two 2x12 planks, screwed those together with 2x4 on the top, so the bottom is flat. Set the bed and headstock on to the 2x12s and lag bolted it down. A lot easier to move and roll around with plastic pipe or golf balls for rollers.
FYI the cabinet and motor for us was harder to move around than the lathe itself.
I would get it all apart and ready to move. Then recruit some help from the football team for an hour or so, that's what I did.
If I was closer I would give you a hand. Still have my planks and lag bolts.
Jeff


Thanks Jeff! Could you please send or post a picture of the planks? I was thinking of the same thing, and your description confused me... How is the chip pan attached to the 'desk'? And... I was also thinking of turning the 'desk' upside down, instead of trying to move it on the feet... whatchathink?
 
How is the chip pan attached to the 'desk'? And... I was also thinking of turning the 'desk' upside down, instead of trying to move it on the feet... whatchathink?

If this is like my SB Heavy 10, the chip pan is just held between the lathe feet and the cabinet. Once the lathe bed is removed, the chip pan should be free, still not light, awkward to move single handed.
 
I moved a Sheldon 13" to a basement shop about a year ago. To get it there I completely disassembled the machine in the garage. I took the headstock off the bed, the bed off the cabinet, and the mounting legs off the bed. I was able to transport each of the pieces down the stairs on a refrigerator dolly. When it came to the base I removed the drawers under the chip pan, then removed the chip pan from the cabinet bases. I also moved both the chip pan and the tailstock end cabinet on a refrigerator dolly.

I did hire a moving company to move the pedestal with the drive to the shop. The complete pedestal unit weighed a little over 800 lbs. The moving company came with a 1750 lb. capacity stair climber dolly. It had a battery powered electric motor and a set of rotating legs at the back like this:

https://handtrucks2go.com/Escalera-Electric-Stair-Climber.html

It took 3 guys about 20 minutes to load it, and get it down the stairs into position. It cost their minimum charge of $300.00.

It took me a couple weeks to clean all the parts and reassemble the machine. It's been running over a year now in it's current position. About 4 months ago I did remove the Worthington drive and replace all the bearings. Once I started taking apart the drive I realized it wasn't that complicated. Looking back I could have also easily removed the drive and motor, and done the job myself with the same refrigerator I used to move the other parts of the machine. I would have no problem doing it again (this time by myself) if I decide I need another machine.

Thank you for your input! And I have questions...

How did the mounting legs/feet come off the bed? It looks as the screws on mine come up from underneath, making it tough to detach without lifting the bed AND feet off the chip pan...
I'm thinking I'll have to remove the motor (just to reduce the weight)... can the 'drive' be removed as a unit, and then bolted back into place, without taking it all apart? Working at it on the garage floor, it seems like it will take forever to get it apart in those tight quarters. And then will I be able to get it back together? I want a lathe to learn to use, not a mechanical project... : )


Thanks,
Steve
 
Steve, removing the motor was a royal pita, at least on mine.
The chip pan on my cabinet did not come off.
I sent ya a pm.
Jeff
 
Before starting any further disassembly I would take lots and lots of pictures of the machine before you begin. Once you start the process I would take more pictures at each stage. I probably took over 100 pictures from start to finish of the process. Many times the same components should be photographed from several angles. It's easy to forget how a fastener, retainer, pulley or other component was oriented once it's laying on the floor. I've found the pictures a necessity to make sure everything goes back in place in the proper order and orientation.


As for the disassembly process, first I loosened the belt(s) to the spindle drive end of Jackshaft assembly. On mine there's a jackshaft assembly between the Worthington and the headstock. When the belts were lose I could rotate the jackshaft enough to ride the belt(s) from the head over the sheave. Then the headstock was free to be removed.

The headstock is held in place by 4 bolts coming up from the bed. The 2 in the front can be accessed by removing the sheet metal plate at the front of the casting between the bed ways. The 2 in the rear can be accessed by removing the large gear in the lower center of the drive, and the banjo to the lead screw. Once they are out of the way there are 3 bolts holding the gear cover to the headstock. When the cover is removed you'll be able to see the 2 bolts that come up through the bed to the headstock. You should be able to lift the headstock off the bed with the belt still around the headstock end of the drive.

At this time I would loosen and remove all the remaining belts. Those from the jackshaft to the Worthington drive should be next. Followed by those from the Worthington drive to the motor. When removing the belts I would label them with inner and outer position as well as spindle to jackshaft, jackshaft to drive, and drive to motor. They will have to be reassembled in the opposite order, and tightened spindle to jackshaft first, jackshaft to drive second, and drive to motor last.

Now the legs of the bed can be unbolted from the headstock and tailstock cabinets from inside the cabinets. You'll have to remove a couple drawers on the tailstock end and use a socket on an extension to get to the bolts. On my machine I could reach the bolts on the headstock end legs through the open door with an extension and a swivel socket.

Once the legs are unbolted from the cabinets you can turn the bed on its side and remove the legs. Again I believe there are 2 bolts holding each set of legs to the bed. On my machine there are 2 additional bolts holding the chip pan to the headstock cabinet. On your machine it looks like the bolts that hold the bed legs to the cabinets also hold the chip pan in place. I believe the tailstock end cabinet will now be light enough to transport with a refrigerator dolly.

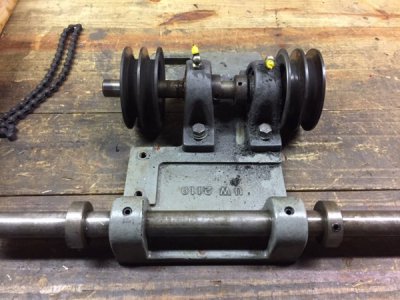
To make the headstock cabinet lighter I would remove the jackshaft assembly first. If it's like mine it's mounted to 2 rods running lengthwise through the cabinet. The mounting plate is secured to the rods with set screws through each mounting block. The rods are secured to the cabinet with a shaft collar on each end. You'll have to loosen all the setscrews and slide the bar out of the gear train end of the cabinet. On mine I had to tap on the end of the bars facing the tailstock cabinet to get them to move freely. If you need to do this use a soft metal bar such as brass or aluminum to avoid mushrooming the end of the shafts. Also place some wood between the plate and the Worthington drive so the jackshaft assembly doesn't fall on the drive.

The Worthington drive is held in place in a similar manner. It can be removed using the same process. Just make sure to place a board between the motor and the drive . It will make sliding the assembly out much easier. To remove the drive on my machine I had to disconnect a stepper motor at the rear. Yours has the walking stick linkage that will have to be disconnected and removed.

The final piece to be removed is the motor. I would disconnect the wiring at the motor junction box. All the wires in mine were marked with metal collars. There was also a wiring schematic inside the junction box cover. If these no longer exist on your machine I would be sure to label all wires and take lots of pictures. The motor in my machine is held to the mounting platform with 4 bolts. 2 can be removed from the front of the machine through the open door, and the other 2 can be removed from the rear side of the machine. The motor was the heaviest component on my machine. I would again slide some wood under it and work it side to side until it's through the door.
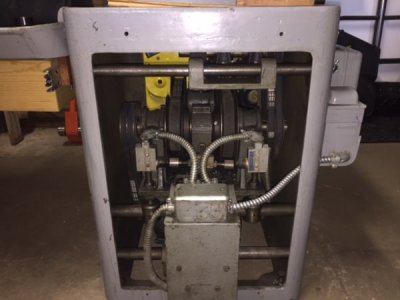
IMG_0176.JPG View from rear of headstock cabinet. Note stepper motor drive for Worthington speed change rather than walking stick speed change.
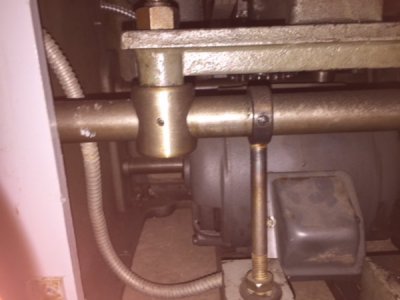
IMG_0188.JPG Mounting for jackshaft and Worthington drive assemblies.
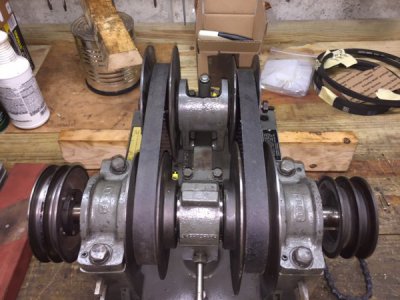
IMG_0373.JPG Worthington drive on bench.
IMG_0400.JPG View from operators position. Open cabinet door showing Worthington drive & motor. IMG_0325.JPG Jackshaft assembly on bench.
 
Back
Top