[How do I?] Square Hole ?

My bad, I was thinking the supports are 2X in, square.
Yes, shaping the shelves and the final edge banding is where we really add some value to this project. Normally, we would build the whole damn thing out of laminated hardwoods, but the [repeat] customer wants a wood/metal rack for his incredibly expensive gear...I guess that it will help him sleep better at night...but, regardless, he's paying the freight, so there you go.

This is also a nice idea, but it's the "tightening" part of this design that has me scratching my mellon a bit. Does the "access" you mentioned mean a hole in the horizontal/lateral members that will accommodate a wrench? If so, all of the hardware involved in the structural fastening of the rack would have to be fairly small, no? The horizontals in the working design are only 1" x 1" OD.

I really appreciate everyone putting their ideas into words for us.

EDIT: We have a supplier in Ohio who would love to supply us with a bunch of fairly heavy duty polyethylene "plugs" that would fit tightly into the ends of the 1" x 1" square horizontal members. An enhancement to this idea might be to employ longer pieces of all-thread to effectively reduce the number of structural connections. The "plugs" I just described could be bored very accurately, via a centering jig and the mag drill, and used to keep the all-thread centered and, more importantly, well away from the inner edges of the horizontal members.
 
Ah, the mention of tressle table makes me think... Is the "through" post a design element? The welding a butt joint is going to be easiest/most effective, but doesn't have the "post sticking out" design element.

Perhaps that is the confusion? @Firestram?
Finally, something I can write intelligently about. :grin: Yes, I was taught a variation of square rule joinery back on the farm and I've continued the practice, on and off, ever since. I even studied a bit of it when I was in Europe, so I've seen many different connection methods. With our trestle table design, the front horizontal supports pass through the legs and small trunnions are employed to fasten the corner braces to the legs and the horizontal supports. There are zero metal connections employed, so it is traditional timber framing on a smaller scale.
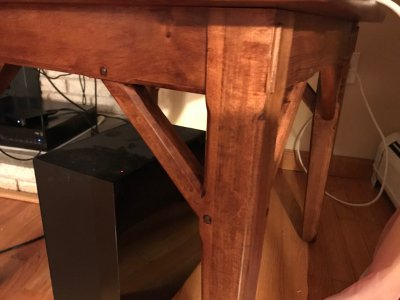
EDIT: Here's a photo of the connection I just described. In the front, you can see the small trunnions that fasten the corner braces to the leg and the horizontal support...and, if you look under the top, in the upper-right region of the table, you should be able to see the through tenon protruding near the top of this particular leg. Needless to say, there are four of these tenons visible in the trestle table. My apologies for the poor lighting.

Trestle Connection .jpg
 
Last edited:
Sorry, i shouldn’t have said befuddling and I did not intend it as an insult; I apologize. I take issue with both the stated design and your approach to fabricating it.

The stated design doesn’t make much sense. It has certain benefits, but those are only achieved if the holes are cut accurately. The industry has solved this problem (computer-controlled cutting methods), but you want to find a different way to do it. Your way loses the benefit of the holes (precise alignment). Using a standard fabrication approach (fixturing and welding) would eliminate any need for the holes. And once welded, the holes do not offer much visual impact. If one really wanted crisp joints, the holes (with minimal welding) could be warranted.

An engineer that works with metal would understand that the design would be better without cutting the uprights. They are stronger that way and the fabrication is more straightforward.

I remain interested in following your approach. It’s of course true that many approaches would lead to an acceptable result.
As ever, I'm very happy to be in a place where folks feel free to discuss a problem like this at their leisure. :)

I forgot to mention that the design calls for the 1 x 1 horizontals to protrude [slightly] from the outside edges of the four outer legs, which is why I mentioned to 1" decorative square plugs. It's also why I mentioned the trestle tables. They have through tenons that are exposed after passing through the legs of the table, so I was only half-joking when I wrote that our work may have influenced the original design. I'm not exactly sure why the designer wants the front and rear horizontal members to pass through all of the legs, but he may very well have a bit of visual effect in mind. I never really thought to question him on it...but it may be something that I bring up at some point.
This confims what I was guessing above: The "through post" is a design element, not structural! This is useful, since it changes why we're doing this :)

I still might consider doing the welded butt-joint, but make a wood-jig for the 'other side' to align a small 1" (or so) cutoff piece of 1x1 and weld that in separately. So basically 'fake' the through-tenon look.
 
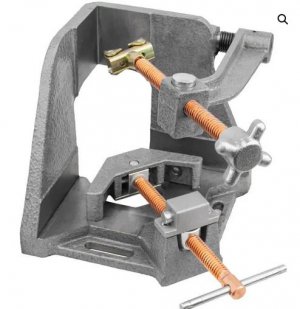
I've watched a YT video that was created by the folks at Eastwood. They manufacture a fancy "welding clamp" that can be used to align vertical and horizontal steel members on the the x-, y- and z-axes. It looks like a great design, but the fact that the verticals in the rack design we've been discussing are 2" x 2" and the horizontals are all 1" x 1" gives me some pause. If you take a look at the clamp (below), you can see that there are milled surfaces that the steel tubing is referenced to, but, given the fact that we're employing two different OD dimensions of square tubing, what would be the best way to keep the smaller tubes centered on the larger tubing?

If cut appropriately, I suppose that some 1/2" flat stock could be used as spacers, but I was wondering if anyone had any other ideas about this?

Eastwood 3-Axes Welding Clamp.png
 
I've watched a YT video that was created by the folks at Eastwood. They manufacture a fancy "welding clamp" that can be used to align vertical and horizontal steel members on the the x-, y- and z-axes. It looks like a great design, but the fact that the verticals in the rack design we've been discussing are 2" x 2" and the horizontals are all 1" x 1" gives me some pause. If you take a look at the clamp (below), you can see that there are milled surfaces that the steel tubing is referenced to, but, given the fact that we're employing two different OD dimensions of square tubing, what would be the best way to keep the smaller tubes centered on the larger tubing?

If cut appropriately, I suppose that some 1/2" flat stock could be used as spacers, but I was wondering if anyone had any other ideas about this?

View attachment 378086
Yep, exactly, just cut out some 1/2" spacers.
 
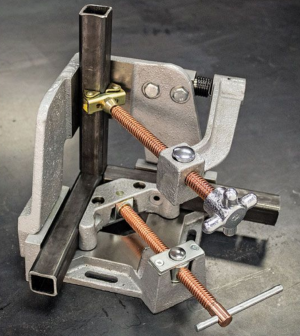
Okay, so the diehards that stuck with this thread can take a ganders at what I hope is the solution to the rack issue we've been discussing herein. It's a 3-axes welding clamp made by Strong Hand Tools.

Screen Shot 2021-09-15 at 10.38.46 PM.png

Although I know which end of a welding whip plugs into the welder, I'm certainly not skilled enough to weld up all of the right angles in the design. In the end, I'm sure that, by having the "three extra hands" that this thing provides, we have a much better chance of getting a quality end product.

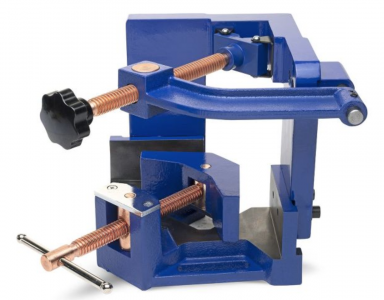
By the way, I went for this clamp over the [blue] clamp, pictured earlier in the thread, because of the quick releases you can see attached to each adjustment screw and, even more importantly, the beefier pivot assembly that comes with this particular clamp.
 
It's a 3-axes welding clamp made by Strong Hand Tools.

That's a very interesting clamp. I've never seen that one before.

One question (I checked the vendor site and did not see the answer).....
Is it only good for outside corner joints?

That is, if any one of those bars goes thru, how do you remove the clamp jig from the work-piece?

-brino

edit: the picture above seems to show the top half is bolted on. however, this picture from their site shows one with a single solid body:
ScreenShot072.jpg
 
Last edited:
That's a very interesting clamp. I've never seen that one before.

One question (I checked the vendor site and did not see the answer).....
Is it only good for outside corner joints?

That is, if any one of those bars goes thru, how do you remove the clamp jig from the work-piece?

-brino

edit: the picture above seems to show the top half is bolted on. however, this picture from their site shows one with a single solid body:

That's a very good question, Brino. Ours, and all the versions that I researched before buying, have a removable "top half," which, in theory, converts the clamp to an X-/Y- (2-axis) clamp. I definitely understand your point about components passing through the clamp, so I definitely hope that, by releasing the "open Vee" top half, we can pull that part away for the next part of the project. At this point, it's all theoretical, but, once we have all of our ducks in a row, I'll put the theory into practice and get back to the thread with a more definitive answer. :encourage:

By the way, the only reason I went with the version shown in the second photo (the grey clamp) is because of the quick release buttons and the beefier pivot assembly. Otherwise, I would've stuck with the blue clamp in the first photo: and its beefier steel construction.
 
I keep 6 3/8" turnbuckles with my welding clamps. Once you are tacked up square, you can tack weld them in opposing corners to push or pull the frame as needed while you weld it out. It helps stay on top of the welds pulling when they cool. Pick one side of the cube to stay clamped down to the table until everything is welded out, the turnbuckles could "lift" a corner. Measure the diagonals while you work and keep adjusting as needed.
 
Back
Top