Straddle knurler build, no mill required (we hope!)

Hmm, forgot to post this. This is a picture of the unmachined faces of the parts. (The 2 unfaced pieces of the original stock, for each piece.) I'll just grind or file them off.
IMG_20200430_151555.jpg
 
Cobalt 120 degree spotting drills came in today :cool: from allindustrialtools. 3 days order to receipt of goods.
IMG_20200430_173248.jpg
Forgot to mention, apparently I didn't clean off all the cutting oil from the stock. I did wipe the oil off with some tissues. That wasn't good enough. When I ground the stock, I got a tiny fire inside the belt sander. That was exciting.:eek: Fortunately the flame went out in a few seconds. No harm, no foul.

Note to self: Clean off all oil before belt sanding! Second note: don't ever use this sander for both wood and metal! That would have been bad.

So far I have only ground tool steel and low carbon steel on the grinder. Will make a sign to remind myself not to sand wood on it.
 
Drat, lost a post, got a security error during attaching a file.

Here we go, second time's the charm. So, I got sidetracked a little. Worked on my spindle light, and decided to make a collet wrench using @darkzero's thread "Code Named Operation Spanner Wrench". Have the ring machined, but haven't cut it yet. While machining the ring something dropped in the chip pan. Oh, it looks like a gib set screw and locknut! Well that's why nothing is working right! I had grooves while boring the hole, and couldn't figure out why. Figured out that it was the carriage gib, behind the apron. Then a light went on in my head. Ahah! So that's where that strange nut came from 3 weeks ago. Took the lathe apart and confirmed that both gib lock nuts were not attached and the set screw was missing as well. Got everything adjusted and assembled. Oh, that's machining nicely now. Much nicer finish. So even though it was a sidetrack, it was a useful one, as I got the lathe running well again. It will useful in a little while.

So back on track. Something was delivered today from the fine folks at Form Roll Die. 3 little vials. Woohoo!
IMG_20200502_130356.jpg
Work to do. How do I accurately measure the ID? I have an external micrometer, but not an internal. I put both an OS 3/16" M2 hardened shaft in the straight knurl and an undersize, they both feel the same, as they have a little wiggle to them. How can I measure pin to hole? Somewhere I have plastigage, that's not really the right way to do it, right?
 
Very cool packaging!
Do those rolls have beveled edges?


Sent from my iPhone using Tapatalk
 
Not a big bevel, but it is there. Haven't opened up the third vial yet, but I can see the bevels. Here are 4 of them on the 3/16" pin.
IMG_20200502_134326.jpg
 
Made some pieces ok, and flopped on some others. No problem making the little 1/2 moons and drilling and tapping. Not too hard to do. Used HSS tooling and things cut fine. I used a cobalt drill for the holes. I had thought the tapped hole was supposed to be 1/4-28, so I could use my snazzy spiral point tap, but nope, it's 1/4-20. Well darn, I'll have to use my HF tap. Took a bit of exertion but made it through the O-1 fine.

Got a bit cocky and single point threaded the 12L14 rod to 1/4-28. Huge stickout, but it threaded ok. Made a mistake and used the hand wheel rather than under power. Threads had some fracturing on one side of the vee. Seemed to clean up a little when I ran a good die over it. Flipped the piece around and tried to SPT at 1/4-20. I clearly didn't know what I was doing and mangled the threads completely. Not recoverable. :mad: Oh well, I'll try again, the next day. Hopefully, I'll figure out what I did wrong.
IMG_20200507_161034.jpg
Next day, I thought perhaps I should practice threading under power, using 20 TPI, to see what I was doing wrong. I grabbed a piece of 1/2 aluminum rod and threaded it. I used a 0.062" parting blade to make a stop. Then I threaded the end of the rod with HSS. My eyes were playing tricks on me, and I thought I had a terrible cut. However, when I used a magnifier, it wasn't that bad. However, one side of the thread was pretty clean, and the other side had a little roughness. I then flipped the piece around and used a new carbide cutter. The threads came out slightly nicer. At least I could cut threads under power and for a short distance.
IMG_20200507_161117.jpg
Left side is HSS, right side is carbide, and 1/4" long of thread.

Today: So back to the new 12L14 rod. I cut the 1/4-20 thread and it looked very nice. Flipped the piece around to get it ready for the 1/4-28 thread. Ran into a minor snag, which I created a separate topic, since I want to keep this one on this project. Be back to this in a short while.
 

Attachments

  • IMG_20200507_161117.jpg
    IMG_20200507_161117.jpg
    3.9 MB · Views: 16
So, used a follow rest to cut my 1/4-28 threads. Was quite a diversion. Learned that I will minimize my usage of a follow rest in the future. Definitely a PIA.
IMG_20200507_144616.jpg
But, I did the 1/4-20 threads and 1/4-28 threads under power. The threads seem to cut cleaner. For the 1/4-28 I followed up with a die. So here are a few of the parts together that I fit together today. Nut & spacer, new threaded rod (today) and the half moons. Tomorrow, I will make the delrin spacer and get back to the arms and plates.
IMG_20200507_224256.jpg
Feel better that something got done!
 
Made the little washer out of a delrin scrap. That didn't take long. Then back to the arms and main plates. Clamped the arms together and belt sanded off the ends. Likewise to the main plates. @DavidR8, used my toolmaker clamps to hold the plates together. They can hold quite tightly.
IMG_20200508_165242.jpg
Side view of the clamps.
IMG_20200508_165313.jpg
Then spent what seemed like hours filing the pieces to match. Managed to get a small blister on my thumb from all the filing. So far, no mill. Been thinking about one though... :)
 
Ordering material. I'm going to assume that you have already downloaded @mikey's pdf plans and have studied them a little. If you haven't the following might be a little confusing.

Well, w/o a mill, we have to buy some precision stock. Fortunately, it's not too expensive. The side plates and arms, which mikey milled need to be procured to dimension.

Since the side plates are 2.5 x 2 x 1/4", I ordered some tight tolerance low carbon steel bars, precision ground +/-0.003". McMaster has this in 2.0 and 2.5" widths. I chose the 2.5" width, and 1 foot long because I have non-knurler plans for the left-over piece. I will cut two pieces that are a little over 2" long from both ends. This will yield two pieces that have 5 machined surfaces. We can get away with one surface unmachined. To make the 6th edge sort of nice, the plan is to clamp them together and run that surface against a belt sander to a scribed line. If feeling ambitious some filing will happen.

For the arms, we can use 1/2" x 1/2" tight-tol low carbon steel bars. I ordered a foot, so I'll have 6" leftover. Enough for another knurler maybe? Or a backup for a mistake? Let's think positive, shall we?

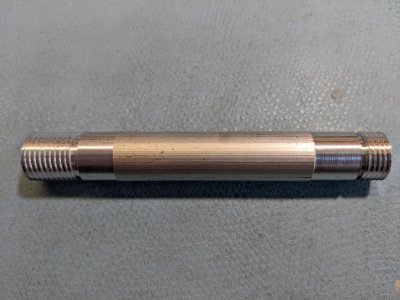
The tension rod and tension nut are made from 12L14 stock, in 3/4" hex and 1/4" round respectively. I bought a foot of the hex and 3 feet of the rod.

For the half moon pivots, the plan is to use 1/2" O-1 and machine the flats in my lathe. I did a prototype run, using a 4 jaw chuck and the surface came out pretty well. Only ordered a foot of this, trying not to go hog wild an buying too much stock. The arm pivots are 5/16" McMaster has tight tol O-1 with 3 feet being the minimum length you can buy.

Wheel pins. You can use 3/16" drill blanks if you like. Drill blanks are precision ground to tight tolerances. I happen to have some hardened O-1 in 3/16" both in undersize and oversize. So I didn't have to buy it.

Haven't figured out what hardware to use besides the stainless 6-32 x 0.25" SHCS and matching stainless washers. It looks like one needs #10 SHCS about 1" long, but we are a ways from assembling things just yet.

Like mikey, I have ordered knurling wheel sets from the Form Roll Die Corporation, in Worcester, MA. They have a website, but they are not set up for e-commerce. In anycase, they have been quite helpful. Purchased the beveled versions of the following.

1 pair EQS230 straight knurl pair, 30 TPI
1 EQR225 diamond, right, 25 TPI
1 EQL225 diamond, left, 25 TPI
1 EQR230 diamond, right, 30 TPI
1 EQL230 diamond, left, 30 TPI


Bought some tooling, reamers, and drills, per mikey's recommendations. I bought what was needed in my shop.

Yeah, so a slightly expensive day online. The stuff I could get on eBay will take a week to get here. McMaster has promised me delivery tomorrow! That's what I have for today.
Hows the project going and where do I look at these plans?
 
Back
Top