Straddle knurler build, no mill required (we hope!)

Rule of Thumb: keep it as simple and as rigid as you possibly can. The more parts involved, the greater the potential for disaster. Trust me; I speak from experience.

Another rule: don't be afraid to make mistakes. Your greatest lessons will come from them. Just try not to cut off body parts if you can avoid it. If you try something and you screw it up, just start all over again. I cannot count the number of times I've had to do this BUT I learned why something worked or didn't work and I rarely make the same mistake twice. This is how a hobby guy learns, from trial and error. Only so much can come from reading or watching videos; the real lessons come at the machine.
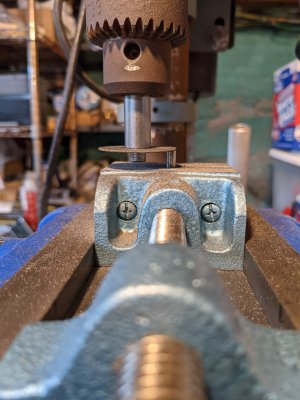
 
I've done a lot of trial and error. It is kind of how you can tell how your machine is cutting under load. Listen to the machine. Try a little cut, then one bigger, ..., finally something not so good happens, then back off. If you take little steps, that not so good thing usually isn't catastrophic. Seems to work on the lathe and the mill.

One of the most distressing things is to watch your part get pulled out of the vise. I had one of the knurler arms get pulled out of the vise when drilling with the 6-32 tap drill. I totally wasn't expecting it, thought the part was clamped in the vise firmly. It wasn't. I have had this happen when stacking parts. (Or having them side by side.) If the parts do not have identical widths, and the little one is on top, you can bet there will be lift, even if it seems everything is in tight. I seemed to get fooled about 1 out of 30 times. Need to get better at that.

Since most of the time I am home alone, I am very careful. So far, I have all my body parts and intend to keep it that way. Perhaps I'm too cautious now, but I'd rather be that way than dangerous. Had a near miss with a vehicle falling off a jack stand, so I understand you have to be vigilant ALL THE TIME. In that case, everything was stable - until it wasn't. Was scary as h3ll. Took me 20 minutes for my heart to calm down enough to figure out how to lift the vehicle back up and to complete the job. Had some interesting things happen while working on that car. Used the blue wrench to remove a shock off the vehicle. (An oxy-acetylene cutting torch will persuade any nut or bolt!) Managed to catch the undercoating on fire. There was a CO2 fire extinguisher next to me as I thought there could be issues. So the flames were a non-event. One pull of the trigger and the fire was out.
 
One of the most distressing things is to watch your part get pulled out of the vise. I had one of the knurler arms get pulled out of the vise when drilling with the 6-32 tap drill. I totally wasn't expecting it, thought the part was clamped in the vise firmly. It wasn't. I have had this happen when stacking parts. (Or having them side by side.) If the parts do not have identical widths, and the little one is on top, you can bet there will be lift, even if it seems everything is in tight. I seemed to get fooled about 1 out of 30 times. Need to get better at that.

Yup, that's why you have to machine things together; so they are the same dimensions when you need to clamp them. When in doubt, slip a thin piece of cardboard (think cereal box) between the vise and the part. The cardboard will take up small variances and the part will be clamped tight.
 
Ooh, good idea! Just went out to the recycling bin to pull a cracker box. My wife had just dumped a pile of recyclables on it, so it was buried. Came back with a supermarket pizza box instead. Same thin cardboard, just more of it!
 
Yup, that's why you have to machine things together; so they are the same dimensions when you need to clamp them. When in doubt, slip a thin piece of cardboard (think cereal box) between the vise and the part. The cardboard will take up small variances and the part will be clamped tight.
... or (if you can find it) use some 1/16" or so aluminum wire. This from one of Tom Lipton's books.
 
Easy, peasy. Use your edge finder. Just measure the OD of the end mill, then measure the thickness of the wall of the part. Use the edge finder to put the center of the spindle over the edge of the part and then use your handwheels to move the end mill into position. So, half the diameter of the end mill plus the thickness of the wall of the part being cut = back to where you need to be.

If your mill has some slop in it like mine try to only turn the hand-wheel in one direction otherwise the backlash can make it look like the table is moving when it really isn't.

That is, put in the edge finder and turn the handwheel to approach the work and try to just kiss the edge of the work. If you go too far then back up a full turn and come in slowly again. Then when you swap in the end mill turn the handwheel the same direction again. Then you can trust the dials to show actual table movement.

Some day a DRO will make this go away for me......

-brino
 
... or (if you can find it) use some 1/16" or so aluminum wire. This from one of Tom Lipton's books.
I've used 1/16" aluminum TIG wire for squaring before. To use this for two vertically stacked blocks do you have two pieces or run one piece sort of diagonally across both?
 
If your mill has some slop in it like mine try to only turn the hand-wheel in one direction otherwise the backlash can make it look like the table is moving when it really isn't.

That is, put in the edge finder and turn the handwheel to approach the work and try to just kiss the edge of the work. If you go too far then back up a full turn and come in slowly again. Then when you swap in the end mill turn the handwheel the same direction again. Then you can trust the dials to show actual table movement.

Some day a DRO will make this go away for me......

-brino
Prior to getting my PM25 I spent a lot of time on HM reading. Most people recommended a DRO, so I got one with my PM25. Glad I did. One less thing for me to worry about. There's still backlash in the dials, but at least the readout on the DRO is ok.

The slop in the dials is nothing compared to the horrible drill press xy table that I had the misfortune of buying about 18 months ago. Today I tried using the xy table, the backlash is 1.2 full rotations before there is movement. Overall, that table is a waste of cast iron. Regret getting it.
 
I've used 1/16" aluminum TIG wire for squaring before. To use this for two vertically stacked blocks do you have two pieces or run one piece sort of diagonally across both?
It kinda depends on the form factor of the blocks. Two separate, loose wires can sometimes be a bit awkward when trying to close the vise jaws. If you want two separate "pressure" points, you can bend a longer piece of TIG wire into an inverted U.
 
Managed to cut the pins with a built up contraption on my drill press. The original dremel arbor I used failed. The M1.8 screw sheared. For a while I was sort of discouraged. Snapped out of it when realizing I could make something better. Made a 1/2" diameter arbor out of 12L14 with a 10-32 screw. Figured increasing the screw diameter by a factor of 2.5 ought to be a wee bit stronger. :) Slightly reamed out the Dremel brand abrasive disk so the 10-32 would clear the metal center piece. Ground off a 10-32 screw and used a washer to clamp the disk to the arbor.

Drill press complained a bit, but was able to cut the M2 steel pins. Sort of cut the pin like one would use a slitting saw, small bites at a time. Only downside to this abrasive disk is it is a little thicker than I'd like at 0.050". Fortunately that isn't critical.
 

Attachments

  • PXL_20210605_215733343.jpg
    PXL_20210605_215733343.jpg
    2.1 MB · Views: 10
Back
Top