Surface Finish Issues On 12x36 (long Post) + Kb Electronics Vfd Install

Well, I'm really grasping now.
I am thinking, "If the pulley is causing the problem, how about if I increase the vibration/deflection a bit?"
So, I place a piece of Black Gorilla Tape on one side of the groove ( in a random location) of the input pulley. Tape goes all the way to the bottom and is approximately 2 inches long.
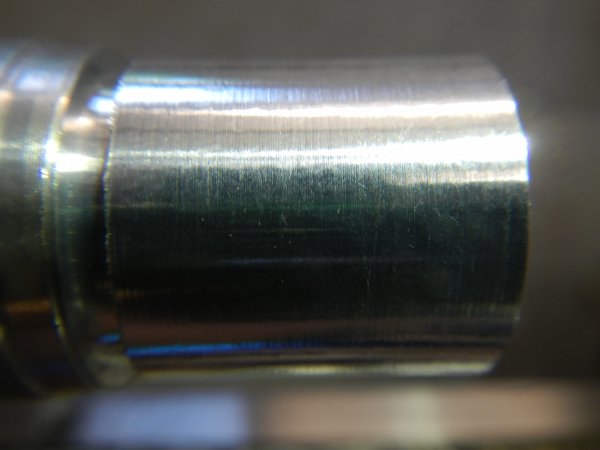
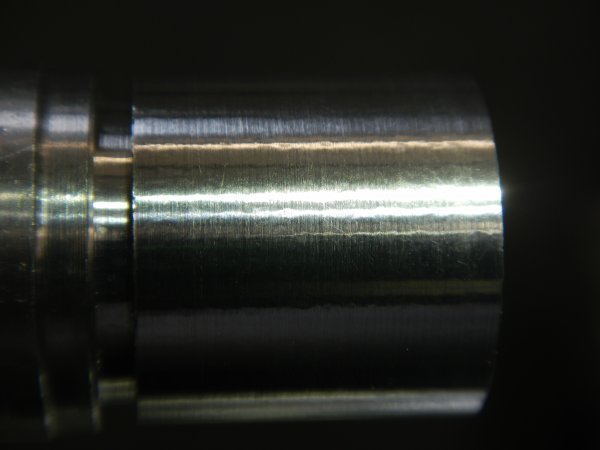
Here is the original pic (Top) and a new one (Bottom) after the tape is in place. I could not duplicate the exact lighting & distance.
It actually, to me, looks slightly better with the tape in place. Go figure???
DSCN2894.JPG
DSCN2898.JPG


Jerry in Delaware
 
Do you still have the link belt on? Try to loosen it up as much as you can, with it still being tight enough to spin it.

Its hard for me to see it in the pictures, and I know its hard to take a picture too though.

Does it change with speed?

If it was something in a pulley, I would think that the link belt really should eliminate it. Or I would think there would have been a drastic difference, not just slight. I've seen some pretty bad pulleys on different things over the years, and no bad effect that I knew of from it. I would think so anyway.

I will have to think for a while to see if I can come up with anything else. Anyone else please reply if you come up with anything too. I like these threads, we all usually end up learning something.
 
Just thinking here, Jerry, but looking at the pics immediately above, it looks like the defects in the highlighted parts repeat at regular intervals. I'm talking about the little oval-like dimples that are in the highlighted band roughly in the middle of the top picture. I took a caliper and marched out toward both ends and can convince myself that the pattern repeats.

This argues that this is a transmitted harmonic. This phenomena is not unheard of on lathes. If the tape you applied altered this pattern, which it seems to have done, then that supports that something to do with the pulley is creating that harmonic. Have you tried indicating the pulley one full turn? If the pulley is out of round then that would show it.

As an aside, link belts (at least Fenner belts) are said to reduce vibration by up to 50%. That doesn't mean they cannot vibrate. I'm sure you realize that a new link belt feels like its too small - difficult to get onto the pulleys. If you matched the diameter of the link belt to the rubber belt when you made up the linked belt then the linked belt is likely too long; remove a link or two and try again. If the harmonic is due to the belt then it should show an improvement.

I am assuming that your motor spindle is running true, which may not be the case. It is entirely possible that the output bearings are loose. I'm not sure how you would test this because it has to be checked dynamically, I think, and you don't want to put a dial indicator up to a moving shaft. Maybe UlmaDoctor will chime in with his thoughts.

Interesting discussion.
 
Tried using a center in the tailstock? Even on a stubby part like you have there. What about feeding away from the chuck?
 
I have a couple of problems, and I now submit them to the group. I shall attempt to thoroughly explain the problem and my methodology. Please be patient.

First, the obligatory disclosure: I have not contacted Matt, or QMT. I am not upset. I am not PO'd. I just want to get it fixed.

There, I feel better already.

Next, a bit about me. I am not a complete machining rookie, nor an expert. I consider myself to be somewhat of an advanced amateur. I used a Grizz 9x20 for 10+ years, and this PM 12x36 for just over a year. I also have a PM 932 mill.

OK, on to the problems.

I have never been totally satisfied with the surface finish obtained with this 12x36. I have used CRS, HRS, 6061, Brass, Bronze, 1144, & 12L14. What is wrong with the finish?--It generally looks as though the material has been very very lightly hammered with a tiny ball-pien hammer.

I have used Carbide inserts, Brazed Carbide, & HSS tooling.

I have several TCGT inserts which (with the 9x20) provided nearly mirror finish on Aluminum and also the 12L14. The finish retains the hammered appearance on Aluminum on my 12x36. HSS tooling is not wonderful, either. I will freely admit that my tool grinding skills are not the best--although, good enough (in most instances) to get by with.

So, I started investigating. The first thing I did was to observe the belts with the guard removed--please do not tell the safety Nazis. The 2 belts were not tensioned evenly. I checked the alignment of the motor pulley to the input pulley and made small a adjustment. No improvement. I removed both belts (one was way too loose) and obtained 2 new Gates belts--No change. One of the new belts is also a bit too loose. I removed the loosest belt and rechecked the alignment--hammered appearance was better, but not yet right. Next, I obtained some of the Link Belting and created one to fit. Better again, but still not good enough.

I'm beginning to get a bit frustrated.

I put the DTI (B&S--0.0005) on the spindle taper & hand rotated the spindle--No perceptible movement. This should eliminate a spindle bearing issue.

Next, I put the DTI on the machined surface of the motor pulley--Very little (almost none) movement. This should eliminate a motor issue.

Next, I put the DTI on the machined surface of the input pulley---Whoa--High to Low = 0.006. Further, I can easily deflect that pulley further with gentle hand pressure. I know someone will ask, so here is how I set up the indicator.

As you face the lathe on the gear train end (looking toward the tailstock), the DTI pointer is in the machined (belt) groove at the 9 o'clock position--with the pointer oriented parallel to the indicator (vertical). If I grasp the pulley at the 9 & 3 position and push-pull (not in & out) the indicator will change about an additional 0.003. In-out movement is non-existant. Up-down movement is non-existant (I repositioned the indicator).
Oh yes, I did remove the pulley to check the input shaft for variations or bending, & found none. All of the rotating was done via the motor pulley (by hand) with the belt still in place. I now suspect that the input pulley is not correctly machined. The machined surfaces where the belt runs are very rough (like sandpaper), too. All 4 grooves in the input pulley exhibit nearly the same amount of wobble.

So, what say you? Do you think that the 0.006 of wobble on the input pulley could cause the hammered appearance that I have described?

Since I cannot re-machine the pulley on this lathe (my only one), I will need to either contact Matt for a replacement or proceed to the next step, below.

Before I get too terribly involved in a repair, I am considering a toothed belt and pulley system to replace the current system. Is this a good or bad idea? If a good idea where would be a good source for the replacements?

I realize that this has been exceedingly long. I thank you for your patience.
Jerry in Delaware
While you could have a harmonic coming into play, if your bed is supported evenly I would not suspect this as a problem. Even though you used an indicator on the spindle nose I would suspect the spindle bearings as the most likely issue. If any of the bearing components are damaged it could result in a bad finish under load. Good hunting -- Jack
 
Good idea. Any way to verify the bearings are the culprit without just shotgunning?
 
Good idea. Any way to verify the bearings are the culprit without just shotgunning?
If you have an I phone there is a vibration analysis app that will help you identify high frequency vibrations that would tell you your bearings need service. Jack
 
I'm an Android guy; however, there are apps for vibration analysis for us also. I tried several, with varying results.
Most were able to graph the x, y, & z axes separately. By playing with the phone a bit, I was able to determine that Z is up-down.
Z showed the most deflection; however, the results could have been in waffles per toolboxes (squared) for all I know. As with most phone related stuff, documentation is sparse to non-existant. Anyway, I tried the apps at varying speeds, and with/without the feed rod engaged. I did not remove the belt--big PITA to get it reinstalled & adjusted correctly. I tried the phone resting on the HS, & on the cross slide (oriented the same for each test). I placed the headstock between speeds (neutral). I ran in both forward & reverse. I tried it while cutting the same piece of 6061 with the same TCGT insert. Essentially all the results were very similar. The amplitude did not look great--but again, there is no apparent way to determine how much there actually was.

I was just informed that since today is our anniversary, there would be "NO shop playing" this afternoon.

I guess that possibly tomorrow, I will remove the belt and run just the motor to see how it reads on the vib tester.

Thanks for all the ideas.
Jerry in Delaware
 
Just for reference, you don't need two belts. Leave one off. The single belt is more than capable of transmitting all the power the motor can provide. Unless you get perfectly matched belts, that second belt is going to hurt your finish.

A gear headed lathe is never going to give you as nice of a surface finish as a bet driven spindle. Some people solve some of this problem by putting vibration mounts on the electric motor and/or replacing the inducation motor with a 3 phase motor (vibration mounts help a lot, 3 phase motor helps a little).
 
Last edited:
Just a thought, but if I had a two-belt drive I'd figure out how to replace it with a 12-ribbed belt and pulley system, assuming I could get a belt of proper length. Even if I had to make the pulleys myself. :)
 
Back
Top