Surface grinder wheel balancing from scratch, and on the cheap:

I didn't see that one! Though, I suspect mine is going to be somewhat similar. I'm building adjustable rails in a way that I'm pretty excited about, that I think you all will like!

I also don't have balancing arbors, so I have to make those too :)
 
I didn't see that one! Though, I suspect mine is going to be somewhat similar. I'm building adjustable rails in a way that I'm pretty excited about, that I think you all will like!

I also don't have balancing arbors, so I have to make those too :)
That video has a rabbit-hole of its own! At the end, it runs to him using the grinder to make an outrageous OTT milling vise, and your thread has me going all over the place.

#1 @pontiac428 The Ti-89 Graphing Caclulator. Nostalgia! For everyday calculating, I ended up using HP Reverse Polish. It cuts through complex bracketted scientific calculations. Now, we have smartphone apps that can run rings around the old calculators, though they don't have the charm, and need to be coddled, because of the investment on "other stuff" on them, quite aside from the price!

#2 That guy's skills, precision, and video-making production are all exceptional. Reminds me a bit of Clickspring (Chris Ramsay) except maybe for the ambient lighting level, and that he lets you see his hands, and himself.

#3 A 0.01mm indicator is 0.0004" - so slightly smaller than a half-tenths type.
A 0.002mm indicator is 79 milliionths !!! :eek 2:

#4 What is going on when he is "tapping" on the spindle while indicating it. Does it "move"? Is it "adjustable"?

# 5 I am thinking that what he calls "gray (grey?) cast iron" is probably what I think is "semi-steel".

#6 I have to learn more about "soft jaws" esp in relation to CNC

All that stuff above is only about the thoughts it provokes in me. What will it do for Erich?
@Janderso Jeff, showing a guy like Erich a video like that is just madly digging his rabbit-hole deeper for him. The poor guy is now probably out there looking for a 0.002mm indicator, and thinking on plans for what else in his shop is going to need the services of his surface grinder!
 
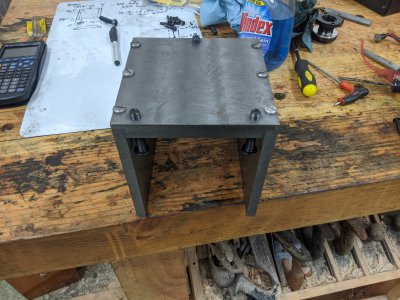
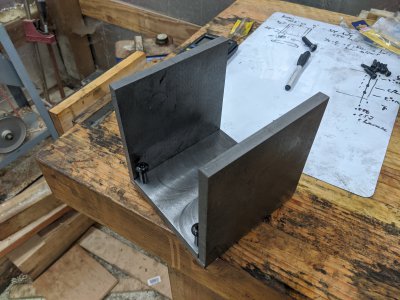
A little more progress today. I got the sides drilled/tapped and it bolted together! I think this part is now ready to be welded before I can do anything else. After it is welded, I'll probably grind the screws flush.

IMG_20200828_151939.jpgIMG_20200828_151944.jpg
 
One ready source of edges is planer blades, they come precision ground and are not expensive.
Oooh!, that is a REALLY good idea that actually makes my post-weld thoughts that much easier! I actually HAVE a couple of 18" planer blades I could use (assuming I can find a way to drill holes in HSS easy enough :) Or, have a design that uses clamping force instead!) that might work perfect! thanks for the idea!

My plan had been to use some ground-rod that I have, and put 2 bolts in each side. Basically, each side would have 2 bolt holes, 1 through that would have corresponding threaded hole in the fixture. The other would be threaded through the rod (with no corresponding hole) that would push against it, similar to the design of gib adjustments on mills.

But I have some interesting thoughts now on how to make fine adjusters for some planer blades!
 
Its a (nice) jig for holding two edges to have a grinding wheel roll around on in a balancing operation.

Does it need to be welded?
Bolted together would seem to be enough for the balancing support role. I suspect that welding it could introduce all sorts of distortions that could bring about the need to re-flatten the bottom, turn it over, and re-do the tops. Of course, if you have already welded it, the point becomes moot.

You are to be doing several extra operations to give it a feature I am, so far, not understanding. Of course I could be just plain wrong, so maybe there is something to learn here.

I am also curious also about the value of having the top edges "micro-adjustable". Yes yes - do use the planer blades! I love the idea! :) Agreed also that they need to be a tad "moveable" initially in getting them fixed to the U-section, but once made parallel in 2 axes, and clamped hard, they can stay fixed. After that, having 3-point adjusters under the whole jig seems the obvious thing to do.

Thinking this through, it seems to me the prime requirement is to arrange the tops of two beveled straight edges be exactly on the same plane, and clamp them there.

Given that the top edges are relatively narrow, if not sharp, the contact to the wheel arbor/axle is just a small point, then it would not matter if the edges under splay a little along their lengths. There is not the need to make the edges be any better than nominally parallel in the same direction as the axle is rolling. It will roll anyway.
 
Its a (nice) jig for holding two edges to have a grinding wheel roll around on in a balancing operation.

Does it need to be welded?
Bolted together would seem to be enough for the balancing support role. I suspect that welding it could introduce all sorts of distortions that could bring about the need to re-flatten the bottom, turn it over, and re-do the tops. Of course, if you have already welded it, the point becomes moot.

You are to be doing several extra operations to give it a feature I am, so far, not understanding. Of course I could be just plain wrong, so maybe there is something to learn here.

The welding isn't necessary, it is more to make it 'permanent' and repeatable. I could definitely get away having it be bolted together ONLY (and that was my initial plan). My order-of-ops was going to be to do the tops AFTER welding for that reason, since my plan for the rods wasn't super adjustable. The bottom doesn't have to be flat though, only the top (which has to be close enough to adjust in). The bottom is held up by the 3 bolts, so its flatness is meaningless.

That said, I can now think there are some advantages to having this be a 'break down'-able device. Since I'm using planer blades now, I think I have the advantage of being able to adjust them MORE, so the extra range of motion might make this worth while!

I am also curious also about the value of having the top edges "micro-adjustable". Yes yes - do use the planer blades! I love the idea! :) Agreed also that they need to be a tad "moveable" initially in getting them fixed to the U-section, but once made parallel in 2 axes, and clamped hard, they can stay fixed. After that, having 3-point adjusters under the whole jig seems the obvious thing to do.

Thinking this through, it seems to me the prime requirement is to arrange the tops of two beveled straight edges be exactly on the same plane, and clamp them there.

Well, getting them into the same plane is the only goal. I intended to make them as adjustable as possible so that getting them into the same plane is as easy as possible. This way the 'tops' of the device being even isn't necessary. The adjustment was simply to attempt to get them flat in these 2 axes. I have an even nicer (though a little more complicated to machine) way of micro-adjusting them up/down now that I'm using planer blades!

Given that the top edges are relatively narrow, if not sharp, the contact to the wheel arbor/axle is just a small point, then it would not matter if the edges under splay a little along their lengths. There is not the need to make the edges be any better than nominally parallel in the same direction as the axle is rolling. It will roll anyway.

Yep, thats exactly it. Making them coplanar is the only requirement as far as my understanding.
 
I've been following this because I also have been thinking about a wheel balancer. It would only be used on occasion so I don't want to spend much $ or time on it. The planer blade idea is brilliant. But just to stir the pot, supported linear shafting isn't too far off, pricewise, either: for example. If you can find just the shafting it should be even less money. You won't cut yourself on it, either.

Regarding the co-planarity issue. Do you have a surface plate? You could use that as the reference plane for your planer blades or rods. Flip your balancer upside-down and support the body so the blades have some room to settle down to the surface plate, then bolt them in place. But now I've handed you something else to make (those supports). :grin: Or perhaps a pair of machinist jacks could be pressed into service for that.
Fast! Cheap! Accurate! :encourage:
Also, I think, probably very much like what Erich is actually going to do. When it's upside down, he can use his micro-adjusters to get them right.

I have not yet picked apart every aspect of grinder wheel balancing. Yes indeed, if the majority bulk of the wheel is not at right angles to the shaft, you can imagine the wobble. Theoretically, it could still be "balanced" so far as non-vibration spinning in one plane is concerned, but even when the circumference is trued with a diamond, it is still scuffing axially on the surface. So fixing this either by tilted shimming, or using one of those adjustable arbors where you rotate two slant washers relative to each other to set it up true, I can believe those are expensive!

Non-uniform weight lumps within the wheel? This whole deal is exactly like balancing a car wheel, with the added refinement that we further don't allow a perfectly balanced disc that ends up with it's surfaces not much within the spatial confines of a mathematical geometric disc on axis.

I am not sure about "drilling" bits out of a disc is OK. Adding epoxy in special places seems less harmful. I still feel I am somewhat ignorant on this. I still have to read and explore more to get up to speed. Meantime, there are bound to be HM members who have been through this, and can say exactly what not to do to a grinding wheel.
 
I've been following this because I also have been thinking about a wheel balancer. It would only be used on occasion so I don't want to spend much $ or time on it. The planer blade idea is brilliant. But just to stir the pot, supported linear shafting isn't too far off, pricewise, either: for example. If you can find just the shafting it should be even less money. You won't cut yourself on it, either.

Regarding the co-planarity issue. Do you have a surface plate? You could use that as the reference plane for your planer blades or rods. Flip your balancer upside-down and support the body so the blades have some room to settle down to the surface plate, then bolt them in place. But now I've handed you something else to make (those supports). :grin: Or perhaps a pair of machinist jacks could be pressed into service for that.
The nice part is I have BOTH used planer blades AND precision ground shaft rod :) I like the planer blades, since mounting them is way easier.

the surface plate is essentially my idea of how to calibrate them. I'm going to flip it over, and bolt them in place. The idea of micro-adjust is to save me from having to elevate it in some way (though, 2 1-2-3 blocks are probably sufficient....), but I guess I can add that later.!

Fast! Cheap! Accurate! :encourage:
Also, I think, probably very much like what Erich is actually going to do. When it's upside down, he can use his micro-adjusters to get them right.

I have not yet picked apart every aspect of grinder wheel balancing. Yes indeed, if the majority bulk of the wheel is not at right angles to the shaft, you can imagine the wobble. Theoretically, it could still be "balanced" so far as non-vibration spinning in one plane is concerned, but even when the circumference is trued with a diamond, it is still scuffing axially on the surface. So fixing this either by tilted shimming, or using one of those adjustable arbors where you rotate two slant washers relative to each other to set it up true, I can believe those are expensive!

Non-uniform weight lumps within the wheel? This whole deal is exactly like balancing a car wheel, with the added refinement that we further don't allow a perfectly balanced disc that ends up with it's surfaces not much within the spatial confines of a mathematical geometric disc on axis.

I am not sure about "drilling" bits out of a disc is OK. Adding epoxy in special places seems less harmful. I still feel I am somewhat ignorant on this. I still have to read and explore more to get up to speed. Meantime, there are bound to be HM members who have been through this, and can say exactly what not to do to a grinding wheel.

Basically, the problem with grinding wheels is they aren't uniform density, so you have to move/add/remove weight to balance them. There are a few different mechanisms to do so (including hubs that have weights that move!). The drilling bits out of the wheel is the 'common' way, but I'm not going to do that, it scares me that I could break it easily. Adding epoxy seems time consuming!

My idea is to essentially turn my 'cheap' non-balancing hub into a balancing hub by either modifying or replacing the nut. I think I can just drill/tap it in a number of places for set-screws, like these: https://www.kineticprecision.com/all-about-balancing-rings

THOSE rings are expensive, and I think there is no reason I couldn't do the same on the nut instead! The question i've got is whether I want to increase the diameter of the nut, or just use it as-is.
 
Back
Top