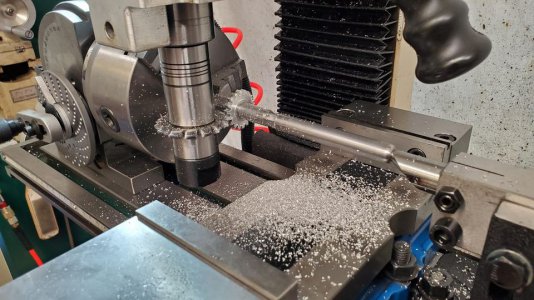
That 0-36 direct indexing plate doesn't do 18 holes, doofus!

dewbane

Michael McIntyre
H-M Lifetime Diamond Member
Joined
Mar 2, 2018
Messages
232
I was about to cut my very first gear. I knew I would need lots of practice to master the whole crank 12 times and 17 holes thing, so i wanted to make it easy on myself, and just use the front plate. You know, the one that has the handy dandy little stick out plungie thing that locks dead on a hole, and no need to think about no steeking backlash or math.

In fact, as a lead up to this, I cut my first hexes with this setup. 36 / 6 = 6. 0, 6, 12, 18, 24, 30, back to 0. BOOM! I am a machinery chammmmpion!!!

I cut a few hexes with this setup, and I was pretty confident I had figured it all out. Then I went to cut my 18 tooth gear. 18, because it was a blank I could turn out of aluminum I had on hand.

So yeah, I figured it out as soon as I advanced and cut the next tooth. Mavis, that don't look right. Yeah genius, because the front plate on a standard B&S BS-0 diving head can do... RTFM... "Direct Indexing Plate: Provides 24 evenly spaced holes for indexing 2, 3, 4, 6, 8, 12, or 24 locations."

I kept going anyway, and it didn't get no better from there. Bravo!

Wait, there's more!

I went ahead and turned that mangled blank down to the size for a 12-tooth gear. I finally figured out how to use the holes correctly. A 12 hole was totally doable. Boom!

Yeah. I got everything right, except I made a stupid math error when I set the Z axis height, and I cut a perfect 12 tooth gear with the cutter perfectly aligned with the outside diameter of the arbor, rather than the center of the arbor. Bet I'm not the only one who ever screwed that up. I knew what I was trying to do, and I just had an episode of cerebral flatulence. A 0.500" arbor and a 0.222" gear cutter, so 0.250 + 0.222 = 0.470 / 2 = D'OH! (Every cutter in this set is different, but in the future I will be looking for a number around 0.360" as a clue that I am not eyeballing the blood vessels in the walls of my own rectum.)

Anyhoo, no problem, I mounted another of my 18-tooth blanks, went back to the dividing head, and smart as I is, I seen they was a hole plate dooflatchie with the number 18 on it.

Yeah, I'll just move it one hole at a time, because 18.

Yeah. I wish. I figured that out in time to save the day. I figured out I should have been going 2 turns and 4 holes on the 18-hole plate. Booyah! It's just that my entire plan was to practice on something easy first, and as expected, I messed up the turn turn click thing. I'm thinking I jumped a hole. I just fumbled somewhere or something. I was planning to do a dry run with a sharpie before I got into that 42 turns plus 73 holes nonsense.

So that is how I spent a lot of time making a lot of chips in order to wind up with these sad trophies.
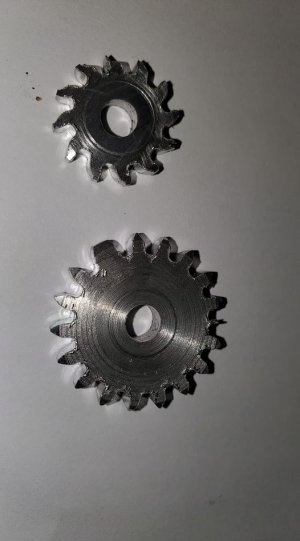
fail.jpg
 
At least you had the guts to try :encourage:, my dividing plates are still in the box, as my father used to say "scares me, and I'm fearless":)

 
Lol! Thanks for the hilarious write up!

We shouldn't fear making mistakes, it's the best learning tool there is :)

Indexing isn't that scary really... I dove straight into differential dividing and helical work and thoroughly enjoy it. My dividing head is probably one of my most treasured machine tools, it's just so versatile.
 
Lol! Thanks for the hilarious write up!
My goal was to cut a gear correctly on the first try. Since I completely face planted on that one, I figured I might as well laugh at myself.
We shouldn't fear making mistakes, it's the best learning tool there is :)
You got that right. I tried not to screw up, and I screwed up anyway, but I understand where I went wrong, and that's how learning works. I'm sure I'll get it right soon.
Indexing isn't that scary really... I dove straight into differential dividing and helical work and thoroughly enjoy it. My dividing head is probably one of my most treasured machine tools, it's just so versatile.
I have a feeling I'll be doing a lot of it. It just appeals to me. I got pretty close, and just had to learn some stuff I never would have learned if I hadn't just tried.
 
That 1st pic looks like a neat ratchet! Tell me how you did that, I may want to copy it;)
 
Well the 'gear' in the top photo can be hung on the wall & if anyone asks tell them it is from a high performance sand drag bicycle.
There is a video on the Youtube that has a tip for sticking a pin of some sort ,(like a toothpick ),into the hole next to the sector arm as a safety check. I thought it was a good idea as once I must have knocked the sector arm one hole. Fortunately it was three teeth from the finish so the glitch wasn't serious. I'm sure you will be making fine gears in no time.
Shop Calc is a handy program for the lazy.
 

Attachments

  • ShopCalc_win32.zip
    2.1 MB · Views: 7
That Sharpie idea sounds good. I didn't have any of these geometry or miscounting problems and my gears still came out looking like that. At least they all worked. I'm not sure those gears in the picture will work without some serious TIG welding.
 
Sometimes math is a good sanity check... 18 steps is a fairly obvious 20 degrees per step, so that's 5 revolutions at 4 degrees per... right back into the same indexing hole, right?
 
That 1st pic looks like a neat ratchet! Tell me how you did that, I may want to copy it;)
I looked at trying to use it as a ratchet, and the tooth geometry is probably way too wonky to ever function. That's the one where I set the height wrong, because I did the math wrong. (Which, in the scheme of things, is a lot easier to live with than setting the height wrong, because I don't know how to set the height accurately. No, I dialed it very precisely to the wrong number.)

Well the 'gear' in the top photo can be hung on the wall & if anyone asks tell them it is from a high performance sand drag bicycle.

That's the stuff.

I'm not sure those gears in the picture will work without some serious TIG welding.

They are officially gear-like objects, but not gears. For the record though, once I get one cut correctly, I will clean up the burrs and make it prettier.

Sometimes math is a good sanity check... 18 steps is a fairly obvious 20 degrees per step, so that's 5 revolutions at 4 degrees per... right back into the same indexing hole, right?

My first false assumption was that my direct indexing plate had 36 holes. I didn't count them, study the plate, or read the manual closely enough. If it had had 36 holes, going two holes per step would have worked.

My next false assumption was just forgetting about the 40:1 worm gear when I switched to the indirect indexing plate. An 18-hole plate gives you 1/2 a degree per hole, not 20 degrees. I didn't actually try to cut a gear like that. I backed up and then came up with the correct answer, so I'll take credit for getting that right. This isn't school, so it doesn't matter if I did the math or used a dividing head calculator app. :)

It's good practice though, so here's the work. One crank on a 40:1 is 9 degrees, two cranks is 18 degrees, and each hole/space on the indirect indexing plate is 1/2 a degree, so 4 of them will get me the remaining 2 to total 20 degrees per step.

I think I've gotten the worst mistakes behind me. I'm debating whether to try to cut another gear before I head to work. It's going to be a long first night back, and I have all these boxes with materials for my clock to unpack. Well, I can unpack boxes in the cold dark when I get home, but I can only cut gears while it's still warm, so I guess that settles that.
 
So a follow-up. Ta dah! There are a couple of dings where I didn't have the cutter out far enough when I started rotating the blank, and I realized this as I nicked it. I got better at that with practice. I won't know for sure until I make another gear, but this looks like a gear.

q.jpg

I figured out where I went wrong last time. The combination crank handle/spring plunger on this Chinese BS-0 clone is not great. It's pretty gritty, and tricky to manipulate such that the pin engages the hole at just the right moment. That was a matter of just slowing down and being careful. One crank, two crank, get to the edge of the sector arm, and twiddle that thing so when I go just past it, it sticks the hole. I also had trouble with shifting the sector arms out of position while I was futzing with the handle. It really is pretty crappy, and I should probably build or buy a better one. The one time I was really worried that I mucked up the sector arms, I did the dance in reverse to go back to the last hole, then ran the cutter through the space with the motor off. It didn't drag at all, so I was lined up perfectly, which means doing the dance in the forward direction would put me on target. I didn't try the toothpick trick yet. I did try marking holes with a sharpie, but it was hard to get the point of the sharpie where I needed to draw in many cases. Shrug. All things to refine later. I think I have the gist of it down now. This appears to be a gear, though I didn't check it with gauge pins or whatever (I don't even own any) to see if I actually got the depth right.

The next thing I need to solve is getting DRO. Back when men were men and used hand dials to make crankshafts for Model T Fords, I'm pretty sure the hand dials on the big American iron they were using worked a lot better than these weird Chinese ones. I think I got it right, rotating it backwards, and eyeballing the space between tick marks at what I think was the right target, but wow, that truly sucks. That's why I never tried to use them before. I always just work to references. I want a nice 4-axis DRO setup, but I need to look at just doing 2-axis. Maybe I can afford to actually do that, instead of waiting. My Z axis DRO is not very pretty and eats batteries like thin mints, but it actually works, and it's already there.

I'm kind of proud of the setup I came up with. I have my vise dialed in perfectly, and I wanted to avoid removing it if possible. I wanted to avoid having to remove the dividing head setup just to mill something small, and indeed I've done several small milling jobs with the dividing head and tailstock remaining dialed in on the table. It's pretty cramped and obnoxious, and yes, I dinged the chuck jaws with the gear cutter a few times (better the cheap Chinese chuck than my Kurt DX4!!!!!!) I'm not at all sure I'm going to be able to use this setup to do the larger wheels on the clock I'm planning to build. I will almost certainly have to remove the vise, and I might just not be able to cut them period, due to Y axis constraints. Still, in terms of using what room you have to greatest possible advantage, I like this setup. It seems to work for making involute gears using standard cutters anyway. Too bad I can't do any of that on my clock build, but those are problems to solve another day.

p.jpg
 
Back
Top