Thread Mic and Internal Threading

gun410

Registered
Registered
Joined
Jul 25, 2019
Messages
53
Hello,

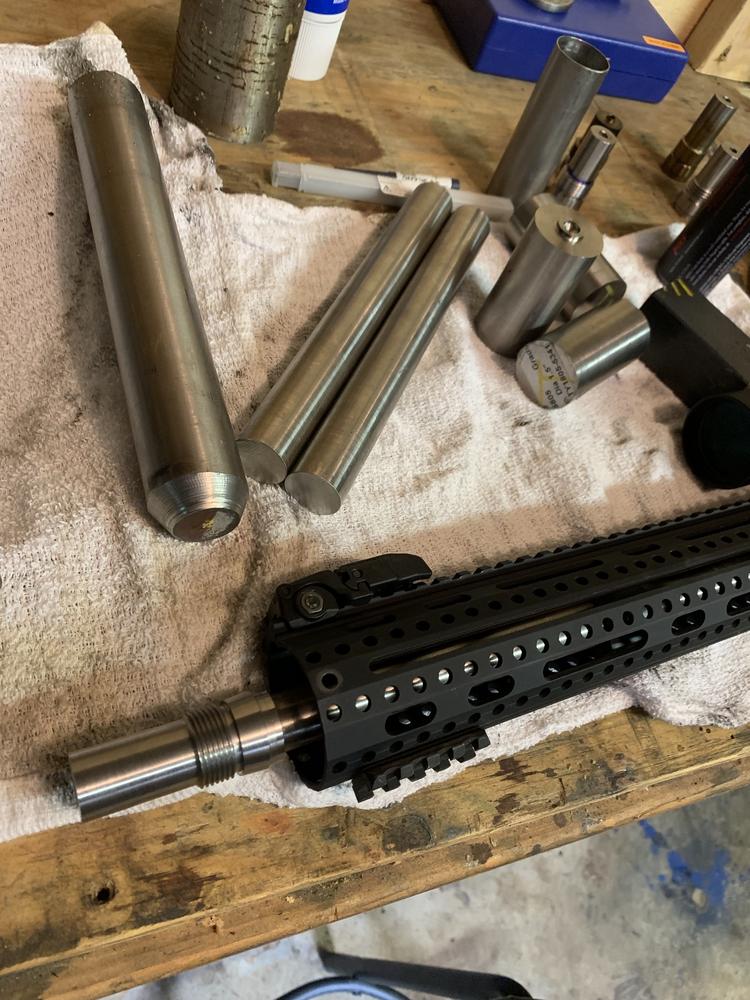
I am a fairly new to machining and even newer to a lathe. I have a G0602 10x22 lathe and I need to machine an endcap to fit on to a previously made brake (for a forum 1 suppressor build). I have 2 brakes made so far, i checked the pitch diameter with wires while threading the brake but they were very difficult to hold and get a good reading. I have a thread mic coming tomorrow that i'll be able to get the exact pitch diameter. But I have not internal threaded before and i've heard people say opposite things and i just want to grasp it more before i try it. I've watched alot of videos and read though quite a few threads on internal threading, and i have a couple questions that may be simple but I'm a newbie:chunky:

Is the cross slide better for controlling depth than the compound for internal threading?
Once my thread mic comes and i get the exact pitch diameter can that help me for cutting the internal thread?
For pitch diameters there is around .005 tolerance is it better to be on the tighter or looser side?
Also for bore diameter for threading i know to use the minor diameter of the threads but once again there is .012 range to the minor

.9375 16tpi thread info.JPG23.4.JPG
 
I'll start this off and the other guys can come in and correct me.
  • I prefer to use the cross slide for internal threading. It is much simpler to control my depths of cut that, quite often, are very light. I usually use either HSS or solid carbide threading tools that enable very light depths of cut. The reason this matters is when producing precision fits being able to cut what you dial in is important. Inserts can do precision work but you have to know how to use them. I usually only use inserts when I have to go deep.
  • A thread mic helps with internal threading in a round about way. The mic will allow you to cut the male thread with precision, and this allows you to fit the female thread to that male thread. It otherwise does not help with internal threading directly.
  • With regard to going for tighter or looser in the tolerance range, let me try to clarify this another way. YOU determine the class of fit you desire. If you need a okay fit and can tolerate a bit of slop or slack then a class 2 fit will do. This is what you get from a hardware store nut and bolt; its that kind of fit. If you want a class 3 fit then you're talking about a precision fit; the nut threads on with no slop or play. It may be snug, depending on how good you are at cutting to fit. A really good class 3 fit nut will thread onto the male thread with a little effort but zero play; you can feel the thread engaging but it is NOT a free-running fit. This class 3 fit requires the male OD to be turned within a specific diameter tolerance range and it also requires the female ID to also be within a specific tolerance range. Then you turn the male thread so that the pitch diameter falls inside the pitch diameter range for a class 3 thread. Once you get that, you turn the female thread to produce the fit that you require. This is the practical way to do this and is the way I would suggest you proceed; it allows you to use the male part to fit the female part.
  • As to your final question, see above. You bore the female part to the tolerance fits for the class thread you need. When you do this, shoot for the middle of the range but as long as you are anywhere inside this range you should be okay.
I know this sounds straightforward but turning to tolerance ranges requires that you be able to hit specific inside and outside diameters. Class 2 fits are usually not too difficult; Class 3 fits require a fair amount of skill, especially boring. You will find that doing precision machining for close fits is going to be challenging with inserted carbide tooling. HSS turning and threading tools will enable you to work with greater precision at these levels of fits, and solid carbide boring and threading bars will really help on the inside; in my opinion, Micro 100 makes the finest tools for this kind of work.

My best advice is to focus on learning to turn and bore accurately. Obtain the tools you need to do this, including telescoping gauges and micrometers if you don't yet have them so you can learn to bore with control. If you can grind HSS turning and threading tools, that will help a lot. If you must use inserts then learn how to control your cuts to hit very tight tolerances.
 
Last edited:
My Brown and Sharp 153 14-20 tpi thread mic came in and my buddy brought over his Chinese screw mic with the changing anvils 0"-1" and for whatever reason the chinese mic was reading lower values. For my .9375 X 16 tpi brakes I measured them and got .897" and .900 for pitch diameters which is bigger than the chart above but the other thread mic had a little lower numbers that fit into the pitch diameters range.

I actually ordered a Micro 100 threading bar after breaking my other one a couple days ago. I have a small piece of 17-4 in the lathe that i have bored to .875 the size needed for 15/16" x 16tpi according to http://www.harveytool.com/secure/Content/Documents/Tap_Drill_Chart.pdf but the only ID threading tool i have is a left hand shars brazed carbide internal threading and im waiting for my micro 100 to show up.
 
Okay, let's back up a little bit. I suggest that you not go with tap/drill charts for anything you do with cutting threads on a lathe. Use the chart I'm attaching below. Let's walk through this a little so I can show you how the chart is used. I'll assume we are cutting for a class 3, 15/16-16 thread.

Screen Shot 09-10-19 at 09.00 AM.PNG

The first thing you notice is that the material you're working with is not listed. This is because thread form is thread form and they assume you know how to cut it.

For the male thread, note that you have to turn the OD to between 0.9375 - 0.9281". You have a 0.0094" range to hit this OD. Once you get the OD somewhere inside this range, cut your threads until the pitch diameter that you get with your thread mic falls inside the listed range, 0.8969 - 0.8932". You have a 0.0037" range that your thread pitch has to fall in to and this produces a class 3a (a is external thead, b is internal thread), 15/16-16 thread.

For the female class 3b thread, you must bore the work piece to an ID between 0.8700 - 0.8783". Since you cannot measure pitch diameter inside the female thread directly, you have to estimate your thread depth of cut and when you get close you will use the male thread you cut above to test the fit until you get what you need. You can get pretty close for estimating the total depth of cut with the formula: 0.750/tpi. So, 0.750/16 = 0.0469". You check for fits well before you hit this depth of cut and when you get the fit you need, stop, and you're done.

When cutting large threads like this, tolerance ranges are big. When you get down to threads in the 1/4" range, tolerances are in the tenths so you need to be up to that level of work.

This chart is the most practical and useful chart I've seen. It tells you exactly what you need to get the threads you want and nothing more. Hobby guys need simple stuff like this.

Insofar as thread mic accuracy, this is calibrated with a mic standard that is pointed on one end and has a V on the other end to match the anvils. The reading you need to hit will be engraved on the mic standard.

EDIT: I forgot to add that thread micrometers are intolerant of any sloppy habits we hobby guys might have. Before measuring, clean the work of burrs, chips and oil. Make sure the mic is centered on the work diameter - if you are off by even a little bit, the reading will be off. When working to very tight tolerance ranges, this matters because once the work piece is taken out of the lathe it is usually too late to cut deeper on it. Work with care and you should be fine.
 

Attachments

  • American-Light-Screw-Socket-Thread-Specification-Sheet.pdf
    165.1 KB · Views: 17
Last edited:
Okay, let's back up a little bit. I suggest that you not go with tap/drill charts for anything you do with cutting threads on a lathe. Use the chart I'm attaching below. Let's walk through this a little so I can show you how the chart is used. I'll assume we are cutting for a class 3, 15/16-16 thread.

View attachment 301933

The first thing you notice is that the material you're working with is not listed. This is because thread form is thread form and they assume you know how to cut it.

For the male thread, note that you have to turn the OD to between 0.9375 - 0.9281". You have a 0.0094" range to hit this OD. Once you get the OD somewhere inside this range, cut your threads until the pitch diameter that you get with your thread mic falls inside the listed range, 0.8969 - 0.8932". You have a 0.0037" range that your thread pitch has to fall in to and this produces a class 3a (a is external thead, b is internal thread), 15/16-16 thread.

For the female class 3b thread, you must bore the work piece to an ID between 0.8700 - 0.8783". Since you cannot measure pitch diameter inside the female thread directly, you have to estimate your thread depth of cut and when you get close you will use the male thread you cut above to test the fit until you get what you need. You can get pretty close for estimating the total depth of cut with the formula: 0.750/tpi. So, 0.750/16 = 0.0469". You check for fits well before you hit this depth of cut and when you get the fit you need, stop, and you're done.

When cutting large threads like this, tolerance ranges are big. When you get down to threads in the 1/4" range, tolerances are in the tenths so you need to be up to that level of work.

This chart is the most practical and useful chart I've seen. It tells you exactly what you need to get the threads you want and nothing more. Hobby guys need simple stuff like this.

Insofar as thread mic accuracy, this is calibrated with a mic standard that is pointed on one end and has a V on the other end to match the anvils. The reading you need to hit will be engraved on the mic standard.

EDIT: I forgot to add that thread micrometers are intolerant of any sloppy habits we hobby guys might have. Before measuring, clean the work of burrs, chips and oil. Make sure the mic is centered on the work diameter - if you are off by even a little bit, the reading will be off. When working to very tight tolerance ranges, this matters because once the work piece is taken out of the lathe it is usually too late to cut deeper on it. Work with care and you should be fine.
Thank you for all the info and the chart. For the brake thread i was originally planning on it being a class 2 thread but the brake i made has a pitch diameter in the class 3 tolerance about a thou over class b, the diameter before threading was .934” a little under nominal but still in the tolerance. I bored a hole .875" finish could've been better but i wasn't using cross feed because the lathe change gears were setup for threading. Anyways i attempted to single point thread it with a left hand tool lathe going in reverse and threading from inside to out. After the first couple passes the tip snapped and messed the threads up. I'll have to wait till my micro 100 boring bar comes until i can do anymore internal threading. I will also have to thread the tube and end cap but i hope that won't be to difficult, i have a Gold N DRO modified I-gaging dro that magnets to the lathe's ways and carriage for the x-axis. I'm planning on using the right hand micro 100 thread into the tube, zero the dro on the edge of the tube and thread towards headstock then disengage the half nut at .5". I saw this today and it looks like it would be a one all for Rh and Lh threading internal and external does anyone have experience with them? https://littlemachineshop.com/products/product_view.php?ProductID=3467&category=-147164245
 
Last edited:
I use this insert for external threading (I don't have a holder for internal threading). Works fine.
 
Okay. Screw cutting is not difficult once you understand what you are trying to achieve. Keep us posted on how it goes.

I have no experience with that LMS tool, sorry.
 
One problem with threading stuff to go on the end of a barrel is that looser threads can work loose pretty quickly, recoil can be hard even on things that are tight. If your brake wobbles it can really mess up accuracy. Guess I'm suggesting the class 3 or thereabouts if you can do it.

Oh, and practice a few times on non-critical practice parts before you jump into the real deal.
 
I’m not a gunsmith nor did I stay at a Holiday Inn last night, but I would think you would want as tight a thread as you can reasonably get for the sake of concentricity of brake and barrel. This seems like a good topic for the “Gunsmithing & Firearms” subforum in the “Weapons” forum. Might attract more attention from those who know about your specific application. And/or you might garner some good info from past threads, if you haven't already.

Edit: Will you be using a crush washer to align the brake and help prevent it from vibrating loose as eeler1 alluded to?

Tom
 
Last edited:
Concentrically is my main concern with threading the tube and endcaps. The muzzle comp was internally threaded with a 1/2-28 tap and fits on a threaded barrel, but the external threads were single point threaded, which I believe i did a good job on but i have concerns. Before i threaded the external 15/16 - 16 i turned it down to .934" a couple thousands below the nominal .9375" will that create slop in the threads?

I wont use a crush washer on a suppressor because it will cause baffle strikes, I'll use a spacer toclock the brake and keep a flat area for the brake to tighten on.
qed7Dmk.jpg
 
Back
Top