-
Welcome back Guest! Did you know you can mentor other members here at H-M? If not, please check out our Relaunch of Hobby Machinist Mentoring Program!
You are using an out of date browser. It may not display this or other websites correctly.
You should upgrade or use an alternative browser.
You should upgrade or use an alternative browser.
Tiny Parts
- Thread starter JimDawson
- Start date
- Joined
- Feb 8, 2014
- Messages
- 11,144
We interrupt this thread for a quick upgrade to the HF pencil grinder. While I have used the pencil grinder for a number of years I have never tried to do anything really precision with it before. So I decided I better check the spindle runout.
0.009'' TIR is not good, need to fix that
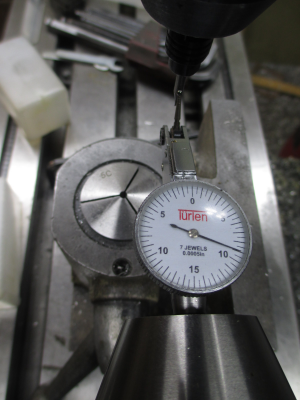
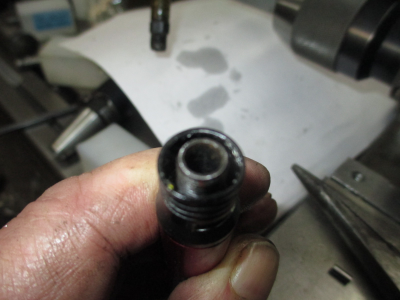
So pull off the nut and check out the spindle. First thing I noticed is that there is no taper to match the collet taper.
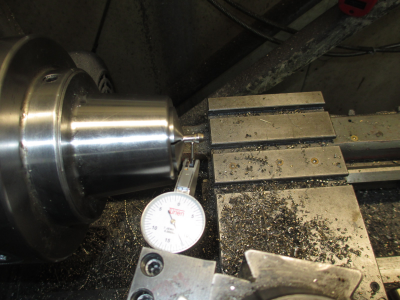
The collet taper is 15° so dial in the collet to set the compound to match. You are looking for no movement of the indicator when the compound matches the angle.
Then insert the spindle into a 5/8'' collet and attach air line. MAKE SURE THE LATHE E-STOP IS PUSHED IN. Don't want to run the lathe spindle.
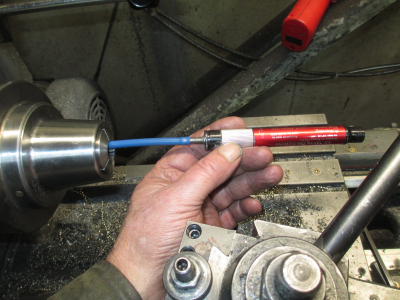
Many times I use a 2 flute endmill as a boring bar for small shallow holes. Just set up so one flute is in the correct position for cutting. The good news is that the spindle is not terribly hard.
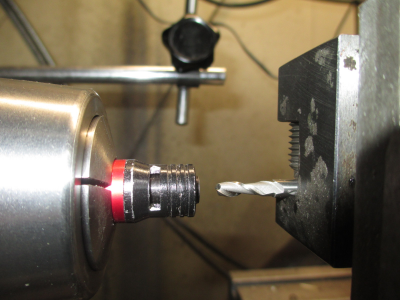
I checked the runout in the spindle and it was <0.001 when I was done boring. Could be better but I was pressed for time. I put a bit back in the spindle and still had about 0.009'' TIR. OK, that means the collet is not the highest quality. But from HF I'm not really complaining.
So time to make a new collet. I already had a chunk of 303 SS sitting there, so I just made it out of that. The original was 0.002 oversize on the ID, and 0.002 undersize on the OD. The new one has a good fit on both dimensions.
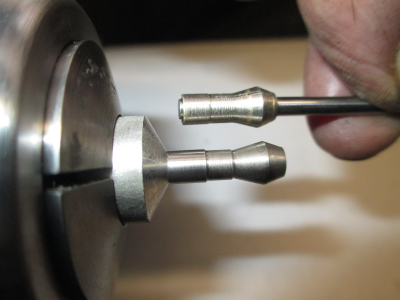
Then over to the mill to make the 3 slits. I stuck a snug fitting aluminum pin in the hole to keep it from collapsing on the slitting saw and was cutting towards the back so the saw would force the aluminum pin into the part so it wouldn't walk out.
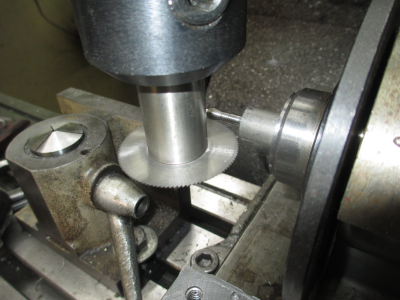
Then back over to the lathe for partoff and final clean up. A bit smaller dia blade would have been helpful, but it's what I had.
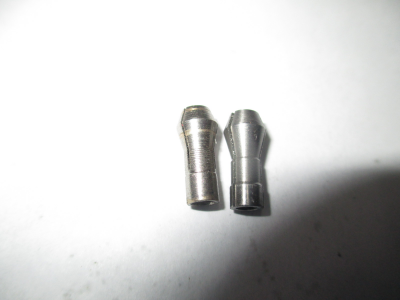
Was not 100% successful, still had about 0.003'' runout. But better than it was. I should have bored the hole rather than just drilling & reaming. Should have been bored to the drill size then reamed. Then it would have been near perfect. That's what happens when you get in a hurry.
But the good news is that it worked. More later....
0.009'' TIR is not good, need to fix that

So pull off the nut and check out the spindle. First thing I noticed is that there is no taper to match the collet taper.

The collet taper is 15° so dial in the collet to set the compound to match. You are looking for no movement of the indicator when the compound matches the angle.

Then insert the spindle into a 5/8'' collet and attach air line. MAKE SURE THE LATHE E-STOP IS PUSHED IN. Don't want to run the lathe spindle.

Many times I use a 2 flute endmill as a boring bar for small shallow holes. Just set up so one flute is in the correct position for cutting. The good news is that the spindle is not terribly hard.

I checked the runout in the spindle and it was <0.001 when I was done boring. Could be better but I was pressed for time. I put a bit back in the spindle and still had about 0.009'' TIR. OK, that means the collet is not the highest quality. But from HF I'm not really complaining.
So time to make a new collet. I already had a chunk of 303 SS sitting there, so I just made it out of that. The original was 0.002 oversize on the ID, and 0.002 undersize on the OD. The new one has a good fit on both dimensions.

Then over to the mill to make the 3 slits. I stuck a snug fitting aluminum pin in the hole to keep it from collapsing on the slitting saw and was cutting towards the back so the saw would force the aluminum pin into the part so it wouldn't walk out.

Then back over to the lathe for partoff and final clean up. A bit smaller dia blade would have been helpful, but it's what I had.

Was not 100% successful, still had about 0.003'' runout. But better than it was.
But the good news is that it worked. More later....
Last edited:
- Joined
- Jan 2, 2014
- Messages
- 8,851
@JimDawson,
Jim thanks for taking the time for the photos and write-up.
I know it's easier just to get the job done.
Thanks for bringing us along!
-brino
Jim thanks for taking the time for the photos and write-up.
I know it's easier just to get the job done.
Thanks for bringing us along!
-brino
- Joined
- Oct 14, 2014
- Messages
- 1,966
Just a suggestion. I mounted one of these (that was not defective) to my CNC mill
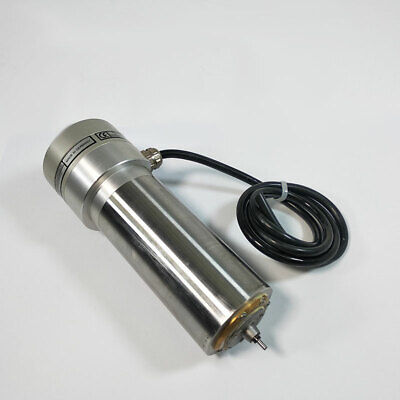
works a treat on endmills and drills under 1mm.

Defective Precise High Speed Spindle Motor 60000RPM 0.5KW ASC200-2 | eBay
About 70%-80% New ,remove From Machine. take all the responsibility. Without Any Kind Of Warranty ! Without Refunf!
www.ebay.com
works a treat on endmills and drills under 1mm.
- Joined
- Feb 8, 2014
- Messages
- 11,144
Ok continuing....
I got the parts done and shipped yesterday. All went well, but drilling & tapping the holes was a bit stressful.
The following are all staged pictures showing the setup. Staged because I didn't get any pictures of the actual operations, and I can't show the parts anyway due to NDAs. All of the operations were done manually by feel and sound, and yes you can actually feel what's happening even with a 25 lb quill and a tiny tool.
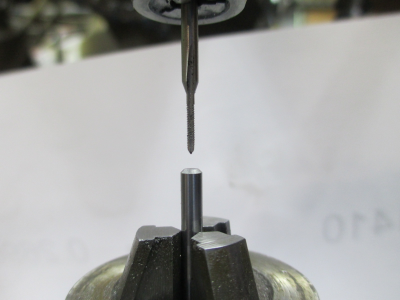
So first ''drill'' a starter hole with a 0.032 endmill. The only 1/8 dia center drill I have is broken on both ends, so grab the next best thing. This nicely mills off the little nub that's left from the parting operation, and really does give a straight hole. I actually centered the tool by eye (and 10x magnification) using a pin that was just slightly larger than the endmill. There was no other way to do it because of the runout in the bit and not knowing exactly where the center of the air spindle is relative to the machine spindle centerline. The air spindle goes in a 5/8 endmill holder, and the air line goes down through the spindle hole where a drawbar would normally be. My machine has a quick change spindle so no draw bar.
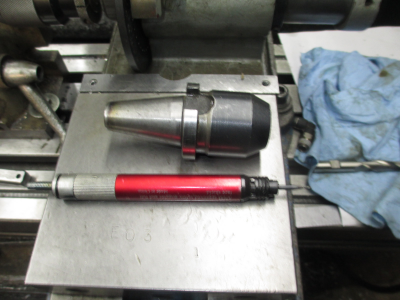
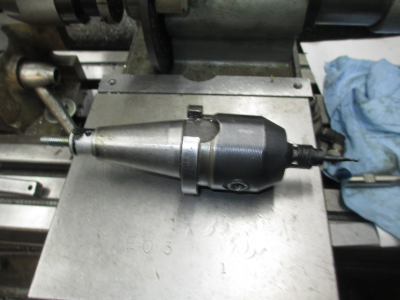
And the air supply.
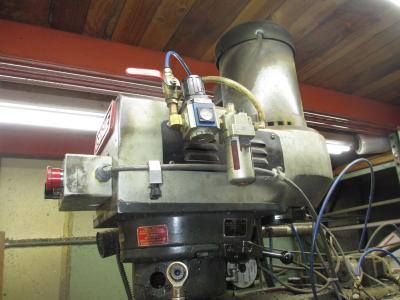
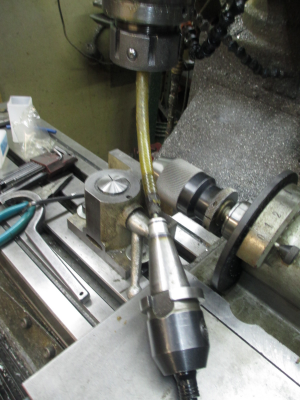
So first operation, 0.032 end mill, solid carbide
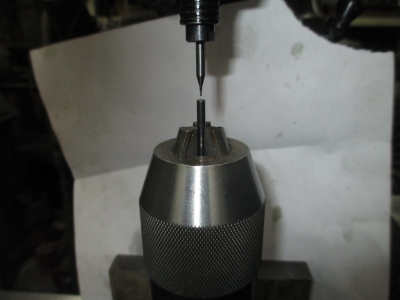
Then drill with a 1mm drill bit. Solid carbide circuit board drill. I one part I had to drill 7mm deep, 7 diameters, that was nerve wracking. The other part was only about 4mm deep, so not so bad. The good news is that the torque of the air spindle was low enough to stall the spindle before snapping the drill bit, built in torque limiting.
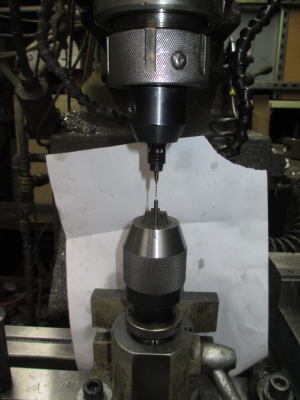
Then the setup for tapping. For this operation I used my sensitive drill chuck and turned the spindle by hand.
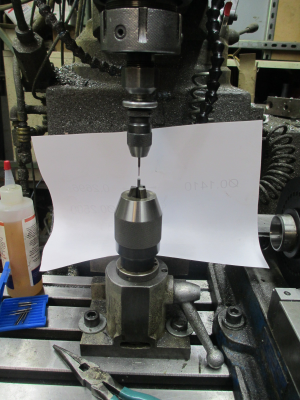
That is a 1/8'' pin in the chuck, that tap is tiny. M1.2x0.25 I managed to get through all 6 parts without breaking a drill bit or a tap. I got very lucky, because I did not have time to make more parts. I beat the shipping deadline by about 7 minutes, and that required a trip to the UPS air terminal at the airport. These parts had to be in the hands of the customer today, UPS came through for me.
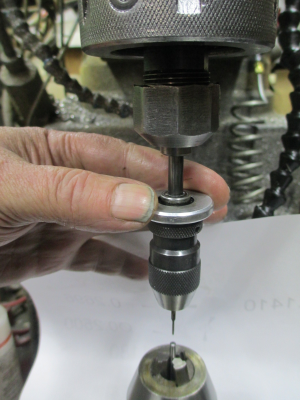
For those of you who have not seen a sensitive drill chuck, the inner shank slides up & down in the main shank and is driven by a key. The hand ring has a bearing in the center and is free to turn, this is how you control the down pressure. A great device for drilling & tapping small holes. I think the chuck capacity is 3/16''
So the next order of business was to mill the three 0.031 slots around the outside of one of the parts. I was going to do it with the spindex on the mill, but because of the runout in the air spindle I wan not able to do so. The smallest endmill I have is 0.031 and with the 0.003 runout the slots would have been oversize.
So on to plan ''B''. I'll use the shaper lathe The slots are only 0.006 deep.
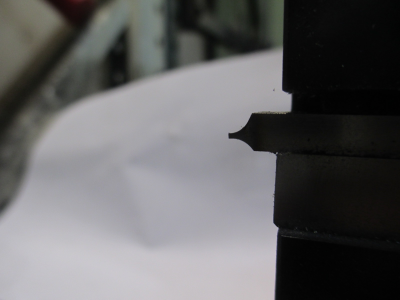
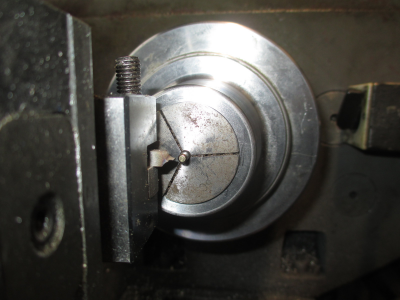
Here is the tool bit
So first align a slot in the collet with the tool bit, luckily the tool bit and the collet slots are about the same size.
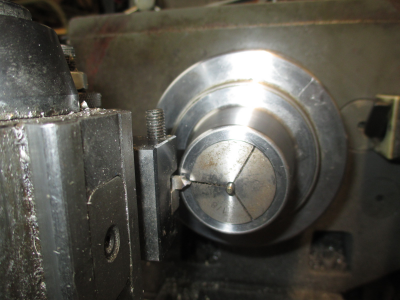
Then become a shaper and go 0.006 deep. About 0.001 per pass. Then rotate to the next position and repeat.
So today, back to some kind of normal work. Went to a customer and fixed their circuit board soldering oven, had a bit of a cooling problem at the cold end of the conveyor.
Then back to some normal machine work with a nice big beefy 1/4'' ball end mill This is a part of a swaging die for another customer, this one I can show.
Needs to me modified to better shape the swage.
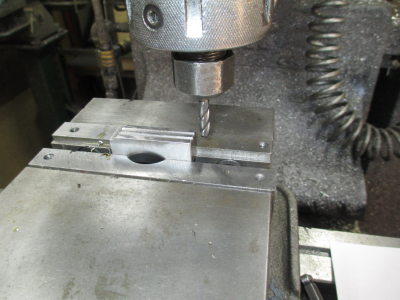
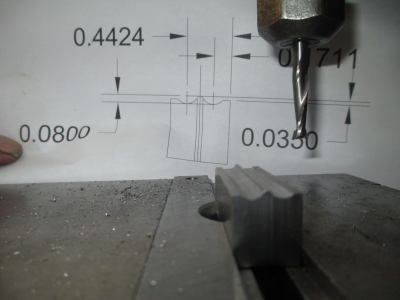
And after machining. All the heights were the same and the center was too wide when I started. So narrowed the center part, and took 0.035 off of the outside rails. Should work well now. If it works OK, I'll build another and have it heat treated. I'll deliver this one in the morning.
Then this morning about 1000 lbs of aluminum was delivered. It needs to all be converted into chips. Gotta start on that tomorrow. And I'm supposed to be retired. Pesky customers keep bothering me.
And speaking of tiny parts, I turned down a job yesterday. One of the features had a 6 hole pattern of 0.013'' holes. I would have taken it, but it had a drop dead ship date of Friday (today is Wednesday). Just not enough time to get tooling in and get it done.
I got the parts done and shipped yesterday. All went well, but drilling & tapping the holes was a bit stressful.

The following are all staged pictures showing the setup. Staged because I didn't get any pictures of the actual operations, and I can't show the parts anyway due to NDAs. All of the operations were done manually by feel and sound, and yes you can actually feel what's happening even with a 25 lb quill and a tiny tool.
So first ''drill'' a starter hole with a 0.032 endmill. The only 1/8 dia center drill I have is broken on both ends, so grab the next best thing. This nicely mills off the little nub that's left from the parting operation, and really does give a straight hole. I actually centered the tool by eye (and 10x magnification) using a pin that was just slightly larger than the endmill. There was no other way to do it because of the runout in the bit and not knowing exactly where the center of the air spindle is relative to the machine spindle centerline. The air spindle goes in a 5/8 endmill holder, and the air line goes down through the spindle hole where a drawbar would normally be. My machine has a quick change spindle so no draw bar.


And the air supply.


So first operation, 0.032 end mill, solid carbide

Then drill with a 1mm drill bit. Solid carbide circuit board drill. I one part I had to drill 7mm deep, 7 diameters, that was nerve wracking. The other part was only about 4mm deep, so not so bad. The good news is that the torque of the air spindle was low enough to stall the spindle before snapping the drill bit, built in torque limiting.


Then the setup for tapping. For this operation I used my sensitive drill chuck and turned the spindle by hand.

That is a 1/8'' pin in the chuck, that tap is tiny. M1.2x0.25
 I managed to get through all 6 parts without breaking a drill bit or a tap. I got very lucky, because I did not have time to make more parts. I beat the shipping deadline by about 7 minutes, and that required a trip to the UPS air terminal at the airport. These parts had to be in the hands of the customer today, UPS came through for me.
For those of you who have not seen a sensitive drill chuck, the inner shank slides up & down in the main shank and is driven by a key. The hand ring has a bearing in the center and is free to turn, this is how you control the down pressure. A great device for drilling & tapping small holes. I think the chuck capacity is 3/16''

So the next order of business was to mill the three 0.031 slots around the outside of one of the parts. I was going to do it with the spindex on the mill, but because of the runout in the air spindle I wan not able to do so. The smallest endmill I have is 0.031 and with the 0.003 runout the slots would have been oversize.
So on to plan ''B''. I'll use the shaper lathe
Here is the tool bit

So first align a slot in the collet with the tool bit, luckily the tool bit and the collet slots are about the same size.

Then become a shaper and go 0.006 deep. About 0.001 per pass. Then rotate to the next position and repeat.

So today, back to some kind of normal work. Went to a customer and fixed their circuit board soldering oven, had a bit of a cooling problem at the cold end of the conveyor.
Then back to some normal machine work with a nice big beefy 1/4'' ball end mill
 This is a part of a swaging die for another customer, this one I can show.
Needs to me modified to better shape the swage.

And after machining. All the heights were the same and the center was too wide when I started. So narrowed the center part, and took 0.035 off of the outside rails. Should work well now. If it works OK, I'll build another and have it heat treated. I'll deliver this one in the morning.

Then this morning about 1000 lbs of aluminum was delivered. It needs to all be converted into chips. Gotta start on that tomorrow. And I'm supposed to be retired.
 Pesky customers keep bothering me.
 And speaking of tiny parts, I turned down a job yesterday. One of the features had a 6 hole pattern of 0.013'' holes. I would have taken it, but it had a drop dead ship date of Friday (today is Wednesday). Just not enough time to get tooling in and get it done.
Last edited:
- Joined
- Jan 2, 2014
- Messages
- 8,851
Then this morning about 1000 lbs of aluminum was delivered. It needs to all be converted into chips. Gotta start on that tomorrow. And I'm supposed to be retired.Pesky customers keep bothering me.
And speaking of tiny parts, I turned down a job yesterday. One of the features had a 6 hole pattern of 0.013'' holes. I would have taken it, but it had a drop dead ship date of Friday (today is Wednesday). Just not enough time to get tooling in and get it done.
Well, I guess if you're enjoying it then retirement can be whatever you want it to be.
....and it does sound like you enjoy a challenge!
-brino
- Joined
- Feb 17, 2013
- Messages
- 4,406
Love it!Then this morning about 1000 lbs of aluminum was delivered. It needs to all be converted into chips.
- Joined
- Jun 22, 2016
- Messages
- 280
You guys are far better than I. Todays job was helping fix the shop edgebander. A 4 pin connector had gotten loose and burned up. We had a replacement but the ground wire was too short and had to fit inside the outer casing. Simple enough, remove the existing pin and put the longer wired on in. Problem was we didn't have the tool to remove the pin. No one in town had one. So on my PM1440HD I turned a tool.
1 1/4" long, 0.103 diameter with a 0.096" hole 0.75" deep. That means the wall thickness was 0.0035". I made it from a broken router bit thinking the steel was very good. Didn't think I could do it. Bander fixed.
I had cataract surgery Tue, 2 days ago. Eyes are feeling better, I'm no longer using reading glasses. Got the multi-focal variety. Seem great so far. Have one more follow-up appointment next Tuesday. Hell to get old!
- Joined
- Dec 31, 2010
- Messages
- 937
Amazing work Jim!!! Thanks for a very interesting post.
Ray
Ray

