Tons of projects coming up,...

Okay, I want to solicit opinions / advice on if I should "fix" the hen pecks and other blemishes in the mill table.

They're not terrible, but they're not good either. I don't have a good pic of the table right now but I'll post one tomorrow. You can see a bit of what I mean at the 31 second mark in the video at the top of post 19.

If I should, what methods should I consider? I've been thinking of milling plastic to the exact width of the slots, then coating the plastic in mould release to block the slots during the repair process.

Then I'd clean the stank out of the table so it is pristine. Then I could mix epoxy with glass microspheres and graphite powder or maybe some steel powder and fill the holes and all the little dings and such. The plastic would insert into the slots to keep the epoxy out, and to allow the few holes that penetrated the edge of the slots to be filled.

Then I'd just need to mill the bed close and stone the repairs the final bit even with the bed.

Or weld fill and grind.. but wonder if that will put stresses into the table?

I'm going to rule out cast iron plugs.
 
Last edited:
Easy...fill them.

They need to be spotless clean so acetone last .

Get GOOD epoxy, mix in some iron powder from your grinder, they too need acetone rinse.

Mix the iron with the epoxy and fill the holes, with putty knife try to get smooth with table but just a bit taller.

Let it cute for a few days then with a flat file work it down flush with the table.

Color will almost match

Sent from my SM-G781V using Tapatalk
 
My opinion is that unless they are so big you can't set your work or vise flat on the table, leave them. Just stone the surface to make sure there are no high spots.

This conversation comes up from time to time and you will find opinions on both sides of Fix/Leave decision.
 
Easy...fill them.

They need to be spotless clean so acetone last .

Get GOOD epoxy, mix in some iron powder from your grinder, they too need acetone rinse.

Mix the iron with the epoxy and fill the holes, with putty knife try to get smooth with table but just a bit taller.

Let it cute for a few days then with a flat file work it down flush with the table.

Color will almost match

Sent from my SM-G781V using Tapatalk

I dont have sufficient powder from a grinder. I do have powder for experiments making composite cores for electric motors. It's clean already.

I'm leaning in this direction, since I have seen elsewhere that people like Richard King recommended Devcon 10610 Aluminum Putty. My solution is not far off from that. I've used similar mixes in the past for filleting on parts.

I really only concerned about a few large holes and one line near the center of the table, and the one slot I intend to use a a register for a few fixtures where the length is not that long and they damage may throw the fixture out of perpendicularity (is that a word?) when I mount it. My spin indexer is long enough to not be influenced but I have a electronic indexer I started that is short im worried about.
 
Last night I saw a fedex update that the DROs were in Mississauga Ontario. Just the other side of Toronto.

This morning they're in Don Mills Ontario. Much closer. About 15 minutes away. Sadly, it would be considered breaking and entering, theft or perhaps robbery for me to go liberate my parcels right now.
 
I've seen several posts/threads about deliveries that yo-yoed around the "final" destination before being delivered. Just be happy that your delivery isn't now on the way to Vancouver, BC.
 
One of these days, I'm going to fill the holes and dimples the students put in my drill press table before it became mine.

But with a twist...

I'm planning to add color shift pearls, metallic flake, and dye to epoxy, and fill each blemish with a different color swirl. When I'm done, it will look like planets and stars, radiating towards the factory original thru hole like a black hole in the center of a galaxy. I'm serious, got the materials already, just need to make the time!
That sounds really cool
 
Today I replaced the cross feed screw on my own. My brother was out somewhere in places unknown.


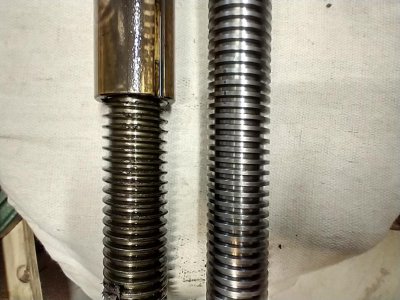
The lead screw did have about a 6 inch section that was well worn.

IMG_20221015_152521898_HDR.jpg


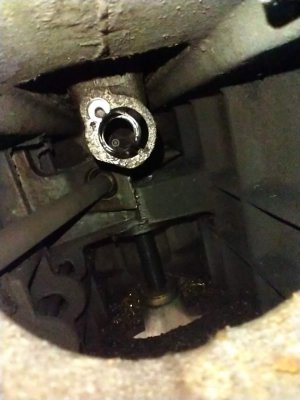
Luckily the key was also in place in this section of the feed nut bracket as well. You can see it down at about 5 o'clock on the opening in the bracket.

IMG_20221015_152718714.jpg

I dropped both the feed nut retaining screw and the washer head screw down the knee this time, but unlike yesterdays I could seen both in the knee to be able to extract them with a magnet. You can see all the shavings down in that knee, perfect camouflage for a small screw.

Once again the new woodruff key needed working on, as did two areas of the new lead screw, the section where the bearing seats was way too tight, as well as a section just past the mid point of the woodruff key. It took more fiddling to adjust the nut tension to set the backlash... each time I thought it was too tight, but once everything was assembled again there was too much backlash and the screw turned very easily. In the end I tightened the nut up pretty tight and reassembled everything and voila, perfect. No backlash and easily turned lead screw.

After the past two days I feel so confident I want to tackle the quill rebuilding... but I keep thinking dunning kruger effect might smack me in the face.
 
Back
Top