Toolpost indicator mounts

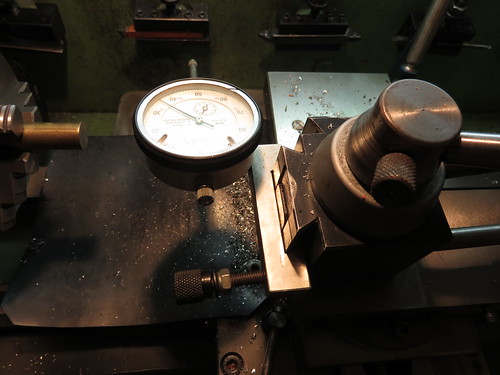
I know this thread is a little old but I figured I'd share version. A few months ago I decide to make an indicator mount for each of the lathe workstations at the school. Very similar to the other designs in concept but using minimal materials. These are BXA sized. I attached them using a short length of aluminum hex turned down for the mount and held in place with a hex screw. Each end of the mount is tapped so the indicator can be moved for face indicating. I found teaching 4 jaw indicating a treat with this mount. This photo was taken during the construction of the BXA racks. These racks have worked great also.

BXA indicator mount v16.pngIMG_3778.JPG
 
If you are like me and lack access to a mill, you might consider 3D printing!

IMG_2890.JPG

The necessary files are on Thingiverse: https://www.thingiverse.com/thing:2797717

This particular one is supposed to be sized to fit a 0XA toolpost. The dovetail opening was a little large for mine so I glued in a 0.45mm shim of aluminum. Now it holds snugly. The dial indicator fits very nicely. I did have to use a tap to clean up both the 1/4-20 and 6mm threaded holes.

Note that there are several other 0XA tool holder options as well as for other sizes.

BTW, I don't have a 3D printer...our local library does. It took 4.5 hours to print the indicator holder. The library charges for printer time so it wasn't free. It cost me about the same as buying a general-purpose toolholder and I didn't have to make a mount for the dial indicator.

When I get time, I'm going to print a similar holder for facing measurements and a couple of other parts. I may also replace the cross-feed nut for my Atlas 618 with a 3D-printed one.

Craig
 
Made mine with a file and a hacksaw
24898164210_a526d8e0fc.jpg
 
So... on the 3D printing note:

I've had a design in my head for a QCTP indicator mount for about a year now, but I didn't get around to buying a lump of alumimum, etc. Well a friend of mine has a *really* nice 3D printer, and offered to 'prototype' it for me.
It turns out that is is plenty strong enough to use daily, even at "20% fill", which makes it pretty light. I'm sure from the pictures anyone handy with the tools can fabricate one quite quickly.

[on a side note: this is Revision 2 - we found 14 improvements to make to our first design!]

IMG_2997sm.JPG

IMG_2998sm.JPG

IMG_2999sm.JPG

IMG_3000sm.JPG
 
Nice double sided design!
 
Back
Top