Torque Needed For D1-4 Cam Lock?

mhagadorn

Registered
Registered
Joined
Dec 11, 2015
Messages
38
I have been working diligently on the used G4003 lathe that I bought a month or so ago. I still haven't made a cut with it, but it's getting closer. I need to start a thread on the project I've made out of it (teardown, repaint, rebuild, adjustment, refinement).

Anyway, I put the 3 jaw back on it today, and spent about 4 hours studying it so far. I was surprised at the torque needed to seat the D1-4 mount. I ended up settling on 70 ft-lbs for the three square drive cam locks. At 50-60ft-lbs, I can still see light between the face of the spindle and the mounting plate. 70 to 100 ft-lbs makes no difference in runnout measurements.

Is this normal?

Sent from my iPhone using Tapatalk
 
Last edited:
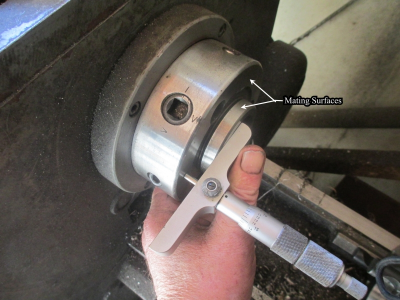
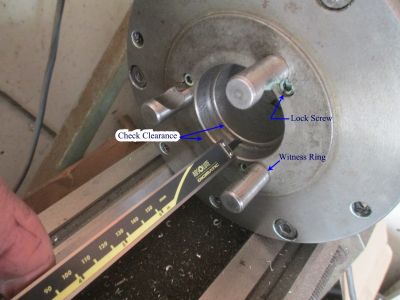
I would say that is not normal. It sounds like the taper in the back plate is too small or there is not enough clearance for the spindle nose to seat. I would first check the depth of the of the spindle nose to make sure it can not bottom in the back plate. It needs to seat on the taper, and not bottom out in the back plate.
upload_2015-12-27_6-18-31.png

upload_2015-12-27_6-18-57.png


If that is OK, then re-machining the taper in the back plate would be in order. Never machine the spindle.
 
Thanks. There is no step in the back plate, so it is definitely the taper.
I will assemble the faceplate and 4 jaw mounting plate today. I should see if they are any different. They have never been used.
 
Last edited:
D1-3, not many chinese lathes with that mount, its most likely d1-4. I am not aware of any Grizzly branded lathe that has or had D1-3.

michael
 
The purpose of the taper is to register (center) the chuck to the spindle. On my D1-5 I don't use a torque wrench, just the T handle wrench used on the chuck jaws. Maybe I get 20-30 pounds torque twisting the handle pretty hard. I can't measure the difference between the spindle and backing plate diameter accurately enough to come up with an exact number but I can't imagine the backing plate is more than .001" smaller than the spindle. Just need enough to ensure it registers firmly.
Dave
 
Hi Mhagadorn. You have asked a very good question. All the replies are also good, and well worth reviewing.


The cam torque values are interesting. I have never heard of anyone torquing the cams. Once you get this sorted out, it is unlikely you will torque it either.

It seems that you are needing to torque the cams to a higher load than should be necessary. I probably have mine torqued about the way dave2176 recommends.


I believe the chuck should pull right up against the flat face of the spindle AND fully contact the taper. As Jim pointed out, both mounting surfaces are important (you are on the right track about trying to get rid of the small light gap). Another consideration is how difficult it is to remove the chuck. My preference is that the chuck breaks free of the taper, with a bump from my hand.


I have gone through and "tuned" the mounting of my chucks. Setting of the pins is pretty obvious. Of course, mark the location so the same pin goes back in the same hole. After setting the pins, I followed an approach similar to what Jim described above - except I didn't measure anything. As you are adjusting the taper, you need to be very careful. Remember, you are advancing a shallow taper about 0.001" - the amount you need to remove is EXTREMELY small. You probably only need to remove 0.0001" (or less). Perhaps the best way is to grind that taper? The approach I took (following the advice of wiser folks than I) was to simply work a little material out with abrasive cloth (sand or polish the material away). It really does not take very long. Working with just the back plate held in your other chuck, give it a polish, test the fit, polish some more, test the fit, . . . and so on until the back. It is a bit tedious to keep removing the chuck holding the first backplate, reinstalling the 3 pins, testing the fit, removing the pins, putting the other chuck back on, gripping the backplate in question, work a little more material out - then repeat. With this method, you really don't need to fuss to much about getting the adapter plate all nicely centered - after all, you are hand polishing.


Once you have the adapter plate so it fits to your liking, then skim the mounting surfaces where the chuck will land. The flat landing surface will then locate to the accuracy ability of the lathe. You have the choice with the rabbit fit of making it snug (to register with the corresponding location in the back of the chuck), or leave it slightly loose, and bump the chuck into final alignment before you finish tightening the bolts that secure the chuck to the adapter plate (sort of a poor man’s "SetTrue"). To start with, I recommend making the rabbit a snug fit, then see what sort of run out you get - if it is satisfactory, then leave it.


I recently purchased a blank D1-4 adapter plate for a collet chuck (auction prize). I followed the above approach and the run-out on a pin held in the “new” chuck is ~0.0005” (close as I can measure) – which is what Bison claims to achieve. http://www.hobby-machinist.com/threads/backing-plate.41246/#post-354309

Let us know how it all works out.
Regards, David
 
D1-3, not many chinese lathes with that mount, its most likely d1-4. I am not aware of any Grizzly branded lathe that has or had D1-3.

michael
G4003 has D1-3. (The non gunsmith version).

Edit: Doubleeboy is correct. It is really D1-4


Sent from my iPhone using Tapatalk
 
Last edited:
According to manual and spec sheet online the G4003 has a D1-4 mount. D1-3 is pretty rare, Monarch 10ee and some of the smaller , new Southbend lathes.

D1-4 mount looks just like D1-3 but has slightly larger taper and pins, specs for all the D1 mounts are online with google search.

michael
 
According to manual and spec sheet online the G4003 has a D1-4 mount. D1-3 is pretty rare, Monarch 10ee and some of the smaller , new Southbend lathes.

D1-4 mount looks just like D1-3 but has slightly larger taper and pins, specs for all the D1 mounts are online with google search.

michael
Ah, yes. You are right and my memory was wrong. I knew it was one number down from the G4003G.


Sent from my iPhone using Tapatalk
 
Thanks for the replies. I won't quote chipper's post, but its a good one. I'm going to get set up to dust the taper as several have suggested.

The only reason I'm using a torque wrench is because something seemed off. I torqued to 30 ft-lbs today, and measured the gap with feeler gages. It came in at 0.0045" average. I then put pins in the plate that the 4 jaw will go on (never been used). That plate fully seats at 33 ft-lbs, which is much more reasonable.

I am getting ready to cut that plate and get the 4 jaw mounted. I don't really want a chuck plate to be my first cut on this lathe, but I'll go for it.

Interestingly, the 3 jaw has runnout on the order of 0.010" depending on where it is measured. I pulled it off of the mounting plate, which has 0.006" face runnout and 0.003" radial runnout on the chuck mounting pilot diameter. It must not have been seated when it was cut. The tee handle wrench was also broken by the original owner. Hmmmm.

After I get the 4 jaw mounted, I'll dust the taper in the 3 jaw plate, and then recut the chuck mounting features. I need to take enough to draw onto the taper another 0.004 to 0.005". Probably a thou or so. I'll try the emery cloth method suggested by chipper. It wont take much.


Sent from my iPhone using Tapatalk
 
Last edited:
Back
Top