Tramming a vise- the easy way

I get a kick out of reading this post. That was me for about 4 years. Tramming a vice is such "old school". Nice to know when all else fails. Half the time I did the vise in a couple of minutes, the other half I chased my tail for 10-15 minutes. The methods above work. So do the You-Tube videos showing this.
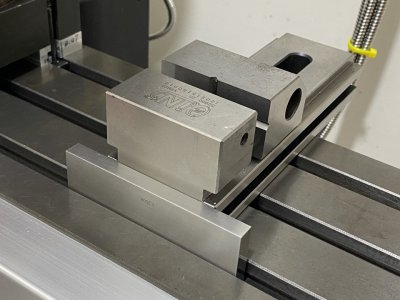
Just bite the bullet and make the keys for the vise (and rotary table if you have one). Took me about two hours to make precision fit keys for the Kurt vise and Grizzly rotary table. It now takes about 60 seconds to place the vise fully in tram on the table. Most of that time is bolting it down. The tram is .0002 over a 9" precision parallel clamped in the jaws. I check it prior to doing important work and skip it for run of the mill things. Either way it hasn't changed.
Last week I took the vise off and on the table 4 times. Just the way items ended up being held. Just last week alone by time estimates here, I recovered about 1/4 of the time making the keys and I have been using the keys for a year or better now.
So, you'll twist, tap, rotate and have a good time, me, I'm going to get a cup of coffee.
 
I was having a hell of a time trying to tram my vise. As I was trying every method imaginable I began to notice that once I went past the screws holding the jaw to the vise I lost tram by a thou or two towards the back. Happens on both ends of the jaw. I don't know if the jaw isn't flat all the way across or if there is something on the vise causing the bow (wrong term probably). So I only tram from screw to screw.

I rarely take my vice off of the table. Can't even remember the last time I removed it. I will have to retram everything once I get my shop back up and running. Column, vice and my rotary positioner.

What's a rotary positioner you ask. My vice came with a swivel base. I took the swivel base off of the vice and made a backing plate with the same threads as my lathe spindle. Now I can put a piece of work in a chuck and easily drill precise bolt circles or mill angles. I have the X&Y coordinates written down to center the RT under the quill. With something in the chuck it is above the vise. With the chuck removed anything in the vise is above the RT. Not as good as a rotary table but I find it useful. I don't have a rotary table. Maybe some day.

IMG_3895.JPG
 
I was having a hell of a time trying to tram my vise. As I was trying every method imaginable I began to notice that once I went past the screws holding the jaw to the vise I lost tram by a thou or two towards the back. Happens on both ends of the jaw. I don't know if the jaw isn't flat all the way across or if there is something on the vise causing the bow (wrong term probably). So I only tram from screw to screw.

Vise jaws do get worn, especially in the middle, as that is where the vise is used the most. I have an Enco mill vise that has about .002" wear in the middle of the jaws.

When I get the new surface grinder up and running, I may test it on the Enco jaws.

-Bear
 
This was a brand new vise.
 
I used to tram the vice with DTI everytime and just very recently, I found that the slots on the table are surprisingly parallel to the X rail. I have always been under the impression that those slots are just good for clamping , not indexing but this is clearly wrong. To set up the vice I just put a piece of steel plate ( actually a 100 mm guage block ) into the slot and push the end of the vice against it before locking the vice down. Sweeping the vice afterwards indicates that the difference between the ends of the jaw is about 0.005 mm or 1/5 of a thou which is good for 99% of my work.
 

Attachments

  • IMG_6849.jpg
    IMG_6849.jpg
    110.2 KB · Views: 13
I guess I'm one of the few who used to keep the swivel base on the Kurt most of the time . As Chewy said above , I've made keys for all the BP accessories . One of my Hardinge indexers is also ground parallel to the centerline so just throw it the chuck and have at it . I sure don't have any issues with having to tram a vise though , just part of the job . :dunno:
 
But if you happen to have a parallel that lets you position the indicator over the hold down bolts....
I don't have a parallel that long, and my vise jaws don't open enough to accommodate one anyway. I don't know of any vises of that type that could open up enough, since the movable jaw would have to be _over_ one of the hold downs.

It would be possible to make something that would elevate a parallel above the jaws. A block with a step in it would do the job, assuming it's made precisely eough. It also would need something to hold the parallel in place under the force of the DTI finger.

Something like that would be easy enough to make, but it doesn't pencil out fo to spend much money on a parallel set when all you'd use is one of them. But linear support shafting like this would address several of my quibbles and would make the elevation block a trivial part of the whole deal :)

On the other-other hand this particiular problem likely will only impact those of us with small mill tables.....
 
My 6" vice came with a key but I still had to indicate the vice to get it within .001". Since my vice weighs 1oo+ pounds I found that keeping the key from gouging the table was more trouble than it was worth so I removed it. I can get pretty close just with a machinist square and get the rest in 3 or 4 minutes with an indicator. Without the key I can put the vice on a piece of cardboard and then pull the cardboard out. The only trouble I ever had was the vice jaws moving a few thou when I tightened the bolts but some sanding in the center of the vice base fixed that.
 
Compact 8, that is why the keys work so well on a Kurt type vise. Your picture shows a toolmakers vice. When I use one, I set it up as you have shown and then check the tram. I'm in the process of making a 10" t-slot guide to drop in & bolt down to use on long projects. After it is made it will have a 1/32" chamfer on the bottom to handle sharp square corners.
Mmcdmdl, I don't have any problem with tramming a vise, I'm just lazy!!!:calm: As stated, The tram hasn't changed in the last year, But I still double check all different ways if I'm doing something with a critical dimension.
Mickri, I left my vise on for about a year. Just no reason to take off. When I did I had way more rust under it than I liked to see. I don't take the vise off just to build muscles! Only to do long plates and built up items that can't be clamped. 95% of my work is in the vise. So much so that I'm thinking of getting the 5" vise. That will allow me to work 4" stock, which I can't do now between the jaws.
Epanzella, I can sympathize. If my vise weighed 100lbs, I wouldn't be removing it, I would probably buy another mill! :frown 2:

And this will start another round of posts, but I'm seriously thinking of covering the whole table with a 1" plate of 6061 and drilling holes for clamps. Making deictated X & Y slots and key positions for the vise and rotary table. The plate will be keyed to the table so it can be removed and the table oiled. Plug the holes with cutoff screws. I have seen this someplace and don't remember where, but the idea keeps coming back.
 
And this will start another round of posts, but I'm seriously thinking of covering the whole table with a 1" plate of 6061 and drilling holes for clamps. Making deictated X & Y slots and key positions for the vise and rotary table. The plate will be keyed to the table so it can be removed and the table oiled. Plug the holes with cutoff screws. I have seen this someplace and don't remember where, but the idea keeps coming back.
Saunders Machine Works and Tosa Tools both make fixture plates.
 
Back
Top