Tramming My RF-30

yendor

Active User
Registered
Joined
Dec 11, 2013
Messages
302
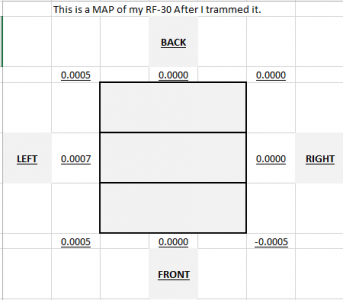
I spent about 2 hours last night dialing in the tram on my RF-30 Mill/Drill.
I used strips of a soda can as shims.
I had to sand down a few strips to get it to where it is now but I was super excited about how it came out.
The distance between measurement is about 7 inches, just under the width of the table.

I saved it on a spread sheet for future reference.

I plan to go back and check it in a week to see if any of the shims have compressed and changed the outcome.
289522
 
You did a good job there, yendor. Getting it trammed inside of a thou is not that easy to do on a round column mill.
 
I'm not really familiar with this machine. Where do you add the shims to adjust the table perpendicular to the spindle?
 
The three blocks in the center what does that represent. Is that your vice?
I used various brass shim stock to do mine.
 
I'm not really familiar with this machine. Where do you add the shims to adjust the table perpendicular to the spindle?

You don't adjust the table. You adjust the base of the column so that the spindle is perpendicular to the table.
 
Sorry not to reply but I travel for work a lot and haven't been around since my original post.

The shims are mostly placed in the corners and are "U" shaped to go around the bolts at each corner so there is support on both sides of the bolt.
However, in one corner where I needed to add more than one shim I placed a 1"x 1/2" flat shim between the two corners to help support along the angle that would be created between the mating surfaces and the bolts. I sanded that shim so it was slightly tapered.

The LINES on the graph just represent the "T" Slots on the table.

I used a torque wrench as have others to insure the pressure is equal on all bolts.
To do that I sneak up on the final torque.
I work around the bolt pattern starting in corner than going to the diagonal corner.
Begining with a torque setting of 15#.
I then upped the torque setting to 25# and started with a different corner and again worked my way around.
Then a final Torque setting of 35# again starting with a different corner.

I plan to check the tram again this weekend to see if the aluminium soda can shims compress and the tram changes.
I haven't moved the head up or down on the column, since I trammed it so it should all be the same.
Here's hoping it doesn't change.
 
Thanks for the clarification. The more I think about it, the better your results look as Mikey points out. One more question, when you're shimming the column to get the spindle axis perpendicular to the table surface, you check by rotating the indicator in the spindle rather than moving the table, right?
If you move the table while the spindle is stationary, then that's how you would check that the table surface is parallel to its ways.
Let me know if I'm overthinking this or missing something obvious.
 
Hey ... and was thinking getting even close to +-0.001 was going to be the best I could do on my HF round column (RFish like) mill.
I gots me more work to do... come on sunshine and help warm up my shop this afternoon!
Do you have any pics of your setup in measuring that you'd like to share - please?
 
One more question, when you're shimming the column to get the spindle axis perpendicular to the table surface, you check by rotating the indicator in the spindle rather than moving the table, right?

John, you are correct. Easiest way is to remove the belt from the front pulley and turn the pulley. The indicator is held in a holder in the quill with a drill chuck/collet or attached to the quill with an Indicol or magnetic holder. The indicator is moved from side to side or front to back by turning the pulley to rotate the spindle.

You can do this with any indicator you have but be sure the holder holds it rigidly. A back button indicator slides over the T-slots readily but a DTI or drop indicator works, too.
 
I plan to do a recheck of the tram this weekened so I'll take some pic's then.

Yes - the indicator is in a holder mounted to the quill and the spindle was rotated by moving the pulley.
I actually turned the motor pulluey by hand and let the belts all do their stuff to turn the spindle.
 
Back
Top