I will be curious myself. I have dove into the plating process myself. I just made my first batch of nickel solution about two weeks ago. I used nickel welding rod as my anode.
What is your process and how have your results been?
I’ve ran into problems with my solution I think or it could be something else I just don’t know. The cause and effects I’ve researched arnt detailed enough for me to grasp.
I’m plating a bunch of hardware for a table I’m building and it started off good I was happy with the results of a semi bright nickel coat. Then doing the same process the coating started to get a haze to it. I tried a different power source and new anode and then I got the hazing and a breakout in the coating and little pin holes in the finish.
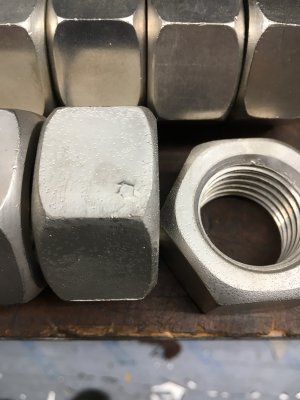
I am at a stand still right now not knowing what I did wrong. I think the ph might be off but I need to get a tester. If you google bright nickel coating problems you get some good leads just absorbing it for me is a problem. It’s all magic to me. Sorry to jump in on your thread ill start another. To me it looks like your solution has rust in it. Idk here’s what I have coated so far. Far left is 1st one, center is 2nd, right is none coated.
View attachment 364877
Top left is the start top five looked good second row starts the hazing and the two bottom right show the spawling and cracks and pinholes.
View attachment 364878
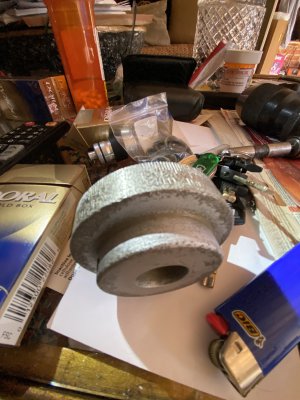
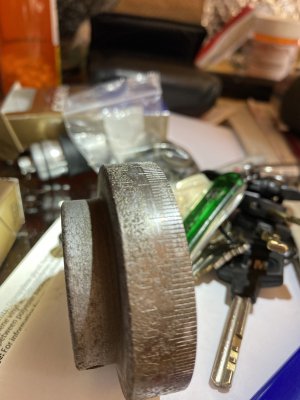
and these are the last two I did. I think I had to many amps at 5v 3.5amps plating both nuts at once. They are 1.250 thread nuts for reference. The first five I was using 6v batteries out of exits signs but I wanted to use a wall wart to eliminate having to recharge batteries in between coating.
i will have to say I love the easy of the process but I don’t know enough to diagnose the problems that might come up. Sorry.
I will provide all the good info I can, and pictures. I have an extensive set of recipes, collections of patents, etc.
My first plating attempts were very successful - kind of beautiful. It not not take long to discover there are ways to ruin it.
It goes without saying that the iron/steel needs to be physically and chemically clean. Using solvents and degreasers is OK provided the film they leave is wiped off with something that evaporates completely - like IPA alcohol. Just before dunking ino the plating solution, a wash in dilute acid, followed by dunk in the bucket of water is what I did. Commonly, hydrochloric acid, the impure form "muriatic acid" is OK. The stuff sold to change the pH of swimming pools to the point the precipitates that make it "cloudy" dissolve.
I did not want to mess with that when at the time, I had some clean battery acid. This, being sulphur based, has no environmental impact when disposed of, though by the time I have used it for what I do, I suspect it's pretty much used up into sulfates anyway. You can throw it onto the ground, or wash it down the drain. It's way weaker than drain unblocker anyway.
Probably the main reason things are going wrong is the current density for the area being plated. My first plating went on in about 10 minutes at 450mA. It was onto a South Bend 9C countershaft, or at least for the half that would fit down the jam jar. Other circumstances have delayed the re-assembly, so I still have the half-plated shaft, and the plated bit looks great!


You can see that the countershaft plating took on a slightly "golden"look. Other plating I have done just looks like chrome. In passing, the nickel came from 100% pure nickel strips. The type that are used to spot-weld battery packs. Take care if you get this stuff, because some types are only nickel plated, not nickel all the way through.
I also have nickel in welding rods. Again, verify they do not have other stuff alloyed in. I suppose it might all still work OK. If I used a 55% NiFe, I guess the nickel would plate, and the iron would just drop out into the solution as dregs. Plating is a way to "purify" an element. I just don't know the viable chemistry yet.
About plating with current.
If you were running as much as 3.5A onto one nut at a time, I would think you might have problems. The saturation of the electrolyte eventually happens (real deep green), but that so far as I can tell, might only cause little rough clumps an flakes of shiny nickel debris that can mess up the smoothness if you use too much current for the area being plated.
The next thing that affects it is the arrangement of the anode distance to the steel. Getting the (nut) as far away from the nickel anode as possible, and stirring or agitating the solution a lot is an attempt to make all the bits of the part being plated experience similar conditions. The concentration of nickel near the part is constantly being depleted. This approach is not practical. It forces large volumes of plating solution, and depending on the shapes, the electric field is not constant.
The better approach is to try and even out the field by putting more anodes around it and even "shaping" them to deliver nickel into awkward places. e..g. To plate up the middle of a spindle, suspend the spindle and put a nickel rod up the middle of it.
None of this is needed for simple plating of some nuts.
The power supply.
You only need a cheap one but having something adjustable is very handy. Capture a PSU unit from a junked computer. They often have 5V and 3.3V outputs. You get the PSU to start up by linking, or putting a switch between a 0V wire and the ENABLE wire connection.
With a teaspoon of salt in the electrolyte, and getting up a suitable current like 0.5Amps, my plating voltages are usually low, about 2V to 5V.
A cheap eBay electronics experimenter's adjustable bench supply is what you need, especially if it can be switched to constant current mode, where you set the current, and leave the voltage to vary. I get a version of this by setting the voltage to a bit more than I need, like about 4V, and then setting a overload current limit to 0.5A. I short-circuit the output, set the current, remove the short, and then use it. We are talking $30 - $60. You get "dual" ones, and very fancy ones which cost more. The most common seems to be up to 5A adjustable. You will never need 30V. The flea market 2nd hand Farnell PSU I use is 1Amp maximum.
More current
This is OK if you have more stuff being plated. If you have enough plating bath, then you can hang a whole row of nuts. The graphs and recipes all involve a rough estimate of plating area, to get the required current density for a particular type of plating surface. You might want ductile - low stress, you might want very hard, you might want "satin" finish with additives, etc.
Electroless
This is a whole other technology, where the only voltage driving the chemistry is the electrode potential of the metal itself compared to that of nickel. The coating is exactly even everywhere, very regular, and can be persuaded to go onto nearly anything. The solution depletes, and the process is self-limiting at a certain thickness. This is used for "nickel strike" as a precursor to subsequent plating to bring the thickness up to what is needed. I have collections of recipes for this too, since it is enough to stop the corrosion, which is all i wanted.
Thickness.
You only need fractions of a micron. 0.25 microns is enough, but lots of plating is done in range 1micron to 10 microns.
For me - it's about rust!
I just hate that our fine iron is being reclaimed back into oxygen laden ore. When I used a steam-cleaner on a lathe bed casting, I was astonished to see it turning orange right before my eyes in a few minutes. I have since discovered that if you get (say) your nuts really clean, maybe with a little dunk in battery acid, then fix it with a wash or dunk in tap water, then put it in a container with something alkaline like washng soda, or even baking soda, or caustic soda solution. This blocks the exposure of the iron to air oxygen. The guys who want to do gun blueing and the like will tell you that boiling the part in alkali changes the surface to magnetite. However it happens, I found that if I just leave the stuff to be plated in the washing soda until needed, then a quick rinse before putting into the nickel solution, works just fine. Even just leaving them under water would be OK. Anything other than bring out into the air, especially if the part is warm or hot.
Actually doing electrolysis in washing soda is a well-known rust removal process - different subject.
I am, of course, still discovering it all, experimenting when I can. I will post more as I verify stuff. I now have a collection of most chemicals used in the recipes I can attempt at home, to get the coatings I want.
Regarding rust - I suppose I quote Winston Churchill, with his quaint exact grammar.
"There are some things up with which I will not put"!

 --> becomes-->