- Joined
- Oct 27, 2023
- Messages
- 306


 It's mostly just leftovers and scavenged materials. The 2 I-beams were salvaged from an engine dynamometer that was scrapped from the lab I worked for long before I worked there, sometime in the early 80s. We finally left the building in 2010, and the beams were headed to the scrap yard. So I saved them. The legsare 2x3 ox tubing, frm a short rack at the nearest Metal Supermarket at $0.25/pound. The bottom pan is leftover angle iron and 18 gauge steel, and was filled with a bag of concrete to add mass down low. And the wooden top is a section of glue lam the local Ace Hardware store gave me. Once I clear out a spot for it, I'll level the lathe, and fasten it down to the floor, well in reverse order...
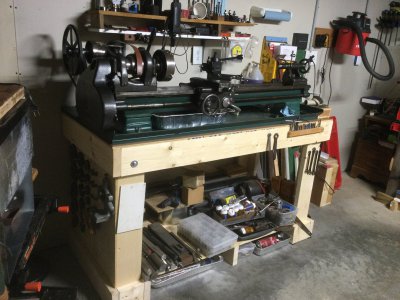
Well, I'm not normally a 'wood everywhere' kinda guy but this is very pretty.This bench was originally intended to be used for building radio controlled airplanes but it was under construction when the lathe became available. I modified the carcass design a little to accommodate the additional weight with the main changes being a thicker piece of ply for the back of the bench and a much stronger base. The base is 2" thick engineered plywood beam material ripped to 3-1/2" width. The retractable casters will not lift the bench with the drawers in place but they work reasonably well with the drawers removed.
View attachment 481679
")

Thanks! I have woodworking equipment (out of necessity) in the shop as well as the metal working machinery. The drawer fronts are actually MDF. The sharp corners were rounded with a 1/8” radius roundover bit and the MDF was finished with oil based polyurethane thinned 50% until no more was bein absorbed. The final coats were only thinned about 10%. The effect is much like coating a soft material with thin epoxy. The finished product is much tougher than the soft bare MDF.Well, I'm not normally a 'wood everywhere' kinda guy but this is very pretty.