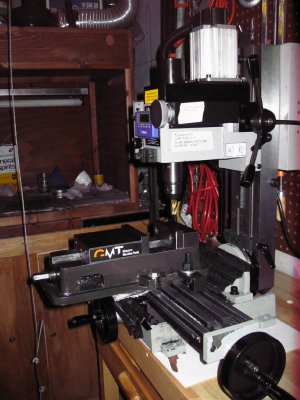
Z-Axis calibration changes with shop temperature?

Walt

Active User
Registered
Joined
Feb 4, 2012
Messages
233
After a week or so of getting pretty consistent results, suddenly my mill cuts changed by 0.003".

I calibrate my i-Gaging type Z-axis scale before use by touching it to my Fowler 1" electronic gauge, set behind the fixed jaw of my Glacern 4" vise. I've adjusted the calibration by cutting a piece of 1/8" aluminum plate set firmly down on a parallel while clamped in the vise flat against the back jaw, and measuring the cut aluminum with a micrometer.

The back of the vise is 1.125" above the throat of the vise (bottom between the jaws), and with the gauge, it should be 2.250". The cut pieces show that the actual distance totals closer to 2.124". Or at least until tonight

I destroyed a couple of pieces I was working on tonight by cutting them too short. I thought I had been careless and mis-calibrated the Z-axis, but that checked out consistent with the above measurement. I thought that I might have not gotten the pieces tapped down firmly in the vise, so I started over again, made sure the parallel supporting the piece was trapped firmly underneath, and still got a piece cut short by the same amount. I cleaned all the chips out from the vise, the parallel, and the work piece, and set the end mill height to 0.995" above the parallel. The cut piece measured 0.992".

In other words, the height from the throat of the vise to the back + gauge is 2.121" tonight, and it was 2.124" last night. Or so it would seem. Is this possible, or am I overlooking something else? The reason I'm suspecting temperature swings is I've eliminated everything else I can think of, and the shop is noticeably colder than in recent days because the thermostat is in the upper part of the house and the shop is in the basement. The outside air is warming up, but the concrete basement actually gets colder because the furnace doesn't run much. Unfortunately, I don't have any temperature readings for the shop to back this guess.

Walt
 
Im no weather man but back in the day early 50s a science project when the whole class could roam
through the woods. We are armed with rulers to measure rail road track joints. Measurements where
taken summer, fall , winter spring. Amazing how all this steel contracts and expands. So I think thats
whats going on, things are moving around while we sleep. I do not leave shop heat on and even
we a nearing the end of April we still need heat. So I practice to bring up the shop temp before running
any machine. Like my buddies log cabin, that moans and creeks like a Clipper Ship.

Thanks for taking the time to read and respond to my problem, GK.

I'm new to this precision metal cutting stuff and every time I think I have it figured out, another assumption/bad practice bites me in the rear end.

Not 100% sure I have this issue figured correctly, but I'll improve my work process by (hopefully) remembering after the first rough cut to verify my tool calibration by taking the work piece out of the vise and checking that the cut is exactly where the scale says it is. I was getting cocky because my calibration process had been working so well. Last night I just calibrated the end mill, clamped my work piece carefully in place in the vise, cranked the spindle of the mill to the number on the scale for the correct final size, and cut away.

Calibrate. Verify calibration. Then cut to size.

As frustrating as this is, it is interesting how many different ways there are to make scrap. I seem to be making progress in terms of not making the same mistake over and over.

Walt
 
What machine are you cutting on?
Do you know if it is primarily steel or cast iron?

It sounds like a vertical mill- is it dovetail column, round column, Bridgeport style?

What type of mill?


Bernie
 
What machine are you cutting on?
Do you know if it is primarily steel or cast iron?

It sounds like a vertical mill- is it dovetail column, round column, Bridgeport style?

What type of mill?


Bernie

Hi Bernie,

My mill is a Micro Mark Micro Lux, with a dovetail column.

http://www.micromark.com/microlux-high-precision-heavy-duty-r8-miniature-milling-machine,9616.html

I'm not sure, but the inside of the column looks like cast metal (it's hollow and rough), so I would guess it's cast iron.

Walt
 
Percentage-wise, 0.003 is quite a lot for such a short distance to be blamed on temperature variations in any of the commonly machined materials. I'd be more suspicious of something moving, or the repeatability of the DRO.....something other than temperature.
 
I agree with Tony- that is. It a very large machine to warrant .003 of expansion in any direction. I can't say I would have picture that happening at all, but I am entertaining your idea.

Do you measure the same change when looking at the handwheels? I can't help but suspect the DRO.

I use the same DRO's, and they are great, but I don't have experience using them to get down to the final numbers. I default to the handwheels to finish the cut.

This is impossible, but what do you use to lube your ways? Something really gooey? Could a chip of aluminum have SomeHoW made it under your X or Y??

Lastly, which direction are you feeding the cut? Using the Z? Or cross feeding with X or Y?


Bernie
 
In all honesty, I'm not quite following what your problem is but, I've been nailed with jobs with tolerances inside a half thou so, these issues in general are near and dear to me...

Are the jaws tight? Are the jibs adjusted properly? Is the way lubrication leaking down overnight?

I haven't done temperature measurements on the mill but have extensively so on the lathe. A 20-30 degree (F) temperature change in the room has virtually no measurable impact on the lathe itself and I could envision roughly similar results with a mill. I have on many occasions noticed previous setups running about 1 thou different from one day to the next and it's due to thermal changes of all the items involved (tool bits and the work piece mainly). Also, a warm part cools off and is always 1-5 ten-thous (depending on size of part) smaller the next morning. I've seen this countless times. ...Rough guess, I could see an endmill expanding about 1 thou in length from cold to a working temperature of say 150 F.

Keep in-mind that aluminum has nearly twice the coefficient of thermal expansion as steel. Also, aluminum sucks-up heat and expands much more rapidly than steel. What are the dimensions of the part you're working on?

... Long story short, I take temperature very much into consideration for some of the things I do; for the size parts I typically deal with, I don't believe anything has gotten more than (about) 0.0015" out of whack due to temperature issues. Half-thou variances due to temperature -comes with the territory. 0.003? Something else is going on.

Ray
 
Last edited:
After reading the well-reasoned responses above, I agree it is unlikely that temperature swings are causing the change in calibration and resulting error. The aluminum work piece I wrecked was only 1.000" x 1.150" target dimensions.

With regards to the gibs being adjusted well, I can't feel any slop when I pick up/push down on the end of the vise that hangs out.

MicroLux with Glacern.jpg

Ahh, but there are another set of gibs on the machine, and they have caused me problems with accuracy before (x-axis). The column gibs.

I just got back from the shop and trying this experiment out: I zeroed the tip of the end mill with the height gauge placed at the bottom of the vise throat and the height entered as 1.001" (the thickness of the height gauge I measured with my micrometer). I left the gib lock on the motor head wide open.

Then I used the dialed the head up a few thousandths, snugged the head gib lock down and touched the height gauge again. It was 0.999". The motor head is "nodding" 0.002" with the gib lock engaged/not engaged. I realize this is only 0.002" of the 0.003" discrepancy, but this appears to be 2/3 of the problem anyhow!

I've been using the gib lock on the head to prevent it from dropping through its gear lash unexpectedly, but I use different amounts of force on the lock depending on what I'm doing. I use minimal force (and resulting drag) when dialing the head to calibrate because the motion is sticky and hard to control exactly. But when I cut with the tip of the end mill, like I was when I was squaring pieces yesterday, I dial the motor head to the correct location and lock it down with the gib lock pretty snug so it won't move while I'm cutting.

Have to think about this one and come up with a way to compensate. First thing is to check the motor head gibs for slop, I haven't readjusted them since the initial setup, maybe there's some break-in wear that could be taken up. I may need to purchase the gas strut to achieve the best accuracy with this machine.

Thanks to everyone for helping get me back on track to figure this problem out.

Walt

MicroLux with Glacern.jpg
 
Hey Walt- you have me so curious now- what was axis you were moving while cutting?


Bernie
 
Back
Top